Browsing Category

Desserts Sweets

Kentucky Maple Syrup

March 10, 2012

 My interest in maple syrup started in my high school anthropology class when we watched a lengthy, black and white, film documentary about maple syrup production in the northeast U.S. I’m not sure why I thought the production was reserved only to that area and Canada. We have plenty of maple trees around. 
Apparently people here have been thinking the same thing. Over the past few years, Kentucky maple syrup has been stocking shelves of local food markets right next to sorghum and honey.
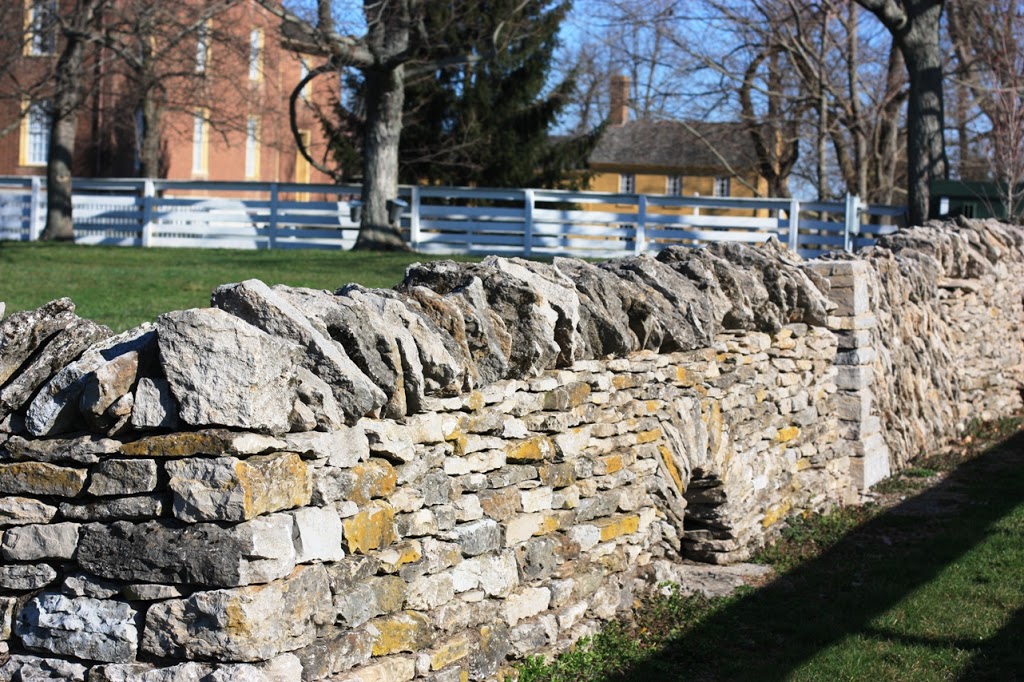
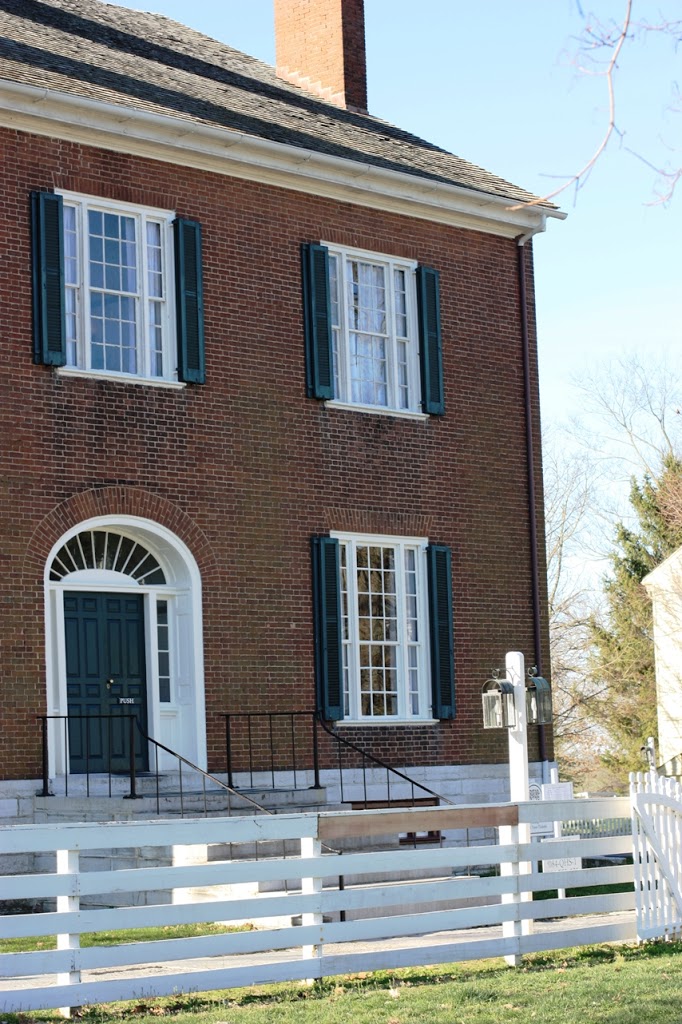
This morning we headed out the Shaker Village of Pleasant Hill, a historic attraction in nearby Harrodsburg, Kentucky.  What is a tourist attraction today was a site where the Shaker community once lived. Roads and buildings have been preserved and turned into education centers, shops, and museums. 
Animals are kept on site and represent specialty breeds owned by the Shakers. Milking Shorthorn Cattle are one example, and we were told this trip that with over 300 head, the Shakers once owned the largest herd in the US.
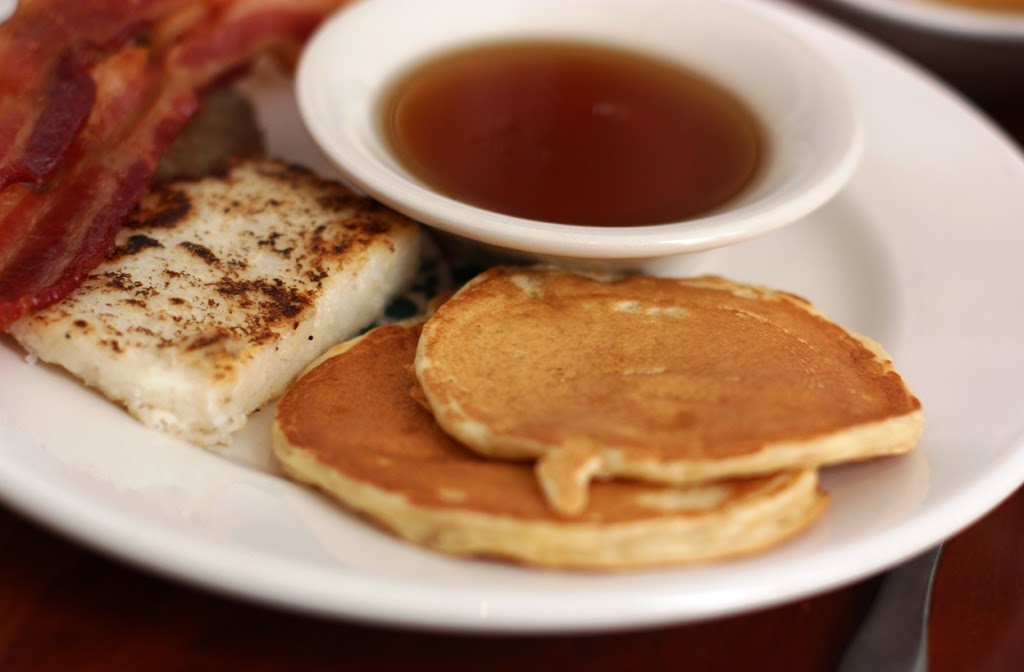
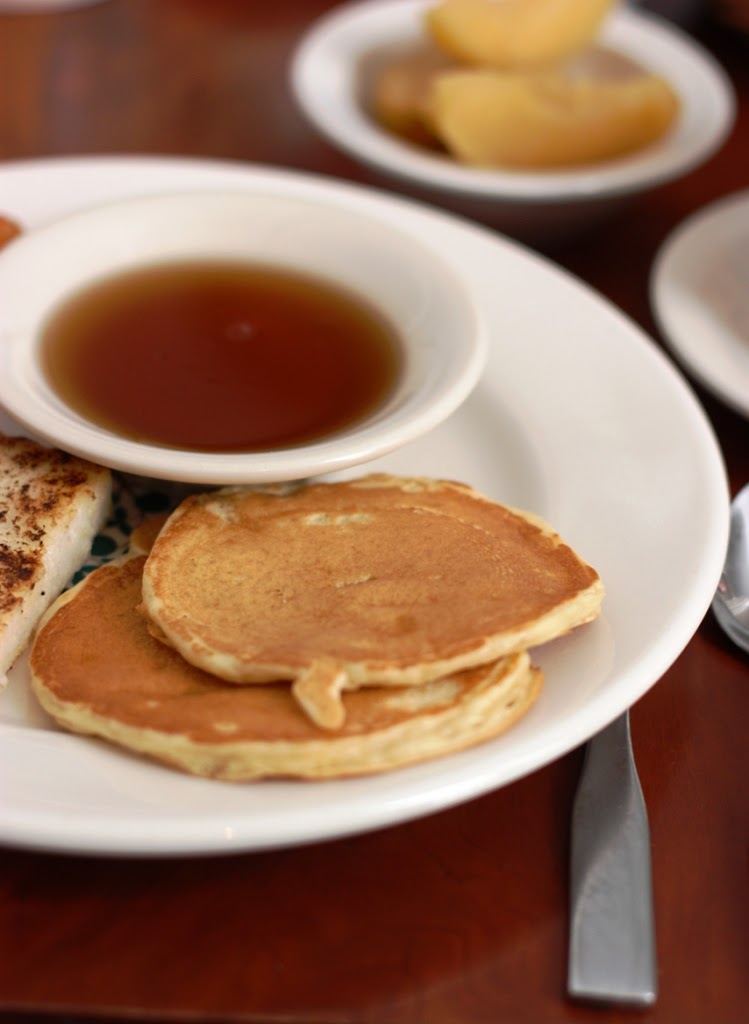
There is an inn on site as well as a restaurant, and that is the reason we made the visit this weekend. The special Maple Syrup Breakfast to be exact. We were able to dine on a breakfast buffet of pancakes, cornmeal cakes, bacon, sausage, and fried apples. Served alongside was maple syrup made on site. After breakfast, it was time to learn about the syrup making process.
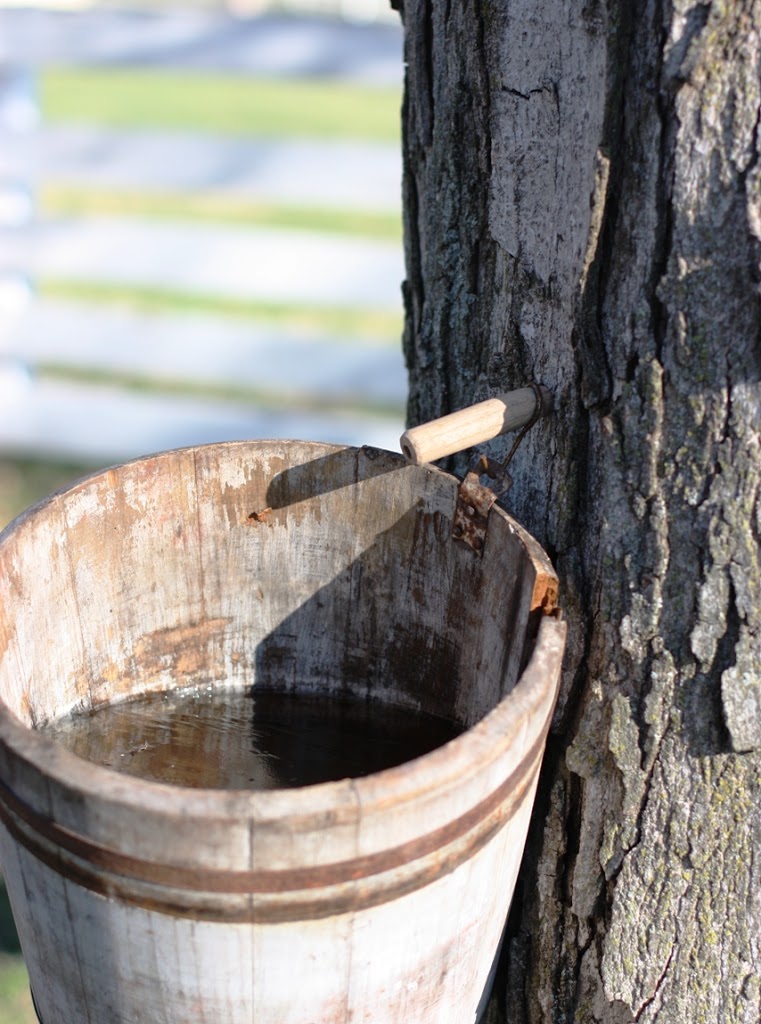
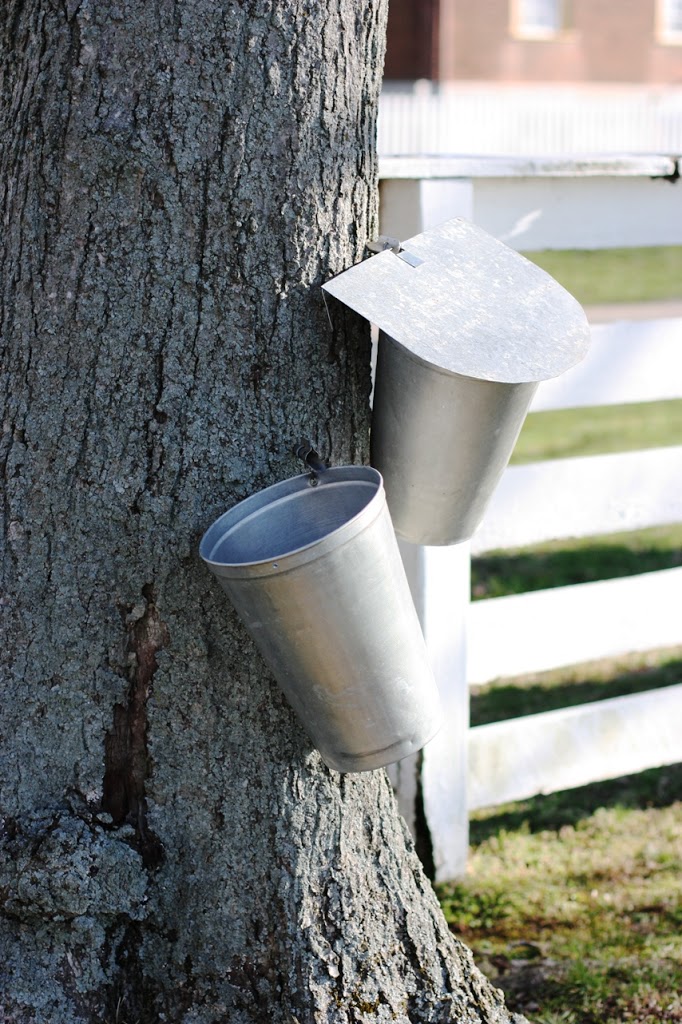
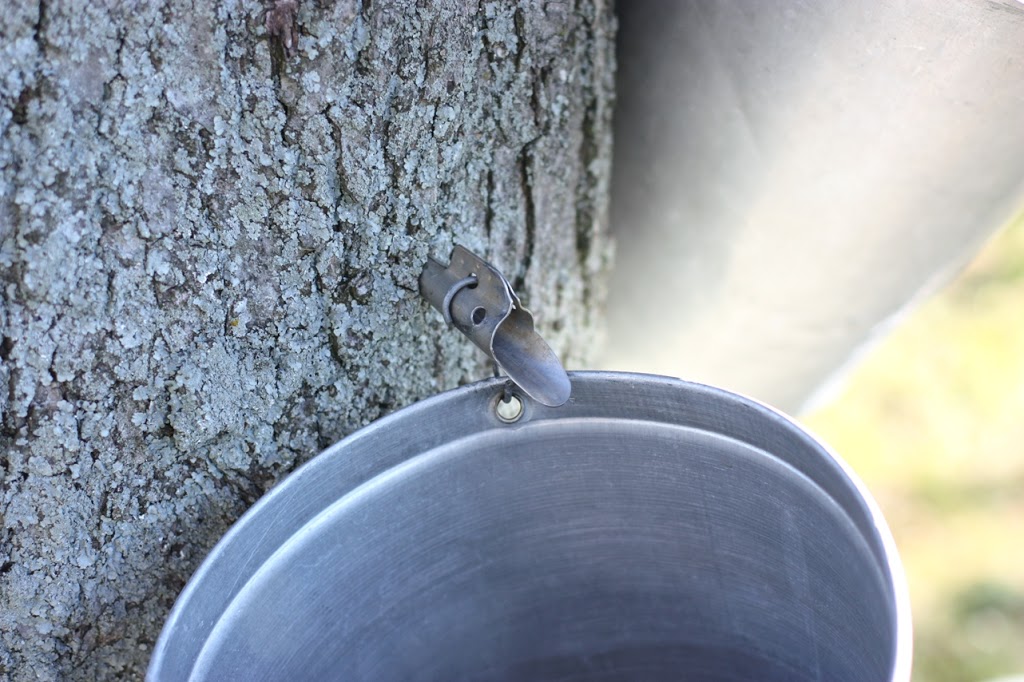
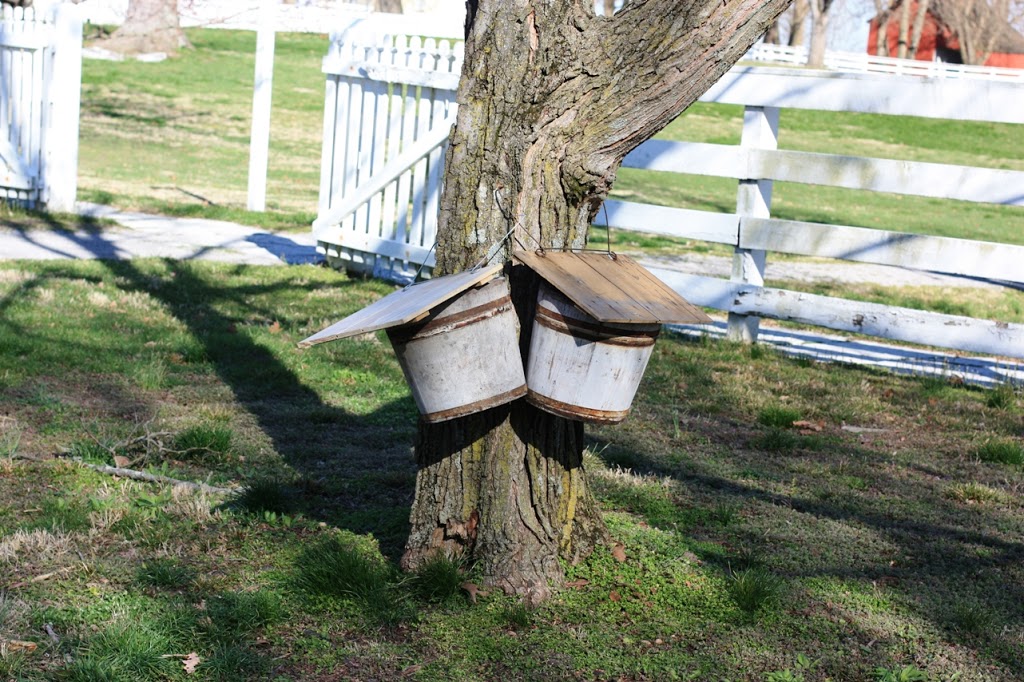
Trees were tapped all along the paths within the village. According to our guide, sugar maples and black maples make the best syrup, and those were the trees we saw strapped with buckets. 
I’m sure you’ve heard that it takes 40 gallons of sap to make 1 gallon of maple syrup. This means that the sap is about 3-5% sugar. Weather plays a role in yield and in sugar content. Ideal temperature is 40 F degree days and 20 F degree nights, and we haven’t had many of those in Kentucky this winter. 

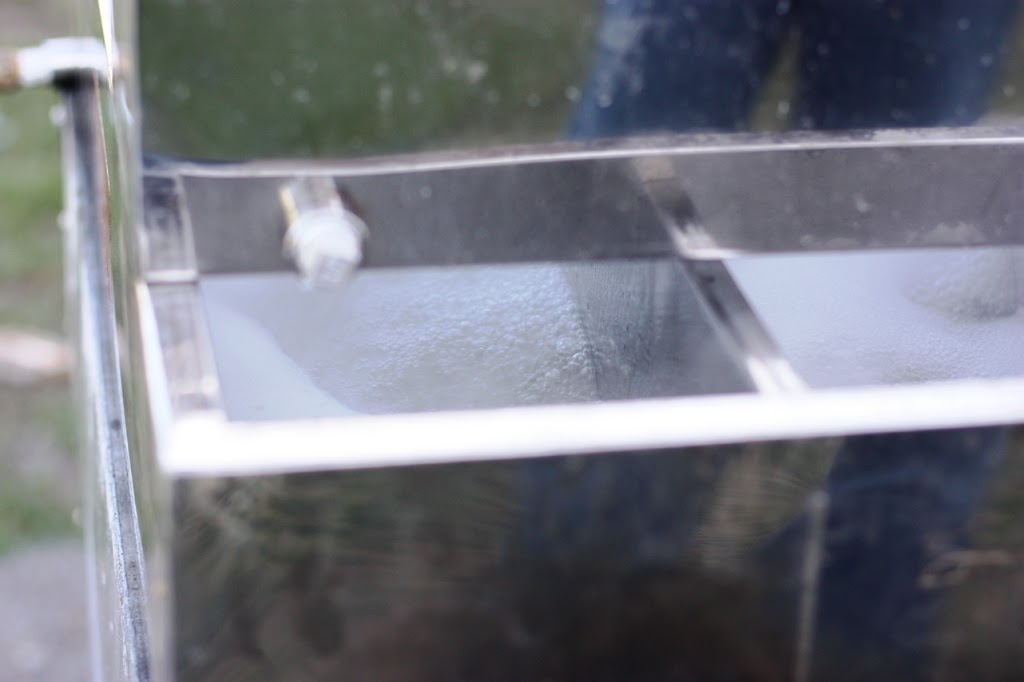
We were able to watch the process in the wood burning evaporator. The sap goes into the top metal box, and is drained through the spout.

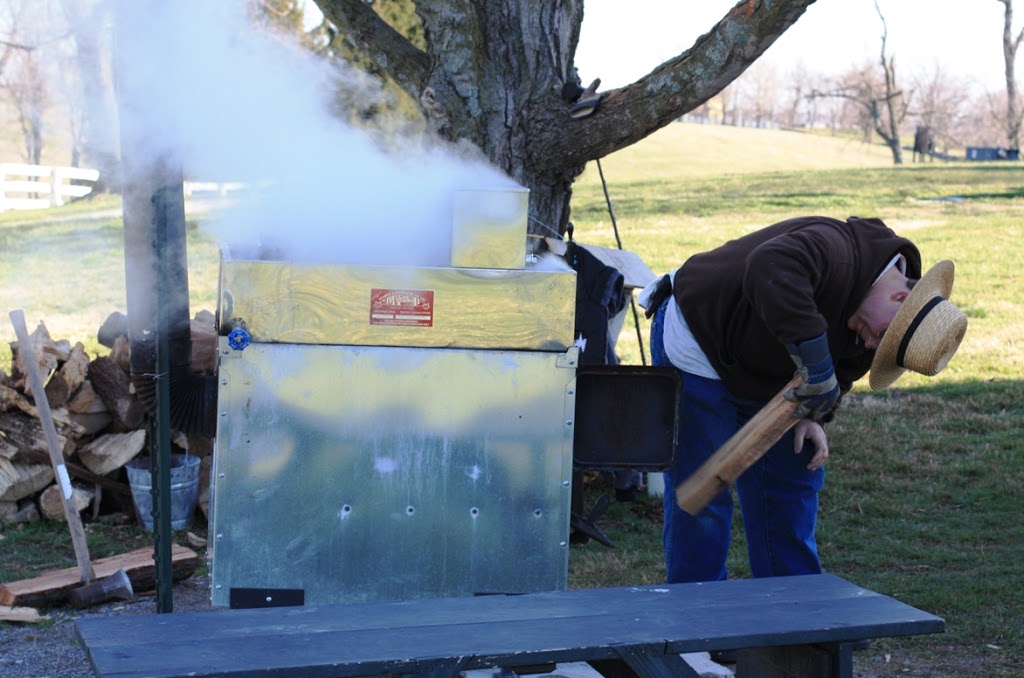
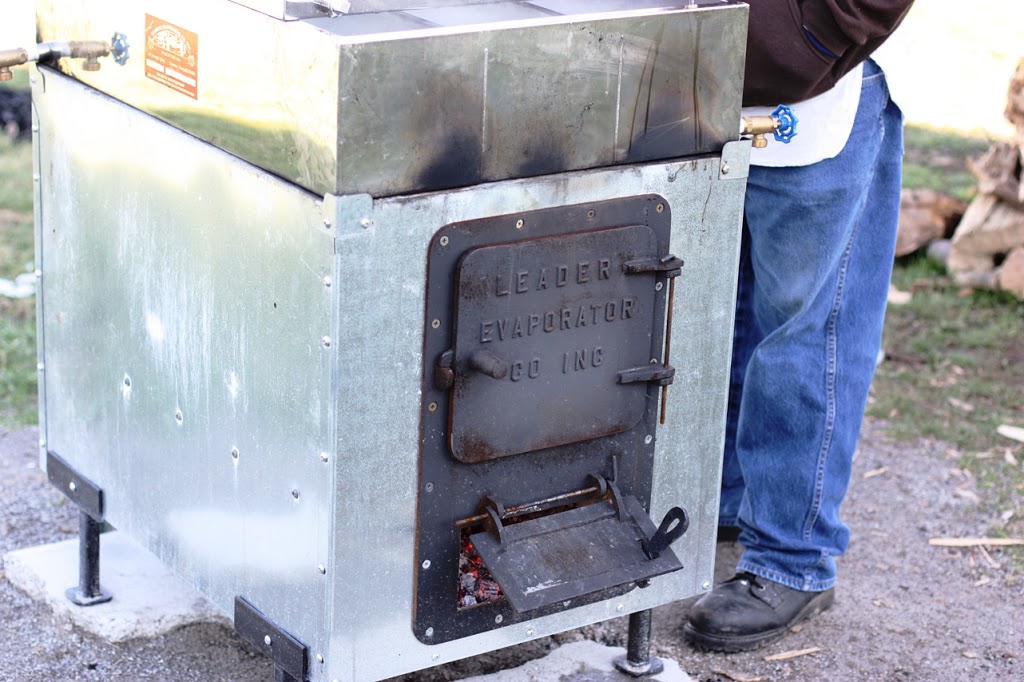
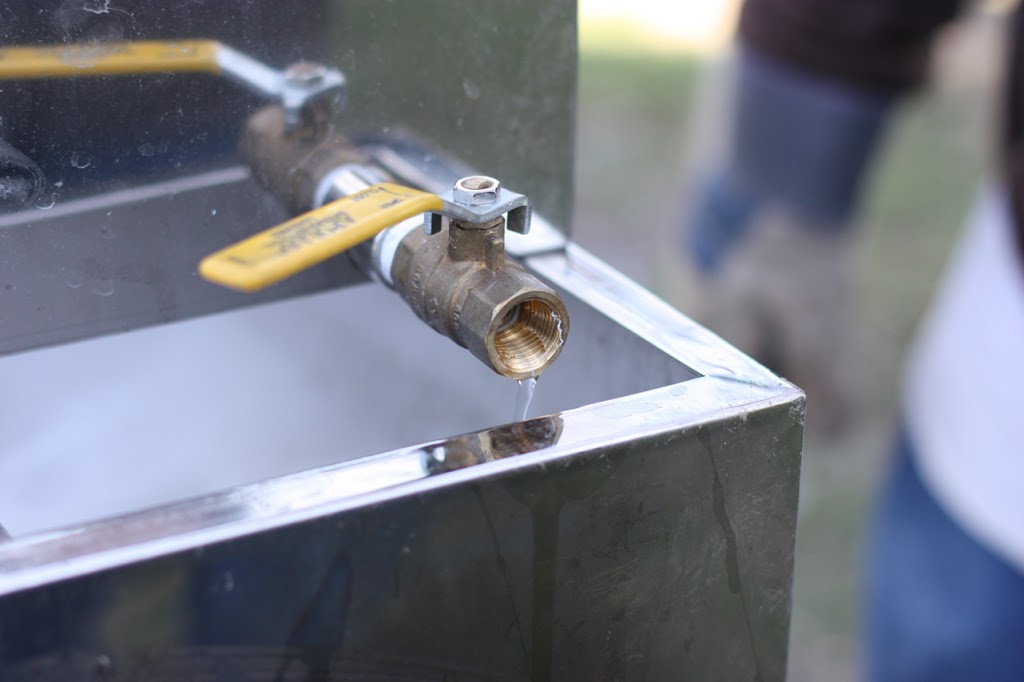
Then it is boiled, and boiled, and boiled until liquid is evaporated and the sugar syrup remains. 
I still hope to see the process in person in the northeast someday, but for now I’m content with adding maple syrup to my list of local foods.

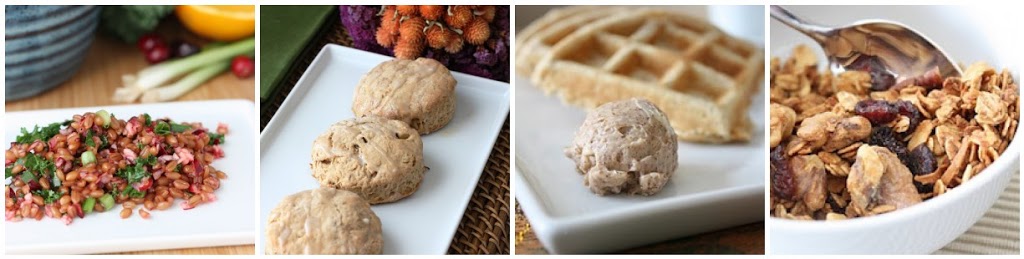
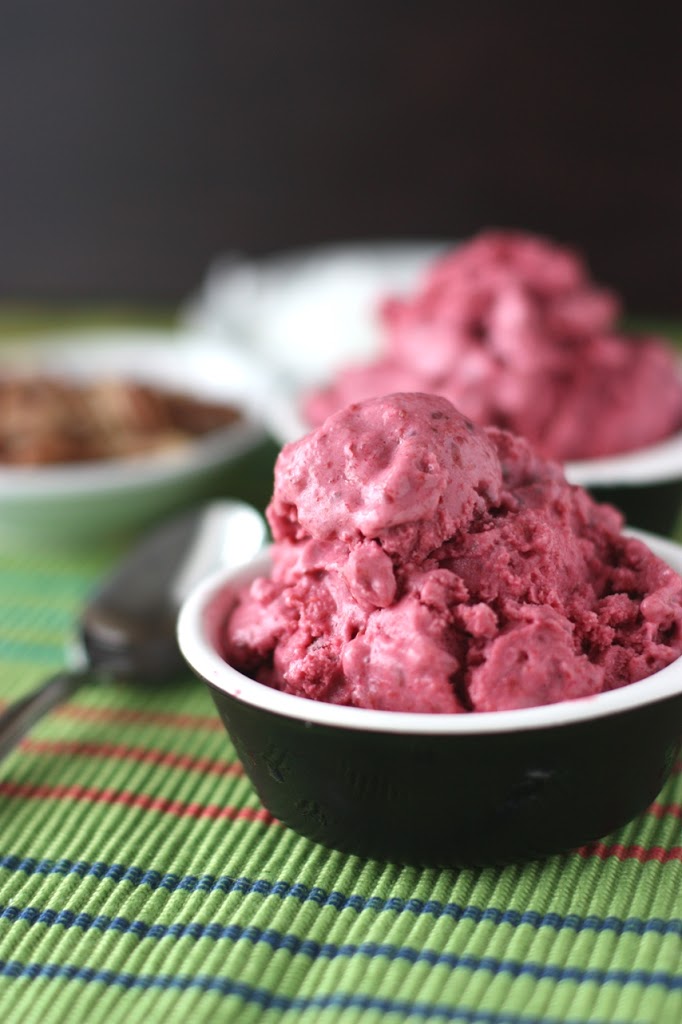
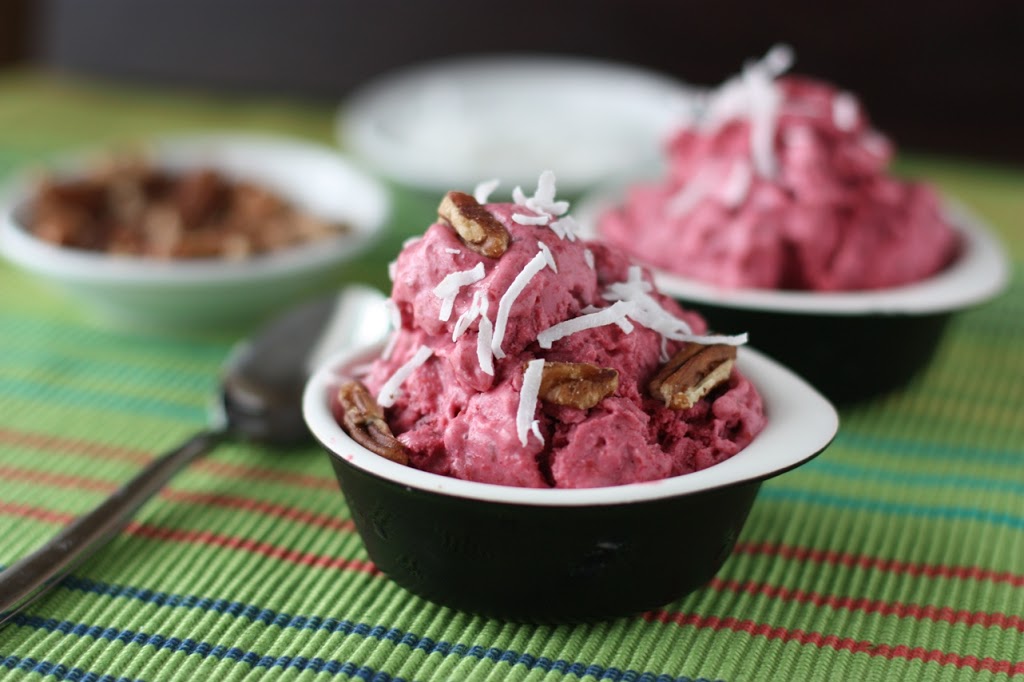
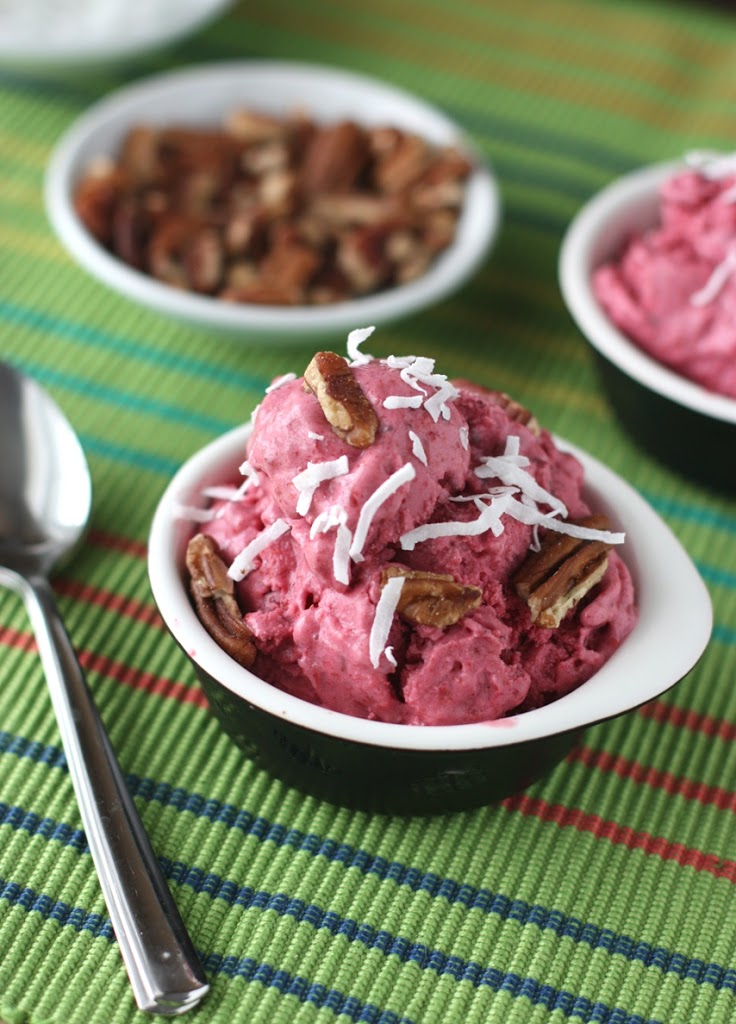
Here are a few of my favorite recipes using Kentucky maple syrup.

Wheat Berry Salad with Fresh Cranberries and Orange Maple Dressing

Banana Bourbon Scones with Walnuts

Bourbon Sweet Potato Waffles with Maple Cinnamon Butter

Butternut, Flax and Walnut Bread

Cranberry Pumpkin Granola

Sweet Potato Date Bars


Blackberry Banana Frozen Yogurt

March 2, 2012
Blackberry Banana Frozen Yogurt | Fake Food Free


I’m working on my added-sugar dependency. I don’t think I eat an exceptional amount, but when you consider that just about everything we eat has sugar in it, in one form or another – yeah, maybe I eat too much.

I cut sugar out of my coffee a couple years ago, and fortunately I haven’t gone back. My oatmeal, however, is a different story. I like honey and maple syrup. Not bad at all in my opinion, but worth reducing.

My main goal is to stop turning to sugar out of habit. This doesn’t mean that I don’t want something sweet. I also happen to disagree that cravings completely go away. Lessen yes, but go away, no; at least not for me, based on several experiments.

So added sugars are out, but fruit is still in.

I solved the problem with my oatmeal. I find a half smashed banana and blueberries or strawberries stirred in to be the sweet enough for me to enjoy. And by enjoy I mean I’ve had it every morning this week for breakfast.

With a big container of plain Greek yogurt in the fridge, I decided to try a no-sugar-added snack. I love the original or tart flavor at yogurt shops. Sadly, almost all the stores in central Kentucky have removed it because it isn’t popular. That leaves me to make it myself.

I still have blackberries in the freezer, and decided to sweeten the yogurt with banana once again. The blackberries I use can be tart, very similar to yogurt, so if you want to go a little sweeter I’d suggest something like blueberries and maybe another half of banana, but for me, this was the perfect treat.

Homemade Blackberry Frozen Yogurt Recipe with no added sugar | Fake Food Free


Blackberry Banana Frozen Yogurt

Makes: 3 to 4 servings

Ingredients

1 1/2 cups frozen blackberries, thawed (with liquid)
1 1/4 cup whole or 2% plain Greek yogurt 
1 banana

Preparation

Place all ingredients in a blender and pulse until smooth. It essentially becomes a smoothie. Turn on your counter top ice cream maker and pour the mixture into the freezer bowl. Run until the yogurt is frozen, about 20 minutes.

Getting the right texture is tricky. I put it in the freezer to set up a little more and after an hour, it had gone way too far. I would suggestion eating it straight out of the ice cream maker, or allow it to set up for about 30 minutes, watching it closely. 

Blackberry Banana Frozen Yogurt with No Added Sugar | Fake Food Free

Thanks for reading! All images and content are the property of Fake Food Free and Lori Rice unless otherwise stated. Please do not republish full recipes and images without written permission. What is okay? Feel free to Pin images, share links to my posts or share the photo in a round up post with the title of this recipe and a link back to the post. Confused about copyright and food blogs? Here is some helpful information on Recipe Attribution. If you want to use a photo or full recipe, just ask. I’m sure we can work something out.

Salted Dark Chocolate Coconut Brownies

February 10, 2012
I love experimenting with coconut oil in my baking and it is especially delicious with brownies! This is a recipe I made a little while back using coconut oil sent to me by Kelapo.
 Salted Dark Chocolate Coconut Brownies | Fake Food Free | Rich chocolate brownies made with coconut oil.
 
 
You’ve heard me sing the praises of coconut oil before. I can be considered a diehard fan. In fact, just the other day I was thinking that it has been at least 2 years since I’ve had anything in our kitchen except olive oil, butter, and coconut oil for cooking. 
 
These are my big three – my real food ammunition for day to day cooking. 
 
Considering that virgin coconut oil makes up a third of the party, I was excited when Jen of Kelapo Coconut Oil asked if I’d like to give their product a try. Why yes, I would. One can never have too many options for good coconut oil, and I’ve learned that Kelapo is very good indeed. 
 
Kelapo’s coconut oil is extra virgin, cold-pressed, unrefined and fair trade organic. I also happen to be a sucker for elephants, one of which they have on their logo, but that is beside the point. 
 
 
Kelapo had everything I would expect in a good coconut oil – a nice fresh flavor and a smooth consistency. From a health educators standpoint I really enjoyed the informational card that came with my jar because it explained simple ways you could start your day with the coconut oil. Most people don’t try healthy foods that are unfamiliar to them because they don’t know how to use them. 
 
Problem solved.
 
The tips included adding it to your oatmeal, or to your tea and coffee; or frying eggs in it and adding it to smoothies. I took a different route with the coconut oil and used it in my baking (as I’m sure you are familiar with if you read the blog regularly). 
 
This time I went with brownies, and saying I went a different route isn’t to say I wouldn’t have these brownies for breakfast.
 
Salted Dark Chocolate Coconut Brownies
 
Makes: 9 brownies
 
Ingredients
½ cup whole wheat pastry flour
½ tsp baking powder
½ tsp Pink Himalayan sea salt (or sea salt of your choice)
¼ cup cocoa powder
½ cup extra virgin coconut oil
1 oz. unsweetened chocolate
2 eggs
1 cup raw sugar
1/3 cup dark chocolate chips
½ cup unsweetened, shredded coconut plus extra for topping
 
Prep
 
Preheat the oven to 350 degrees F and grease an 8 x 8 inch brownie pan with a little coconut oil.
 
In a bowl, whisk together the flour, baking powder, sea salt and cocoa powder. In a double boiler or in the microwave, melt  the unsweetened chocolate and the coconut oil together. Set aside to cool. 
 
In a medium mixing bowl combine the eggs and sugar. Continue to whisk until slightly frothy, about 1 minute. Ensure the coconut oil and chocolate are cool to touch and gently stir this into the eggs and sugar. Stir in the dry ingredients a little at time, just until all the ingredients are combined. 
 
Stir in the chocolate chips and the coconut. Pour the batter into the prepared pan, and sprinkle with extra coconut.  Bake 20 to 25 minutes or until the brownies are set in the center. Remove from the oven, place on a cooling rack. Slice and serve. 
 
 
Salted Dark Chocolate Coconut Brownies | Fake Food Free | Rich chocolate brownies made with coconut oil.


More coconut oil recipes:
 
Chocolate Chip Cookies
Strawberry Cinnamon Toast 
Coconut Lime Granola
Pumpkin Black Sesame Seed Muffins 

 Pin It

Disclosure:  Kelapo Coconut Oil was sent to me free of charge. I was not required to post about it and received no compensation for doing so. 

Thanks for reading! All images and content are the property of Fake Food Free unless otherwise stated. Please do not republish full recipes and images without written permission. What is okay? Feel free to Pin images, share links to my posts or share the photo in a round up post with the title of this recipe and a link back to the post. Confused about copyright and food blogs? Here is some helpful information on Recipe Attribution. If you want to use a photo or full recipe, just ask. I’m sure we can work something out.  


Coconut Lime Granola

January 25, 2012

This is how it goes down. 
You open the webpage and think to yourself – what is this?  You scroll down the page, and you spot something. Your brain says – oooooohh, pretty!
Click, repin, and you’re a goner.
The next thing you know two hours have passed, and you have a visual list of things you want to make, how you want to decorate, and where you want to travel. 
Yes, this is Pinterest
When I was younger I used to carefully cut photos out of magazines and paste them on the pages of notebooks. These were my plans, my inspirations, and they most often had to do with fitness goals or dream houses.
It dawned on me today that Pinterest is my modern version of this; the adult me keeping dreams and inspiration alive. Note: This is my positive spin on the fact that I’m addicted. 
I’m not quite sure how to create a natural transition from Pinterest to granola; other than the fact that I probably have some granola recipes pinned on my boards. 
Here it goes anyway. 
Limes are one of the things I miss most about Brazil. I used to go to the market and get a bag of 10 or 12 of the best tasting limes for about 44 cents U.S. Needless to say, 44 cents per lime was tough to handle when we returned to the U.S. So when they are on sale, I stock up. 
I love the combination of lime and coconut, and have included it in breads, but never in granola. So I tried it. Aside from it being a fabulous way to use up some limes, it’s also the perfect excuse to bake with some coconut oil. The flavors came out so well, and it has added quite a positive spin to my yogurt this week. 
Coconut and Lime Granola
¼ cup molasses
¼ cup maple syrup
Juice and zest of 2 limes
¼ cup virgin, cold pressed coconut oil, melted
4 cups old fashioned rolled oats
1/3 cup unsalted sunflower seeds
½ cup raisins
½ cup raw almonds, chopped
1 cup shredded, unsweetened coconut
½ tsp sea salt
Preheat the oven to 325 degrees F.
In a small bowl, whisk together the molasses, maple syrup, lime juice, lime zest and coconut oil. Set aside.
In a large bowl, stir together the oats, sunflower seeds, raisins, almonds, coconut and salt. Pour the molasses mixture over the oats and stir to coat. 
Turn the granola out onto an ungreased baking sheet. Spread in a single layer. Bake for 40 minutes, stirring every 10 to 15 minutes. Cool and store in an air tight container. Makes about 6 cups. (I like to stir in a little plain coconut before serving to add some color and a different texture.)
Pin It

Whole Wheat Black Sesame Cookies

January 22, 2012
Black Sesame Cookies | Fake Food Free | A simple cut-out cookie made with white whole wheat flour, raw sugar and nutty black sesame seeds.  
I’m looking for some variety in my baked goods. I’m not sure why I’m so bored of chocolate chip cookies and standard flavors, like vanilla. Perhaps it’s all the time I spend exploring on the Internet. Yes, that could be it. 
 
I see apricot, rhubarb, mocha, green tea, red bean and…black sesame. I came across these cookies towards the end of last year and had every intention of making them for the holidays. That didn’t happen, so I revisited the goal this weekend.
 
I’m a big black sesame fan, and if you like anything with a slightly nutty flavor, you will be too. I adapted the recipe from one of my favorite food bloggers, Green Cilantro (unfortunately, the blog hasn’t been updated since 2013). Ideal with coffee, tea, or milk, these cookies are only slightly sweet; perfect for an afternoon snack or post-run treat, whatever the case may be.
 
Black Sesame Cookies | Fake Food Free | A simple cut-out cookie made with white whole wheat flour, raw sugar and nutty black sesame seeds.
 
Whole Wheat Black Sesame Cookies
Adapted from Black Sesame Cookies by Green Cilantro
Makes: About 30 small heart cookies
 
Ingredients 
 
2/3 cup unsalted butter, softened
½ cup raw sugar
1 large egg
2 tsp 2% milk 
½ tsp baking soda
½ tsp salt
2 cups white whole wheat flour
2 tbsp black sesame seeds
 
Prep
 
Preheat the oven to 350 degrees F. In a mixing bowl, cream the butter and sugar until well blended, about 1 minute. Mix in the egg and milk. 
 
In a small bowl, combine the baking soda, salt and flour. Gradually add the dry mix to the wet ingredients with mixer on low. Mix on medium until the dough comes together in a ball. 
 
By hand, stir or knead in the black sesame seeds. Place the dough between two pieces of wax or parchment paper and roll to about a ¼ inch thickness. Place the dough on a baking sheet and refrigerate for 1 to 2 hours. 
 
Cut into shapes and bake on an ungreased cookie sheet for 8 to 9 minutes; just until the edges are slightly browned. Let cool for 1 to 2 minutes and then transfer the cookies to a rack to cool completely. 
 
Black Sesame Cookies | Fake Food Free | A simple cut-out cookie made with white whole wheat flour, raw sugar and nutty black sesame seeds.
 
 Thanks for reading! All images and content are the property of Fake Food Free unless otherwise stated. Please do not republish full recipes and images without written permission. What is okay? Feel free to Pin images, share links to my posts or share the photo in a round up post with the title of this recipe and a link back to the post. Confused about copyright and food blogs? Here is some helpful information on Recipe Attribution. If you want to use a photo or full recipe, just ask. I’m sure we can work something out. 

Holiday Baking

December 15, 2011

At the beginning of the holiday season I set a goal for what I want to bake; then I plan to fall short of that goal. I know that sounds awful, but there is never enough time to make all I would like to and I find if I prepare myself I’m not disappointed when it all doesn’t get done.

I love to bake and make candies, but there is something about the marathon sessions of the holidays that truly wear me out. I always feel so motivated when I start, but by the time I dry the last dish I’m ready to throw in the towel for a while. Fortunately, I get my groove back in time for Valentine’s Day.

This year wasn’t quite so bad. I was much better at taking on only what me and my mixer could handle. I had planned on trying many new things this year, but ingredients that required extra errands made me choose to fall back on some old favorites. 

I did throw one new candy into the mix – peanut butter cups! I’d never made my own before. The recipe isn’t mine, but it is one that I will keep around for many holidays to come.

Here’s a sampling of this year’s treats. The links will lead you the original posts with the recipes.

I put a twist on my Cafe & Cream Shortbread this year, literally. Instead of the original checkerboard shape, I simply rolled out each batch of dough after it had chilled for 30 minutes. Next I put one on top of the other, rolled and sliced. I actually think I like them better this way. It is definitely a less labor intensive process.

Recipe: Cafe & Cream Shortbread

The Ginger Rum Molasses Cookies I reviewed last year from the cookbook Baked Explorations remain my favorite gingerbread. This year I cut them into gingerbread men (and women) and Christmas trees. I iced a few for variety as well. If you like a soft gingerbread, don’t roll the dough too thin. Keep it a bit thicker, at least a quarter of an inch, and they will be perfect.

Recipe: Ginger Rum Molasses Cookies

Now for the newbie this year. These Peanut Butter Cups come from Brown Eyed Baker. The only change I made was I used dark chocolate chips (60%) and I added about 1 tbsp of unsalted butter instead of vegetable shortening to smooth the chocolate. These must be hidden. Much too dangerous.

Recipe: Homemade Peanut Butter Cups

I will be taking a short blogging break until after Christmas. I hope you have a wonderful couple of weeks regardless of what you may or may not celebrate. Here it will be Christmas followed by a much anticipated New Year. Happy Holidays!

Eggnog Latte Cupcakes

December 8, 2011
 My favorite holiday coffee drink becomes a dessert in this recipe for eggnog latte cupcakes!
 Eggnog Latte Cupcakes | Fake Food Free 
 

What’s the first food or drink you think of when you hear the word culture?

For me, it’s coffee.

Coffee brings about memories of travel and some of my favorite places in this world. And it’s not just the coffee itself that I enjoy; it’s the culture that surrounds it. I love to smell it brewing in the morning, and sharing a cup over conversation with my husband or friends. I find it fascinating to watch it grow in the fields, and I feel fortunate to support those who grow it as they share a piece of their world with me in each cup. 

So a few weeks ago when I was asked if I would like to review a very special coffee, I was given a great opportunity to offer my support. 

Equal Exchange buys products directly from small-scale farmer cooperatives for Fair Trade prices. Then they pass these amazing things on to us in the form of chocolate, cocoa, tea and coffee. The Congo Coffee Project was created by Equal Exchange in partnership with Panzi Hospital in the Democratic Republic of Congo. 

The Congo Coffee is a blend of African coffee beans that was described to me as smooth and balanced. I have to agree. I took it to work with me this morning and enjoyed every sip. This is a coffee that is worth an online order. 

This is coming from someone who still recruits friends and colleagues to bring me coffee from Brazil, and who stocks up on 100% Blue Mountain coffee any time my feet touch ground in Jamaica.  Yes, I love quality coffee. 

And now is a great time to place that order as Equal Exchange will donate $2.00 per bag sold through their retail web store to the Panzi Foundation. The Panzi Hospital offers treatment, counseling and aftercare programs for over 2,000 survivors of sexual violence each year. 

So, go. Buy the coffee-lover in your life a bag for the holidays. 

When I agreed to review the coffee, I knew that I couldn’t show you a simple cup of coffee and be done with it. Although, a simple cup alone is worth a photo and sip. No, I needed to figure out a way to get it into some of my baking. 

My favorite holiday coffee drink turned cupcake? That will work.

 Eggnog Latte Cupcakes | Fake Food Free

 
These Eggnog Latte Cupcakes start with a rich chocolate, coffee-flavored cake that uses virgin coconut oil, mascavo (muscovado) sugar and white whole wheat flour. Feel free to substitute butter, brown sugar and your favorite flour, if you desire. 

Although, I will say that these are made only slightly sweet on purpose. The eggnog frosting on top is the real deal and full of sugar. I wanted a less sweet cake to balance out the frosting so my final produce wouldn’t make your teeth hurt. The minimally refined sugar and strong brewed coffee did the trick.

Eggnog Latte Cupcakes
Makes: 8 cupcakes
 
Ingredients
 
Cupcakes 
3 ½ tbsp virgin coconut oil, soft, at room-temp
½ cup mascavo or muscovado sugar
2 large eggs 
3 tbsp Congo Project Coffee, brewed strong and cooled 
¼ cup cocoa powder 
½ tsp baking soda 
½ cup white whole wheat flour 
1/8 tsp nutmeg 
½ cup plain Greek yogurt
Eggnog Frosting 
½ stick (1/4 cup) unsalted butter, softened
2 ½ cups confectioners sugar 
7 tbsp eggnog 
1 tbsp coffee, ground extra fine
Prep
Preheat your oven to 350 degrees F. Line a muffin tin with 8 cupcake liners. 

In a bowl of a mixer fitted with the paddle attachment, combine the coconut oil and sugar. Mix for about 2 minutes, until almost smooth. Beat in the eggs, one at a time. Add the coffee. 

In a separate bowl, stir together the cocoa powder, baking soda, flour and nutmeg. Gradually add the dry ingredients to the batter. Mix just until combined. Fold in the yogurt. 

Divide the batter evenly among the 8 cups in the tin. Bake for 18 minutes or until a toothpick inserted in the center comes out clean. Remove from the oven and cool completely. 

For the frosting, combine the butter and confectioner’s sugar in a mixing bowl and mix on medium and then medium-high until well combined. Slowly add the eggnog, 1 tablespoon at a time. Frost your cupcakes once cool and sprinkle each with a dusting of finely ground coffee. 

Eggnog Latte Cupcakes | Fake Food Free 

 
Eggnog Latte Cupcakes | Fake Food Free

Disclosure:  This coffee was sent to me free of charge. I was not required to use it in some pretty rockin’ cupcakes or write about it, and I received no compensation for doing so. 

Crunchy Peanut Butter Date Balls

November 30, 2011
A few weeks ago I put out a call out for bloggers interested in the 2nd Annual International Holiday Cookie Exchange. I’m excited to say that we had nearly 20 people respond and they are all now sharing recipes and baking away.
The idea behind the exchange is to share cookies or candies without the shipping; so we share recipes instead. Over the next couple weeks those participating will be posting about the recipes they received from a fellow blogger.
So now it’s my turn. There is no way I could help host such a fun event without participating myself!
My recipe comes from Melissa of My McDonald Meal. Melissa just happens to be a fellow Kentucky Food Blogger and friend. If you haven’t checked out her blog, definitely stop by. She creates delicious, real food recipes that are kid-friendly and approved by her beautiful daughters.  
When Melissa sent me the recipe, she wrote:
I tend to stick with old time favorites when it comes to holiday cookies; not something you would likely see on my blog during the rest of the year… I’m going with a favorite of mine from my childhood. — Date Balls. Sounds kind of boring but I found a way to kick these up a notch!
I have to say, while I’ve heard of Date Balls, I had never made them. I’ve used dates in a few recipes, but they aren’t a staple for me. So, long story short, I had no idea what to expect.
Well, Melissa wasn’t kidding when she said she kicked these up a notch. Wow, they are so good! I’d be tempted to say that even if you are not a date fan, you will like these. The flavor of the nuts and peanut butter really come through and the cereal adds a great crunch.
I got a little creative with my dark chocolate; a different style depending on how much you like – a drizzle, half and half or a solid dip.
Crunchy Peanut Butter Date Balls
Recipe from My McDonald Meal
1 cup natural peanut butter (crunchy or smooth)
1 cup confectioners’ sugar
1 cup finely chopped almonds
1 cup brown rice crispy cereal (you can use regular rice crispy cereal too) 
1 cup finely chopped dates (pits removed)
1 tbsp unsalted butter, melted
4 oz. dark chocolate
Mix peanut butter and sugar together in a large bowl. Add in almonds, cereal, dates, pour in butter and combine.
Scoop out rounded tablespoons of mixture to make balls and place on a wax paper coated cookie sheet. Place balls in freezer for about 10-15 mintues. Melt chocolate in a double boiler. When balls are ready, dip the top of them in the melted chocolate and let cool. Makes about 50-60 balls. (I made mine a bit larger and came out with about 30). 
Stay tuned for the official round-up of the International Blogger Holiday Cookie Exchange the week of December 12! There will be lots of great ideas for your cookie tray.

2nd Annual International Holiday Cookie Exchange

November 3, 2011

The International Blogger Holiday Cookie Exchange is back for 2011!

Last year Adrienne of Gastroanthropology and I created this event as a way to have a cookie exchange across international borders. Since it’s not always feasible to ship cookies, we trade recipes instead.

Adrienne has a lot going on this year that has taken her away from food blogging for a bit (including a new baby – congratulations!), so one of my favorite blogging buddies has stepped up to partner with us this year, Andrea of Food Embrace!

Without further delay, here’s how it works:

As a part of this recipe exchange you’ll be doing three things – sending a recipe to another blogger, making the recipe another blogger has sent to you, then posting about the recipe you made.
The recipe should be something you’d find on a holiday cookie plate, so anything from rugelach to alfajores to fudge squares to gingerbread men qualifies!

To participate email me at Lori (at) fakefoodfree (dot) com or Andrea (at) foodembrace (dot) com (or leave a comment with your email address below).

So here are the important dates:

Let us know you want to participate by next Thursday, November 10th.
(We will email you soon after with whom you should send your recipe to and who you will be receiving one from.)
Send your recipe to the blogger randomly selected for you by Sunday, November 20th.

Make, photograph and post about the recipe you received from a fellow blogger by Sunday, December 11th.

The round up will be featured here at Fake Food Free and Food Embrace the week of December 12th.

We hope you will join us!

Spicy Chocolate Peanut Butter Cookies with Curry Glaze

October 29, 2011

It’s been a few years since I made these cookies, but I still love a bit of heat in my dessert baking. They are made with PB & Co The Heat Is On peanut butter that was sent to me to try back then. As expected, I was an instant fan.
 
Spicy Chocolate Peanut Butter Cookies with Curry Glaze Recipe | Fake Food Free


Ever since I made Fiery Peanut Butter Cookies with Peanut Butter & Company’s The Heat Is On, I’ve wanted to experiment more with spicy desserts.

Thanks to my minor addiction with Vosges Haut-chocolat, I can’t get enough of sweets with savory spices. So for Halloween I thought I’d try out a new version of cookies. I figure if nothing else you can trick a few people into trying them.

Despite the initial response you might get to the name, I promise after one bite they will want another. The warm heat, rich dark chocolate, nuttiness and curry turn out to be some pretty amazing partners in a cookie.

Happy Halloween!

Spicy Chocolate Peanut Butter Cookies with Curry Glaze Recipe | Fake Food Free

Spicy Chocolate Peanut Butter Cookies with Curry Glaze

Makes: About 18 cookies

Ingredients

½ cup Demerara sugar
½ cup mascavo sugar
½ cup unsalted butter, softened
1/3 cup PB & Co The Heat Is On
1 large egg
1 ¾ cups white whole wheat flour
2 tablespoon unsweetened cocoa powder
¾ teaspoon baking soda
½ teaspoon baking powder
¼ teaspoon salt
½ cup dark chocolate chips

Glaze
1 cup confectioner’s sugar
2 tablespoons meringue powder
½ teaspoon curry powder
Milk (any variety)

Prep

Preheat your oven to 350 degrees F. In the bowl of a mixer combine the sugars and butter. Cream on medium-high until light and fluffy. (Note: white and brown sugar will substitute for the sugars listed). Add the peanut butter and continue to mix until all ingredients a combined. Blend in the egg.

In a separate bowl, whisk together the flour, cocoa powder, baking soda, baking powder and salt. Gradually add dry ingredients to the mixing bowl and blend on medium speed just until combined. Stir in the chocolate chips.

Roll into balls about ¾ inch in diameter. They will not spread much during baking, flatten slightly with your hand. Bake for 10-12 minutes or until cookies are firm in the center. Transfer to a wire rack and allow to cool completely.

In a small bowl, combine the confectioner’s sugar, meringue powder and curry. Add milk, a 1/2 teaspoon to 1 teaspoon at a time until the glaze can be poured, but is thick enough to still coat the spoon. Take cooled cookies one by one and dip the tops into the glaze. Place on a cooling rack that has been set over a baking sheet to allow excess to drip on the sheet. Use a spatula to spread glaze if necessary.

Allow to sit untouched for about 15 – 20 minutes for glaze to harden. 

Spicy Chocolate Peanut Butter Cookies with Curry Glaze Recipe | Fake Food Free


Disclaimer: Peanut Butter & Co sent me the peanut butter used in this recipe free of charge. I was not obligated to blog about it and received no compensation for doing so.


Thanks for reading! All images and content are the property of Fake Food Free unless otherwise stated. Please do not republish full recipes and images without written permission. What is okay? Feel free to Pin images, share links to my posts or share the photo in a round up post with the title of this recipe and a link back to the post. Confused about copyright and food blogs? Here is some helpful information on Recipe Attribution. If you want to use a photo or full recipe, just ask. I’m sure we can work something out.   

Want to create beautiful food and product photos that you can't wait to share?!
Discover your style, control the light, and shoot using the tool you know how to use (yes, your phone included). Learn about free resources, Live Q&As with Lori, and online courses you can take from anywhere in the world!
We respect your privacy. Unsubscribe at any time.