Browsing Category

Desserts Sweets

No-Bake Running Snacks and Christmas Carols

November 4, 2012
 
As I pulled up to a stoplight on my commute to work last Thursday, the radio scanner stopped on a local station. I sat there for a few seconds before my ears recognized what I was hearing.
A Christmas carol.
Normally, this time of year, I would immediately change the station and swear off any mention of winter wonderland, snowmen and reindeer for a few more weeks. But not that morning. I listened and I thought – this is kind of nice.
It felt a little like a guilty pleasure, a secret I should keep to myself. Kind of like when you have the second cookie you don’t need. Or the no-bake chocolate snowball.
That is, unless you are talking about these No-Bake Chocolate Snowballs.
I came across the recipe when I was catching up on Michelle’s blog at Find Your Balance Health, and I couldn’t wait to try them.
There are many healthy bars, protein bites and energy cookies around the web and these are perfect pre- and post run snacks. The only problem is that many use dates as the base, and while I can handle them in moderation, I get tired of that date flavor.
Big bonus, these don’t have a date in sight! I’m already on my second batch and I’m still loving them. You can get the recipe at Find Your Balance Health. It’s nice and simple, and bananas, nut butter, maple syrup and unsweetened coconut just happen to be staples in my kitchen.
Turn up the Christmas carols and grab a couple snowballs. Around here 2012 is going to be one great holiday season!

Pumpkin Peanut Butter Cookies Recipe

October 10, 2012

These pumpkin peanut butter cookies are one of my favorite cookies for the fall! They are chewy and full of pumpkin and peanut butter flavor! When I first made these a few years ago, I used UNREAL Chocolates that were sent to me for review, but you can easily substitute your favorite chocolate candies or simply use chocolate chips.

Pumpkin Peanut Butter Cookies Recipe | Fake Food Free

A couple of months ago I participated in a Twitter tasting party. Yeah, I didn’t know what it was either. I quickly learned that at a Twitter tasting everyone tries samples of a food while they tweet about the products with a group of like-minded folks. I’m not going to lie. It was a lot of fun!
 
This tasting happened to be for UNREAL™ candy through Kitchen Play. I hadn’t heard of this candy before, and I quickly became intrigued by the information that was sent my way. 
 
First, let me start out by saying – candy is candy. It’s not something any of us should be consuming in mass amounts, but there is a reason I welcomed trying out UNREAL products. This candy is proof that you can still enjoy a treat that isn’t loaded with HFCS, artificial colors and preservatives.  I was even more impressed to learn that the dairy for their chocolate comes from pastured cows and the colorings for the candies are from plant sources such as beets and red cabbage. 

After the Twitter tasting, I thought I might try using the candies in some baking for Halloween. I have to admit that I since we’ve cut out the majority of processed foods from our diet, I do miss using candies in making creative cookies and cakes. That’s not to say I don’t have a peanut butter cup on occasion, but I’m just not comfortable promoting a recipe that uses these things, moderation or not.

UNREAL sent me a few more bags of their candy coated chocolates (UNREAL 41 and 54) so I could try out a new recipe. (I love the colors of these chocolates. With the plum, dark green and yellows they are the perfect color profile for fall.) 

I set out to make some whole wheat peanut butter cookies, and then added some pumpkin. This took the place of some of the butter, and made the cookies even more ideal for autumn. The chocolates baked up beautifully in the cookies. The result was a soft cookie with bites of rich chocolate that went well with the peanut butter and hint of pumpkin. 

Pumpkin Peanut Butter Cookies Recipe | Fake Food Free
Pumpkin Peanut Butter Cookies Recipe
Makes: 18 to 20 cookies
Write a review
Print
Ingredients
  1. ½ cup Demerara sugar (or raw sugar), plus extra for rolling cookies
  2. ½ cup mascavo (muscovado) sugar
  3. 4 tablespoon unsalted butter, softened
  4. ½ cup natural peanut butter (unsweetened, but salted)
  5. ¼ cup pumpkin puree (mine was from a fresh roasted pumpkin)
  6. 1 large egg
  7. ¼ teaspoon pure vanilla extract
  8. 1 ½ cups whole wheat flour
  9. ¾ teaspoon baking soda
  10. ½ teaspoon baking powder
  11. ¼ teaspoon fine ground sea salt
  12. 2 to 3 1.5-oz packages of UNREAL™ 41 Candy Coated Chocolates
Instructions
  1. Preheat the oven to 350 degrees F.
  2. In a mixer fitted with the paddle attachment, beat the sugars, butter and peanut butter for about 2 minutes on medium-high. Add the pumpkin, and blend in the egg with the mixer on low. Add the vanilla.
  3. In a separate bowl, whisk together the flour, baking soda, baking powder and salt. Slowly add the dry ingredients to the mixing bowl. Mix on low just until all ingredients are combined.
  4. Stir in the candy coated chocolate being careful not to break up the chocolates too much.
  5. Spoon out a generous 1 tablespoon of cookie dough and roll into a ball. Roll the ball in raw sugar. (You don’t have to roll the cookies in sugar, but it adds a nice crunch to the baked cookie.)
  6. Place on an ungreased cookie sheet and slightly flatten the cookies with your hands. Bake for 8-10 minutes, until the cookies are firm and the edges are browned. Allow to rest on the cookie sheet for about 1 minute and then transfer to a cooling rack.
Fake Food Free https://www.fakefoodfree.com/


Pumpkin Peanut Butter Cookies Recipe | Fake Food Free


********************************
 
Just about everyone I’ve mentioned this candy to is as intrigued as I was about the source and ingredients. If you have any questions, fire away in the comments. I think these candies are a great option for Halloween. You’ll find more product information below.
 
 
UNREAL candies contain:
No corn syrup, hydrogenated oil, artificial flavor, GMO’s or synthetic colors.
Responsibly sourced ingredients, including:
Traceable cacao beans from Ghana and Ecuador
100% sustainable and organic Palm Kernel Oil sourced from a sustainable and organic plantation in Brazil
Dairy from free-range cows pasture raised without antibiotics or added hormones
All natural origin colors, coming from plants like beets, red cabbage, etc.
30% less sugar, 60% more protein and 250% more fiber
 
UNREAL candies are offered at the same price as typical candy bars.  Available at major retailers, nationwide, including CVS, Kroger, Staples, BJ’s Wholesale Clubs and many others, UNREAL prices range from $.89 to $1.29 for individual bars and $4.99 for the family sized bags 
 
Disclosure:  The candies used in this recipe were sent to me free of charge from UNREAL. I was not required to post about them and received no compensation for doing so. Thoughts and opinions on the product are my own.
 
Thanks for reading! All images and content are the property of Fake Food Free unless otherwise stated. Please do not republish full recipes and images without written permission. What is okay? Feel free to Pin images, share links to my posts or share the photo in a round up post with the title of this recipe and a link back to the post. Confused about copyright and food blogs? Here is some helpful information on Recipe Attribution. If you want to use a photo or full recipe, just ask. I’m sure we can work something out.  


Spiced Gooseberry Oat Bars Recipe

September 29, 2012

A few weeks ago, a slight freezer malfunction caused a hiccup in my food storage. All is good now, but there were a few things that managed to completely thaw before I was able to catch them. One of these was the gooseberries that my parents had given me earlier in the summer. 
I spent a few days staring at them in the fridge, and then decided that baking was the only answer. (I’ve learned that baking is the answer to a lot of things. I recommend trying it the next time you have a problem.)
I decided that these tart little berries would go great in my favorite oat bars. Since this gave me the opportunity to make the recipe again, I decided I’d experiment with a few other ingredients as well.
I made this batch with virgin coconut oil, which worked great. Keep in mind that this makes them a delicate, crumbly bar; one you will want to eat with a fork and not pack in your snack bag. I also had some gluten-free flour. Since this is a recipe that doesn’t need to rise, I felt it was safe to substitute all the white whole wheat flour for the gluten-free mix. Another winner. (Although, as you probably know if you eat gluten-free, oats are a tricky food. So I won’t be quick to name these 100% gluten-free.  But you can easily make yours that way, if you need it.) 
With fall finally arriving, I decided to spice this batch up a bit with ginger, nutmeg and cinnamon. I loved the way the flavors went with the tart berries. If you can’t get your hands on gooseberries, almost any berry will work. Cranberries and blueberries have been two of my past favorites. 

Spiced Gooseberry Oat Bars Recipe

Adapted from Blueberry Oat Bars, Bryant’s Blueberries

1 ¾ old fashioned rolled oats
1 ½ cups flour (I used Bob’s Red Mill Gluten-free All Purpose Baking Flour in this batch)
¾ cup mascavo (muscovado) sugar (or brown sugar)
½ cup chopped walnuts
½ tsp baking soda
1 tsp salt
¼ tsp ground ginger
½ tsp ground nutmeg
1 tsp ground cinnamon
¾ cup melted virgin coconut oil

2 cups thawed gooseberries
¾ cup raw sugar
1 tbsp cornstarch or arrow root
2 tbsp water
1 tbsp lemon juice

Preheat the oven to 350 degrees F.  Grease a 9 x 13 inch baking dish with coconut oil. 

In a medium bowl combine the oats, flour, mascavo sugar, walnuts, baking soda and salt. Add the ginger, nutmeg and cinnamon. Pour in the melted coconut oil and stir to mix well. You should have a crumbly mixture that is wet enough to hold when pressed together. Reserve about ¾ cup of the mixture. 

Press the remaining oat mixture into the baking dish. Spread it evenly and press it firmly into the pan. Bake for 10 minutes. Remove from the oven and set aside. 

In a sauce pan combine the gooseberries, and raw sugar (you can add more or less sugar to your taste). Bring to a boil, then simmer, for about 2 minutes. Stir to break up the berries. 

In a small dish, stir together the cornstarch, water, and lemon juice to make a paste. Add the paste to the gooseberries and stir until the fruit is thickened. Remove from heat.

Spread the fruit over the oat crust leaving just about a ¼ inch edge on all sides. Crumble the reserved topping evenly over the fruit. Bake for 18 to 20 minutes or until the edges of the crust begin to brown. Cool the pan on a wire rack. 

Once cooled completely, cut into bars. Makes about 15 bars.

Chocolate Almond Oatmeal Cookie Recipe

August 25, 2012


Don’t worry. I’m not going to make myself sound crazy by telling you that I’ve already started holiday baking. But I’m not going to lie either. I may have started thinking about holiday cookies, and I may have already browsed my baking list from last year to see what I want to repeat. Maybe.

Okay, I’m not ready for the holidays, but I am ready for fall. Instead of going straight into the pumpkin and sweet potatoes, I thought I’d ease in, at least in terms of recipes. A little comforting oatmeal, nuts, and something to satisfy a chocolate craving.

This was my first time using almond butter in cookies and I loved the result. My husband described these as having the flavor of a no-bake cookie, yet lighter, and of course, baked. Despite it still being summer, these were worth firing up the oven.

Chocolate Almond Oatmeal Cookies

1 cup (2 sticks) unsalted butter, softened
3/4 cup mascavo (or muscovado) sugar
3/4 cup Demerara (or raw) sugar
2 eggs
1/4 cup raw, unsalted almond butter
1 tsp almond extract
1 1/2 cups white whole wheat flour
2 cups old fashioned rolled oats
1/2 cup cocoa powder
1 tsp baking soda
1/2 tsp salt
1/2 cup chopped almonds

Preheat the oven to 350 degrees F.

In the bowl of a mixer add the butter and sugars. Mix on medium to medium high and cream well; about 2 minutes. Mix in the eggs, and add the almond butter and almond extract. Mix for one minute more.

In a separate bowl, stir together the flour, oats, cocoa, baking soda and salt. Slowly add to the wet ingredients, mixing on low. Mix just until all ingredients are incorporated. Stir in the almonds.

Using a cookie scoop or spoon, place the cookies on an ungreased cookie sheet. Bake 8 minutes. Remove from the baking sheet and place on a cooling rack. Makes 2 to 2 1/2 dozen cookies.


Matcha Tea Cookies with Gooseberry Filling

July 10, 2012

These matcha tea cookies with gooseberry are filled with a tangy spread made of the fruit! The sandwich cookies combine two unexpected flavors that are delicious together!
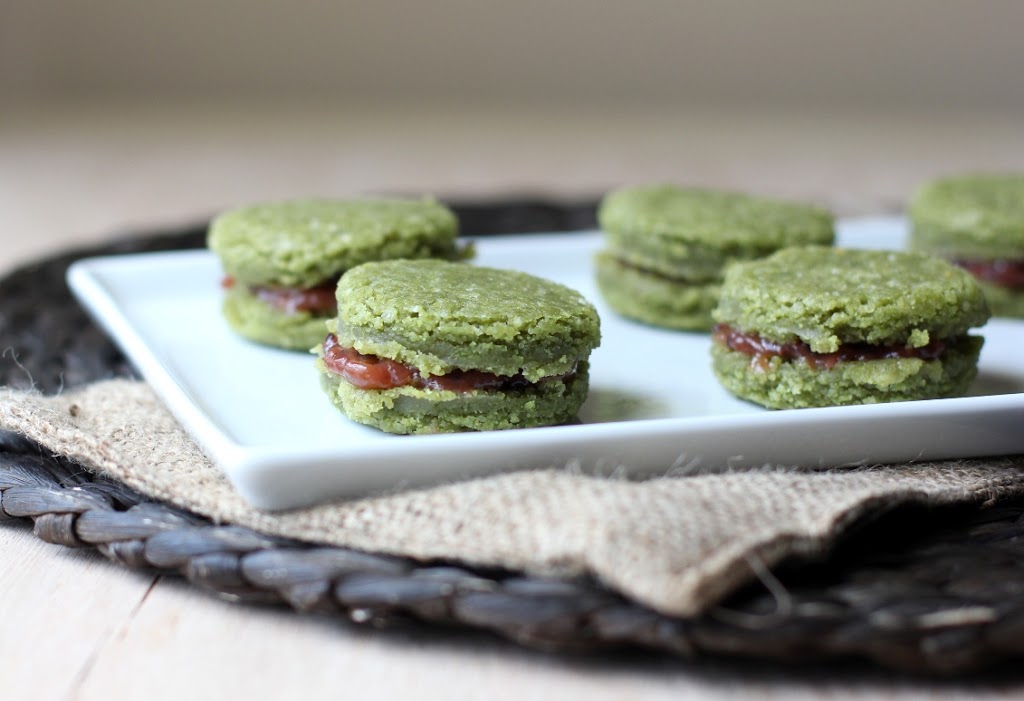
Matcha Tea Cookies with Gooseberry Filling Recipe | Fake Food Free

The first time I had green tea in sweets was during our trip to Hong Kong a few years ago. We loved the fast-paced, cafeteria-like bakeries we found on almost every corner. During one quick stop, I picked up a green tea cake with red bean filling, and loved it.
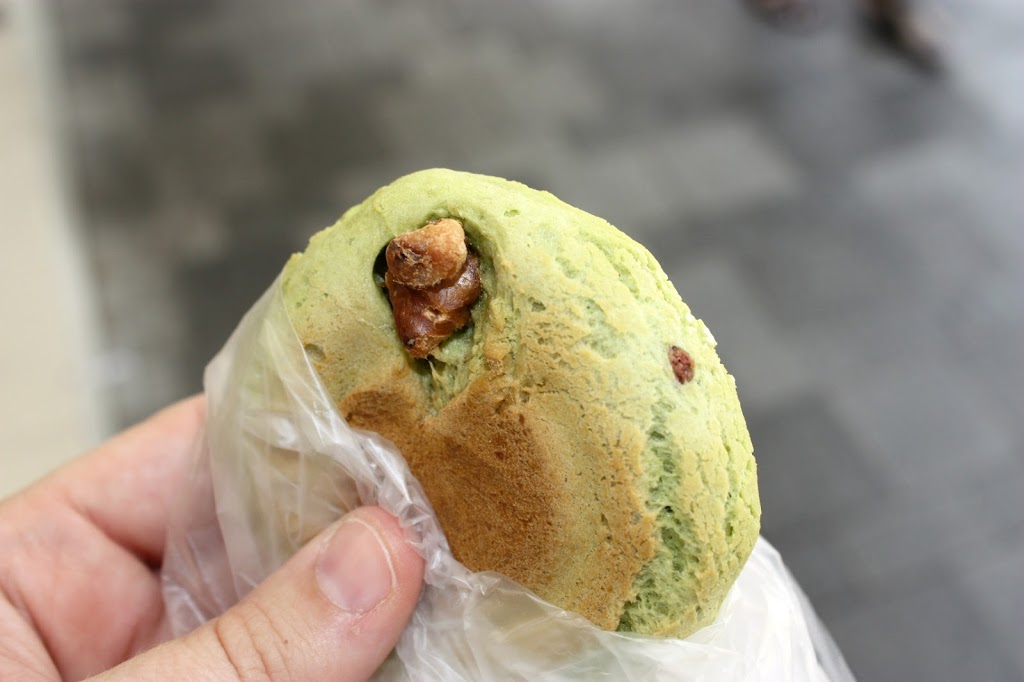
Matcha Cake filled with Red Bean from Chinese Bakeries in Hong Kong. The inspiration for match tea cookies with gooseberry filling. | Fake Food Free


If you do a search for matcha green tea there is no shortage of sweets and bakery creations on food blogs. I’m actually a bit late to the party, but for good reason. I had a difficult time finding the powder around here. I tried to find it when I made the Green Tea Bubble Tea last year without success.

Now I know why.

Since my first experience with green tea baked goods was in Hong Kong, I was associating it with the wrong culture (shame on me). When Matcha Factory contacted me to offer a sample, I learned a thing or two, most importantly that matcha green tea is of Japanese origin.

I’d wanted to bake with it for a while so I gladly took them up on the offer. Matcha tea is ground, shade grown, steamed tea leaves. It’s full of antioxidants, and like most other Asian ingredients, it boasts a variety of health benefits. If that isn’t enough, it also turns everything it contacts into a beautiful shade of green. I definitely need more of this in my kitchen.

When it came to bake goods, just about every idea I had for the matcha tea had been done before, and done well. I first set out with the idea of a tea cake. I wanted to use some of this year’s gooseberries sent from my parents.

I posted about gooseberries last year. If you are unfamiliar it is a small round fruit with an internal texture of a blueberry, but a skin more like a grape. They are tart, and great for a something a little different in baked goods.

My cakes are more like a rich, sweet, chewy cookie, and I’m not complaining. The tart gooseberry filling turned out to be perfect for them. 
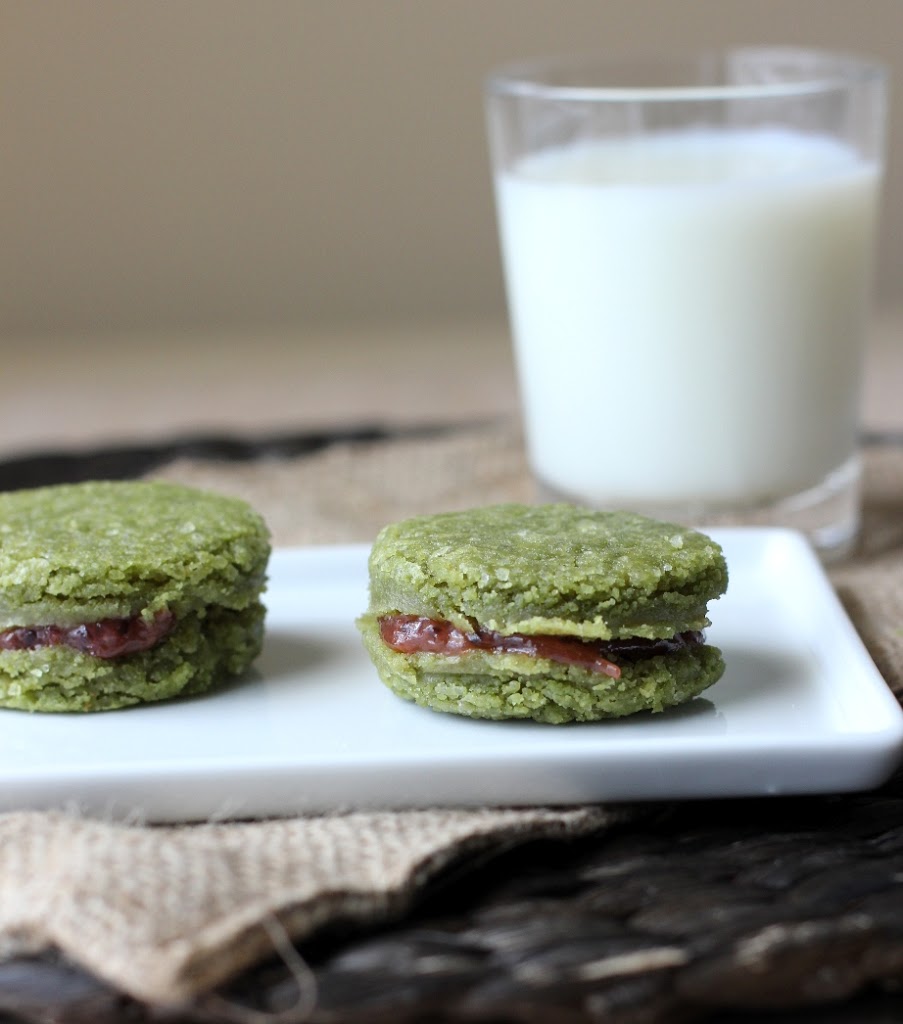
Matcha Tea Cookies with Gooseberry Filling Recipe on Fake Food Free


Cookies or cakes, I’m sold on adding matcha tea to baked goods. I loved some of the recipes I found on the company’s website such as the Matcha Butter and Matcha Salt. Next up I’m going to use it in a morning shake or maybe a latte.

Matcha Tea Cookies with Gooseberry Filling

Makes: 8 sandwich cookies

What you’ll need for the cookies:
1 1/3 cups Demerara sugar
¾ cup (1 ½ sticks) unsalted butter, melted
1 large egg
½ teaspoon almond extract
1 1/3 cup unbleached all-purpose flour
½ teaspoon baking powder
¼ teaspoon salt
1 teaspoon matcha green tea powder

How to make the cookies:

Preheat the oven to 350 degrees F, and lightly grease a 9 x 13 in baking dish.

In a mixing bowl, whisk together the sugar and melted butter, until combined. Next, whisk in the egg until incorporated and add the almond extract. In a separate bowl, whisk together the flour, baking powder, salt and matcha tea.

Add the dry ingredients to the wet ingredients, and stir until all is combined. You will end up with a thick batter, kind of like a very soft sugar cookie dough.
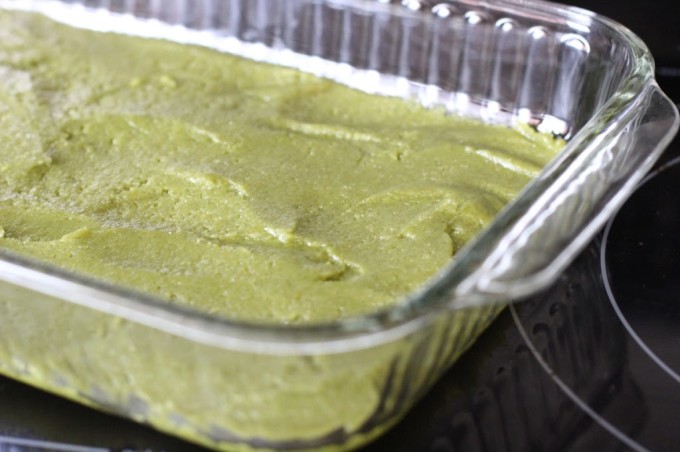
Matcha tea cookies


Press the batter/dough into the baking dish, and smooth it so that it is evenly spread to the corners.

Bake for 18 – 20 minutes, until the edges begin to brown and the center is set. Remove from the oven and cool completely. 


Gooseberry Filling

What you’ll need for the filling:

1 ½ cups gooseberries, defrosted if frozen
2 tablespoons Demerara sugar
¼ cup water

How to make the filling:

Combine all ingredients in a medium sauce pan and bring to a boil. Once the berries have burst and it begins to thicken, remove from the heat. Allow to cool for about 5 minutes.

Transfer to a small food processor, or you can use an immersion blender in the pan. Blend until smooth and no skins can be found.

Transfer back to the sauce pan and continue to cook over medium to medium-high heat until the filling becomes thick and spreadable. Set aside to cool completely.

Use a round cookie cutter to cut the cooled matcha tea cookies, or cut into squares. You will get about 16 (8 cookies) with a 1 ½ inch cutter. You will get more if you choose to make squares.

To assemble, spread a small amount of the filling on one cookie, and top with another just before serving.
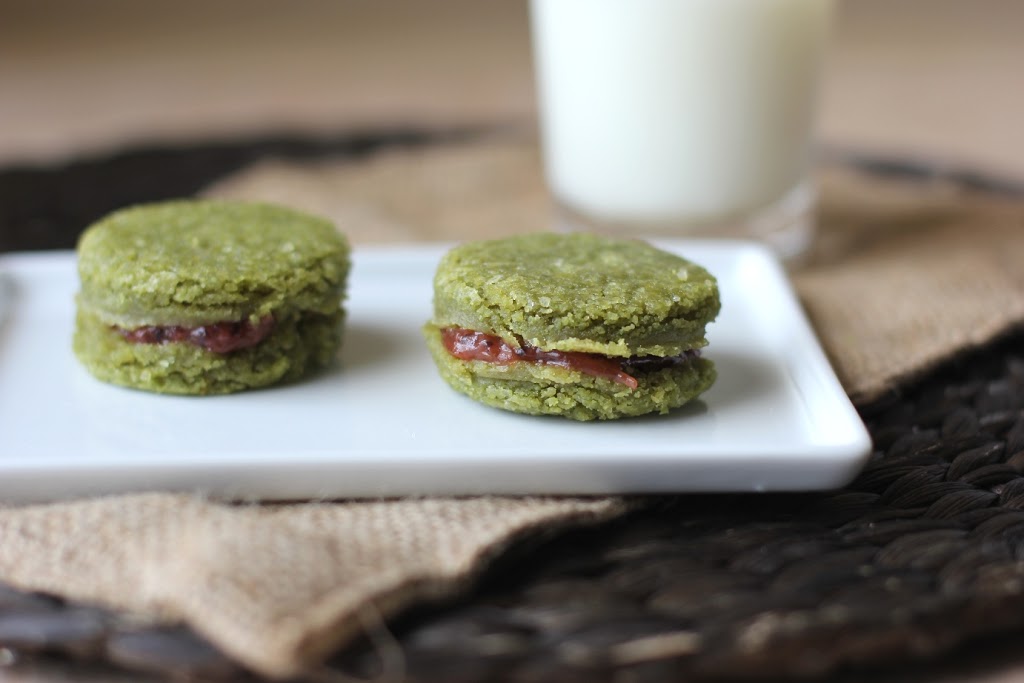
Matcha tea cookies filled with gooseberries recipe | Fake Food Free


Thanks for reading! All images and content are the property of Fake Food Free and Lori Rice unless otherwise stated. Please do not republish full recipes and images without written permission. What is okay? Feel free to Pin images, share links to my posts or share the photo in a round up post with the title of this recipe and a link back to the post. Confused about copyright and food blogs? Here is some helpful information on Recipe Attribution. If you want to use a photo or full recipe, just ask. I’m sure we can work something out.


Disclosure: A free Matcha Tea sample was sent to me by the Matcha Factory. I was not required to post about it and received no compensation for doing so. All thoughts and opinions are my own.

Chocolate Covered Marzipan Cookies

June 10, 2012

These marzipan cookies have a chocolate cookie outside made with raw sugars and whole grain flours that surrounds a generous filling of sweet marzipan.

Chocolate Covered Marzipan Cookies | Fake Food Free  

I love marzipan. And I realize every time I say this that I am often alone. 
 
I know far more people who dislike it, than those who are as crazy about it as I am. But I’m convinced there are others out there, or I wouldn’t be able to find it in chocolates and pastries every time we travel to Europe.
 
It all started during our first trip to Vienna, thanks to Mozart. Apparently it was his favorite, too, so anything that contains marzipan there is often called Mozart.
 
My favorite is the Mozart croissant, and while it isn’t exactly the same, I’m happy that I can find almond croissants here with a similar sweet, nutty filling. 
 
My second favorite are Mozart chocolates, or Mozartkugeln. It’s a marzipan filled chocolate or truffle. Some are a little more complex than others with different colors and even additional layers of chocolate inside. 
 
I think about these treats often so on our last trip to the international market, I finally picked up some marzipan. I thought of making croissants, and then chocolates. I finally ended up going a different direction – cookies.
 
Chocolate Covered Marzipan Cookies | Fake Food Free
 
These simple chocolate cookies have marzipan tucked inside. Anyone who loves it will be pleasantly surprised!
 

Chocolate Covered Marzipan Cookies

Makes: 12 large cookies

Ingredients

1 stick (1/2 cup) unsalted butter, softened
1/3 cup mascavo (muscovado) sugar
1/3 cup raw sugar, plus extra for rolling cookies
1 large egg
1 tsp pure vanilla extract
2 tbsp unsweetened cocoa powder
½ tsp baking soda
¼ tsp salt
1 cup + 2 tbsp white whole wheat flour
~3 oz. marzipan 
 
Prep
 
Preheat the oven to 350 degrees F. 
 
Combine the butter, mascavo sugar and 1/3 cup of the Demerara sugar in the bowl of a mixer fit with the paddle attachment. Cream on medium-high for about 2 minutes. Mix in the egg and the vanilla.
 
Next, add in the cocoa powder, baking soda, salt and flour. Mix on medium, just until all ingredients are combined and a cookie dough forms. Scrape the sides of the bowl as needed. Cover the bowl with plastic wrap and refrigerate the dough while you prepare the marzipan.
 
Divide the marzipan into 12 pieces and roll each into a small ball. Divide the cookie dough into 12 portions and surround each piece of marzipan with cookie dough. Roll the cookie in raw sugar. 
 
Place the cookies on an ungreased baking sheet and flatten slightly. Bake for 10 minutes, remove from the oven, cool for a couple minutes and transfer to a rack to cool completely. 
 
Chocolate Covered Marzipan Cookies | Fake Food Free
 
 Thanks for reading! All images and content are the property of Fake Food Free unless otherwise stated. Please do not republish full recipes and images without written permission. What is okay? Feel free to Pin images, share links to my posts or share the photo in a round up post with the title of this recipe and a link back to the post. Confused about copyright and food blogs? Here is some helpful information on Recipe Attribution. If you want to use a photo or full recipe, just ask. I’m sure we can work something out. 

Strawberry Recipes

May 15, 2012

A past recap of some of my favorite strawberry recipes on Fake Food Free! As I read this, updating this post comes at a good time! Three years later I’m upgrading to another new camera in a few weeks!

You don’t know how dependent you are on something until it breaks down. For most people this is associated with a car or a washing machine, but for the past week and half, for me, it’s been my camera. I didn’t realize that it was possible to miss a camera, but I do now. I can’t count how many times I’ve seen something I want to photograph and then feel cranky when I remember I can’t do so.

Oh, and did I mention I have also realized how much of a photo snob I am now? I could, of course, use the point and shoot, but then I think – nah, it won’t give me the right depth of field or color. Yeah, it’s that bad.

The camera drama started a little over two weeks ago when my Canon Rebel Xsi body died. I made the decision to upgrade to the 60D so quickly, and the trade in went so smoothly that there was barely a hiccup in my posting. Then I started having problems with the autofocus with the new camera. I called Canon for tech help, and back went the camera for an exchange.

Now it’s been a week, and I’m still waiting…

Instead of keeping these pages blank for too long I thought I would recap some of my favorite recipes from the archives. Our strawberry season is coming to a close, but I know for many it is just starting. So here are a few ways we’ve used strawberries around the Fake Food Free kitchen.

Favorite Strawberry Recipes from Fake Food Free

Strawberry Pecan Pancakes

  
Favorite Strawberry Recipes from Fake Food Free
 

Whole Grain Rhubarb Waffles with Strawberry Butter

 
Favorite Strawberry Recipes from Fake Food Free
 

Strawberry Rhubarb Bread

 
Favorite Strawberry Recipes from Fake Food Free
 

Spring Garden Cobb Salad 

 
Favorite Strawberry Recipes from Fake Food Free 

Easy Fresh Strawberry Ice Cream

 
Favorite Strawberry Recipes from Fake Food Free

Strawberry Rosemary Shortbread


Thanks for reading! All images and content are the property of Fake Food Free unless otherwise stated. Please do not republish full recipes and images without written permission. What is okay? Feel free to Pin images, share links to my posts or share the photo in a round up post with the title of this recipe and a link back to the post. Confused about copyright and food blogs? Here is some helpful information on Recipe Attribution. If you want to use a photo or full recipe, just ask. I’m sure we can work something out.  

Coconut Milk Flap Jacks: CakeLove in the Morning

April 18, 2012

I appreciate a big breakfast. 
I didn’t realize exactly how much until a few months into our time living abroad. I knew that not every country celebrated the morning meal the way we do in the U.S., or in countries such as Ireland or the U.K.  But I was taken aback by the confused looks I got when describing pancakes, omelets, bacon, biscuits, and grits to our new friends. 
Brazil is a bread or pastry and coffee culture when it comes to breakfast. In many ways, I guess we are around here too, except for the weekends. Oh the weekends! Or rather, the weekend breakfast!
So when I get a cookbook that highlights this meal you can imagine my excitement. This time it was CakeLove in the Morning by Warren Brown.
Cake? In the morning? I’m in!
I’ll admit when I first looked through this cookbook, I thought it might be best for a beginner in the kitchen. With recipes such asApple-Cranberry Oatmeal and Zucchini Bread, it provides excellent instruction for the basics.
But then I took a closer look. 
I’ve reviewed one of Warren Brown’s cookbooks before and I used to watch his show on the Food Network. While I remembered that he is a lawyer turned baker, it had escaped me that he has a degree in public health and practiced health care law. 
My point? Upon my closer look at the book, his background in health is evident. 
His recipes have a delightful combination of healthy, whole ingredients from buckwheat flour to yams, and I was even introduced to a new oil that I have yet to explore, rice bran oil. This book would be perfect for health-minded beginners, but it has plenty to keep those of us who cook a bit more interested as well.
Aside from baked goods such as White Chocolate Waffles and Chocolate Chip Bacon Pancakes, there are several savory breakfast recipes, and condiments to go with it all – Dairy-free Butternut Squash Frittata, Breakfast Lasagna (I know! Isn’t that a great idea?), Jalapeno Honey Butter. And you can’t forget cake in the title; there are a few of those too. 
I went with a traditional favorite that had an interesting twist – Coconut Milk Flap Jacks. This whole grain recipe uses whole wheat and buckwheat flours, oats, honey and, of course, coconut milk. 
I am no expert pancake maker, and these turned out beautifully. They were light and fluffy despite the hearty grains. I agree with the recipe description that the pancakes bring the flavor of the Caribbean. That’s why I added a little mango on the side!
This one is perfect for Mother’s Day brunch, and you can serve them with the cookbook on the side because it would make a great gift.

Coconut Milk Flap Jacks

From Cake Love in the Morning by Warren Brown, reprinted with permission for Abrams Books
Serves: 4
1 cup (about 6 ounces) banana, mashed
1 cup coconut milk (or milk)
1 egg
2 tablespoons fresh lemon juice
2 teaspoons honey
1 teaspoon vanilla extract
1 cup whole-wheat flour
¼ cup whole rolled oats
2 tablespoons buckwheat flour
1 tablespoon superfine sugar
1 ½ teaspoons baking powder
½ teaspoon baking soda
¼ teaspoon salt
1 tablespoon butter or vegetable oil
Cinnamon and Allspice to sprinkle
Preheat the oven to 275 degrees F to keep the finished pancakes warm.
Combine the banana in a medium bowl with the coconut milk, egg, lemon juice, honey, and vanilla extract. Set aside for 5 minutes.
In a large bowl, whisk to combine the whole-wheat flour, oats, buckwheat flour, sugar, baking powder, baking soda, and salt.
Gently fold the liquid ingredients into the flour mixture, but don’t fully combine. Let the batter rest for 10 minutes to soften the oats.
Meanwhile, heat a large skillet or griddle over medium heat. When the surface is hot, add the butter or vegetable oil and spread it out.
Using a ¼-cup measure, drop 4 to 6 pancakes into the pan. Flip when bubbles appear, after about 3 to 4 minutes. 
Cook for another minute, then remove the pancakes to a heat-resistant plate in the warmed oven.
Sprinkle with a dusting of cinnamon and allspice and serve with warmed maple syrup. 

Disclosure:  A review copy of this book was sent to me by Abrams Books. I was not required to post about it and received no compensation for doing so. I only review books and products that I enjoy enough to have in my own kitchen.  

Lemon Sugar Cookies

April 7, 2012

Happy Easter!

I hope this weekend is full celebration for you and your family.

If you are in need of a last minute dessert, I highly recommend these Lemon Sugar Cookies from Two Peas & Their Pod. As with all of Maria’s recipes, they are outstanding! Sweet, chewy, and full of lemon flavor.

Mine look a bit like Snickerdoodles, I know. This is because all I had on hand was Demerara (raw) sugar. The good news is, they turn out great with the substitution!

Pie It Forward: Chocolate Fleur de Sel Caramel Tart

March 20, 2012

I vaguely remember writing about reducing added sugar a few posts ago.

Then this arrived in my mailbox.

Pie It Forward by Gesine Bullock-Prado is the perfect reason to put your sugar sacrifice on hold, at least for one dessert.
Before opening the cover of this book I should warn you that if your perception of pie is two pieces of buttery crust filled with fruit or cream prepare to broaden your horizons. Among the classic apple and berry, cookie-crusted tarts and puff pastries proudly claim their pie identity.
I am a work in progress when it comes to baking so I have no doubt that the first few chapters of this cookbook are meant for me. The dos, don’ts, and most importantly, the whys of pie making are well explained. It’s the why that I need. The “we do this so it doesn’t do that” is the kind of logic I need to better myself in any culinary undertaking, and this book has it.
It also has beautiful food photos by Tina Rupp, and recipes such as Chocolate Stout Pudding Pie, Yuzu-Ginger Rice Pudding Meringue Pie, and Gooseberry Fool Tartlets. And for all of you out there who have somehow escaped the burden of a sweet tooth, there is a section devoted to savory pies as well.

For better or worse, I was drawn to the Chocolate Fleur de Sel Caramel Tart. I say worse because it took me two tries to get a presentable dessert. First, the sides of the tart fell, second I burned the caramel.

In my defense I did rock the truffles. Oh, did I mention there are chocolate truffles on the top? Yes, just when you think caramel in a chocolate crust couldn’t get any better, along comes a truffle.

I’m still a work in progress, but I did close this adventure with a delicious, albeit slightly modified version, of this brilliant tart. The main differences you’ll see between mine and the gorgeous photo in the book is a darker caramel (I came a mere fraction of a degree from a second burning), and I had an 11-inch tart pan instead of the 8-inch the recipe calls for. Don’t be discouraged if your access to tart pans is as limited as mine, you can still make this dessert, as well as several other tasty recipes, in this book.
I probably don’t need to tell you that the combination of a chocolate cookie crust with a hint of coffee tastes amazing with a caramel filling. Or that the added bonus of a truffle on top will fulfill any chocolate craving to come your way.
Anyone attending a potluck or party with me in 2012 should most definitely expect pie. I’ve only got one recipe down, and there are so many more to go!

Chocolate Fleur de Sel Caramel Tart
From Pie It Forward by Gesine Bullock-Prado. Reprinted with permission from Abram Books

This is a sophisticated candy bar wrapped up in tart’s clothing. It features caramel that leaves ropy tendrils behind after you’ve taken a bite. And while you can use a fork, I have to tell you it’s so much easier to pick up your slice to convey it to your mandibles.

MAKES 1
(8-inch/20-cm) tart

For the crust

Chocolate Cookie Tart Crust (recipe below)  1/2 batch

Soft Caramel Filling (recipe below) 1 batch

For the truffles

heavy cream ¾ cup; 177 ml
unsalted butter 2 tablespoons; 28 g
salt pinch
corn syrup (optional) 1 tablespoon; 15 ml
bittersweet chocolate, finely chopped 8 ounces; 225 g
cocoa powder 1/4 cup; 20 g

For the assembly

large-grain fleur de sel (sea salt) 1/2 teaspoon; 2.5 g

Procedure for the crust

1. Preheat the oven to 350 degrees F (175 degrees C). Line an 8-inch (20-cm) tart pan with
the dough. Dock and freeze it for 20 minutes. Line the crust with parchment, fill it with pie weights, and bake it for 15 minutes. Remove the pie weights and parchment and bake the crust for 15 minutes more, or until
the bottom is golden brown and baked through. Allow it to cool.

2. Prepare the caramel filling as instructed on page 36 and pour it into the cooled crust. Refrigerate until firm, about 2 hours.

Procedure for the truffles

1. In a small, heavy saucepan, simmer together the cream, butter, salt, and corn syrup, if using, making sure the butter melts completely. Take the pan from the heat and add the chocolate. Allow it to sit for a few minutes undisturbed, then whisk the mixture until the glaze emulsifies and all the chocolate melts. Cover and refrigerate until set, about 1 hour.

2. Using a melon scoop, a teaspoon-sized cookie scoop, or a teaspoon, form small rounds of ganache and roll them into balls with your hands. Roll the truffles in cocoa powder to coat them evenly.

Assembly

1. Place the truffles around the perimeter of the tart, sprinkle fleur de sel over all, and serve at room temperature.

Chocolate Cookie Tart Crust

This is a scrumptious and elegant chocolate tart dough. The key is using the right cocoa powder. You can’t go with your grocery-store variety of anemic cocoa. No, sir. I’ll know if you use it, too. You must use a high-quality, very dark cocoa: Cacao Barry or Valrhona are excellent choices. For this one, I use Cacao Barry Extra Brute. You’ll thank me later.

Makes enough dough for 2 (8-inch/20-cm) tarts,
8 (4-inch/10-cm) tarts, or 16 mini tarts

eggs 2
sweetened condensed milk  2 tablespoons; 30 ml
brewed coffee, cooled   2 tablespoons; 30 ml
all-purpose flour, cold 1 1/2 cups; 185 g
cocoa powder 1/2 cup; 40 g
sugar 3/4 cup; 150 g
instant espresso powder 1 tablespoon; 3 g
salt 1 teaspoon; 6 g
unsalted butter, cut into small pieces and chilled ¾ cup; 180 g

1. In a small bowl, whisk together the eggs, condensed milk, and coffee.

2. In the bowl of a food processor fitted with the blade attachment, pulse together the flour, cocoa, sugar,
espresso powder (if using), and salt.

3. Add the butter and pulse until the mixture resembles course cornmeal. While pulsing, add the liquid ingredients, and continue until the dough just holds together when you press it with your fingers.

4. Turn the dough out onto a large piece of plastic wrap. Form it into a flat disk, cover it completely with the plastic wrap, and refrigerate it for at least 30 minutes.

Soft Caramel Filling

Makes approximately 2 cups (480 ml)

sugar 1 cup; 200 g
corn syrup 1/4 cup; 60 ml
salt 1 teaspoon; 6 g
unsalted butter 2 tablespoons; 28 g

heavy cream ⅓ cup; 75 ml
vanilla bean paste 1 teaspoon; 5 ml

1. In a large, heavy saucepan, combine the sugar, ⅓ cup (75 ml) water, the corn syrup, and salt and cook, stirring, over medium-low heat until the sugar has melted.

2. Brush down the sides of the pan with a damp pastry brush to eradicate any errant sugar crystals.

3. Stop stirring, increase the heat to medium-high, and clip on a candy thermometer. Heat the sugar syrup to
245 degrees F (120 degrees C).

4. Once the syrup has reached temperature, take the pan off the heat and carefully add the butter and cream. The mixture will bubble vigorously at first. Stand back and let the hot sugar do its molten dance. When the syrup has calmed, stir until the butter has completely melted. Add the vanilla and stir again. Pour the caramel immediately into your pastry vessel (or other vessel) of choice and allow it to cool and set completely, 1 to 2 hours.

Pie It Forward day was 3/14, but you can still download Gesine’s Wild Blueberry Pie recipe and watch the video to get a few inside tips!

Want to create beautiful food and product photos that you can't wait to share?!
Discover your style, control the light, and shoot using the tool you know how to use (yes, your phone included). Learn about free resources, Live Q&As with Lori, and online courses you can take from anywhere in the world!
We respect your privacy. Unsubscribe at any time.