Browsing Category

Seasonal

Black Rice and Sausage Stuffed Patty Pan Squash Recipe

August 8, 2012

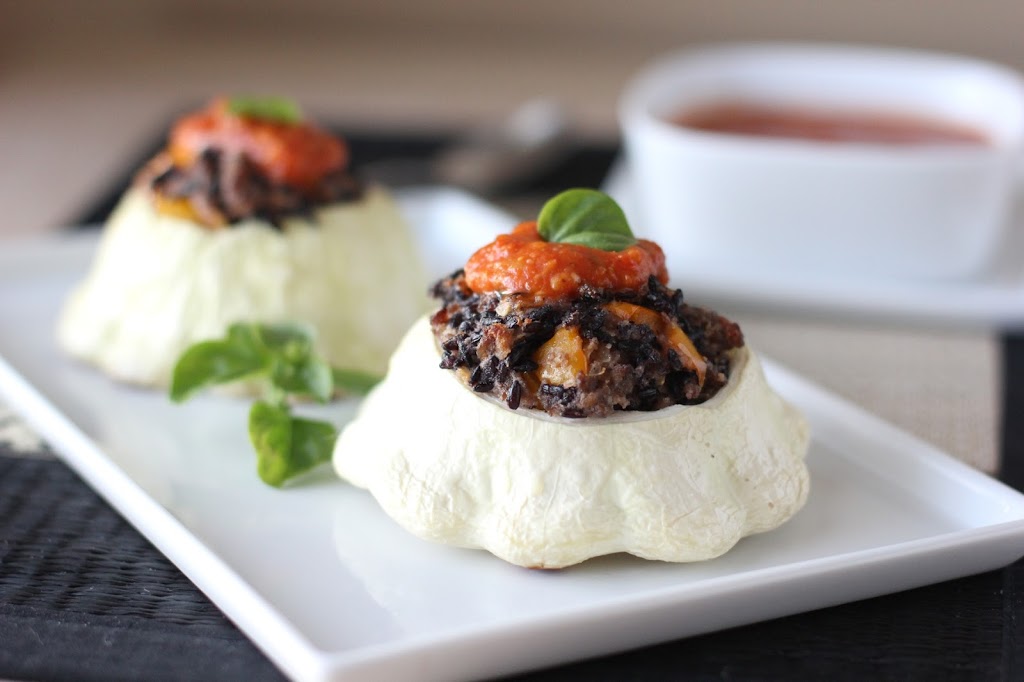
I was so happy when we were finally able to grow squash in our own garden. I love stuffed patty pan squash! This squash filled with zesty sausage and nutty black rice has been a favorite since I first made it in 2012.

Black Rice and Sausage Stuffed Patty Pan Squash Recipe | Fake Food Free

I love that I made the decision to start a food blog a little over four years ago. But I’m not the only one that will tell you – the fun has a way of fading to stress from time to time. Pressures of creativity, uniqueness, pretty pictures, and “what if they don’t like me?” can rear their ugly heads.

These are the times when you have to remember that, while we would all like to be wildly successful, it’s important not to lose yourself along the way. This is supposed to be a happy place!

When I stop worrying about numbers and return to why I started blogging, I realize that these are the posts that are visited the most often on my site. I love how this changes from season to season. It reminds me that, yeah, the post I did two years ago does have some value.

Right now the top post on my blog is Patty Pan Squash Stuffed with Basil Orzo. I made it a few years ago after first discovering this veggie. Everyone seems to want advice for how to tackle patty pan’s pretty, yet hard to handle, shape in the kitchen.

 
Black Rice and Sausage Stuffed Patty Pan Squash Recipe | Fake Food Free


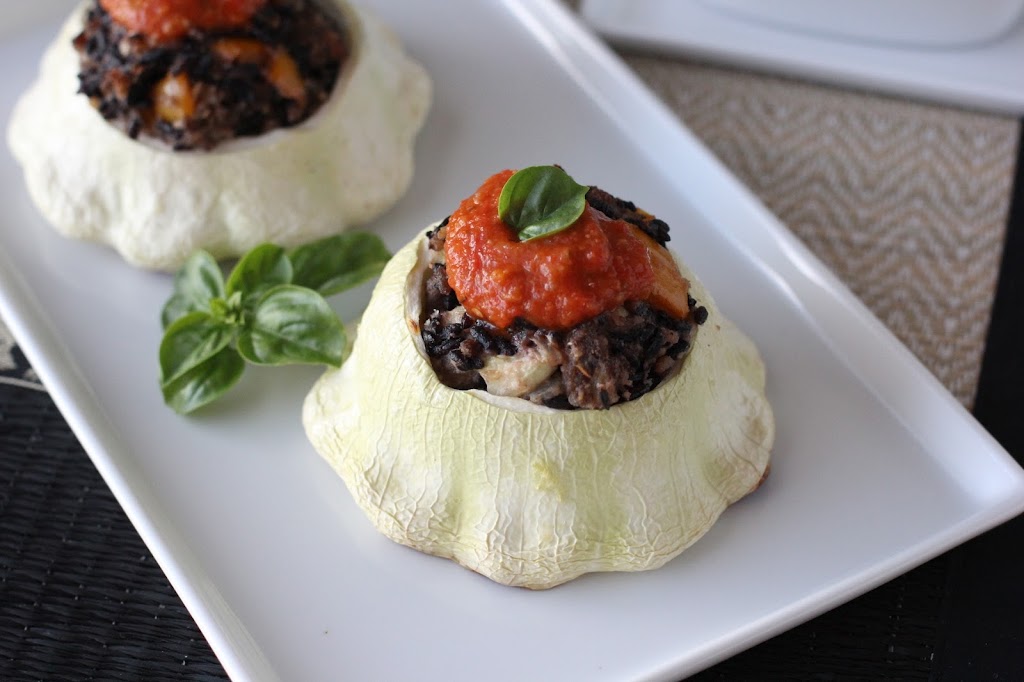
I’ve felt challenged to come up with a new stuffing since I made that first patty pan, but here we finally have it. A bonus this time is that the squash came straight from the garden!

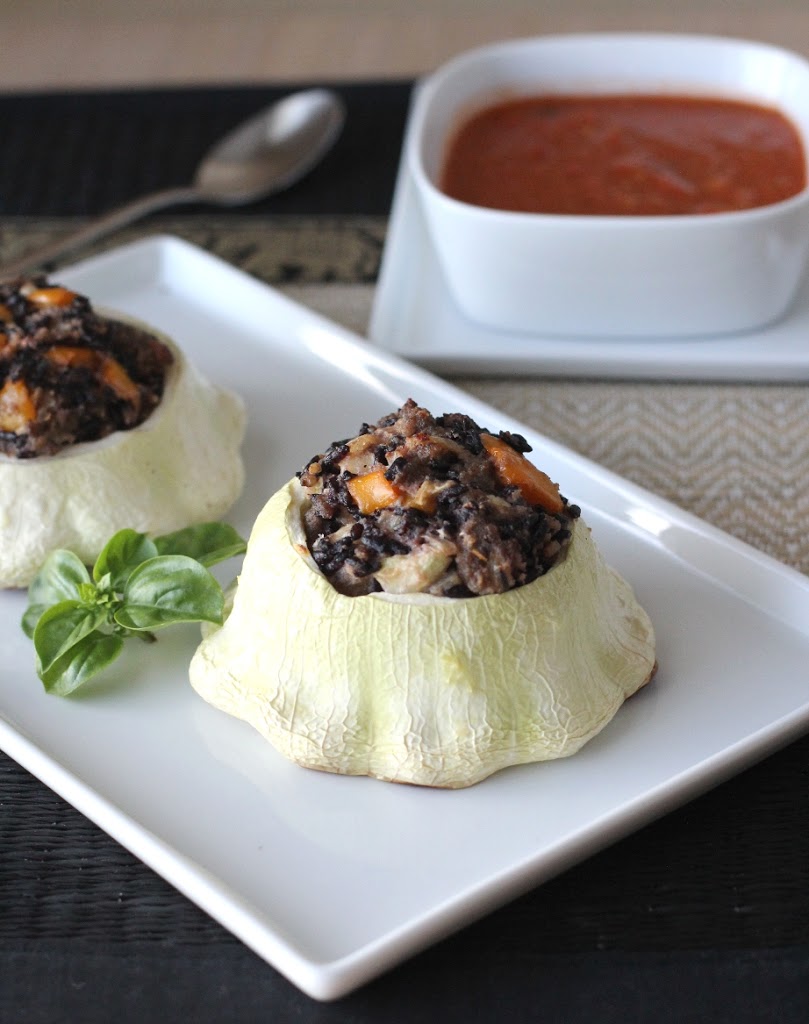
I’m continuing the recent trend of using black rice, but with pastured heritage breed sausage, this recipe doesn’t leave out the meat-lovers.

It’s tasty on it’s own, but if you have some warm marinara on hand to spoon on top, it’s even better!

Black Rice and Sausage Stuffed Patty Pan Squash Recipe
Serves: 4 to 6
Write a review
Print
Ingredients
  1. 4 to 6 patty pan squash
  2. Extra virgin olive oil
  3. 1/2 lb. ground pastured pork sausage
  4. 2 yellow bell peppers, chopped
  5. 1/2 large onion, chopped
  6. 1 1/2 cups cooked black rice
  7. 1/4 cup Panko bread crumbs
  8. 3/4 cup ricotta cheese
  9. 1/2 teaspoon fine ground sea salt, or to taste
  10. 1/4 teaspoon ground black pepper, or to taste
  11. Marinara for topping (optional)
Instructions
  1. Preheat the oven to 400 degrees F. Grease a 9 x 13 inch baking dish lightly with olive oil.
  2. The recipe will fill 6 small squash or 4 larger squash. Wash the squash. Slice off the top on the stem side, and using a spoon, gently scoop out the insides. Don't scoop all the way through the bottom. You want to create a cup to hold the filling. Chop up the squash you scooped out and set it aside.
  3. Lightly coat the squash cups in olive oil and pierce with a fork in a few spots. Bake the squash for about 15 minutes, until they begin to soften. Remove from the oven and set aside.
  4. In a large skillet, brown the sausage over medium-high heat about 5 minutes. Add the bell peppers, onion and the chopped squash you scooped out. Cook until the sausage is no longer pink, 3 to 5 more minutes.
  5. Stir in the rice, bread crumbs and ricotta into the sausage. Add the salt and pepper. You can taste the filling at this point and add more salt and pepper, if you'd like.
  6. Once the filling is cool enough to handle, divide it evenly into each squash. Pile it high and press gently with a spoon so that it is packed in.
  7. Bake for 20 more minutes, or until the squash is tender when pierced with a fork. Top with marinara before serving, if desired.
Fake Food Free https://www.fakefoodfree.com/


Black Rice and Sausage Stuffed Patty Pan Squash Recipe | Fake Food Free


Thanks for reading! All images and content are the property of Fake Food Free unless otherwise stated. Please do not republish full recipes and images without written permission. What is okay? Feel free to Pin images, share links to my posts or share the photo in a round up post with the title of this recipe and a link back to the post. Confused about copyright and food blogs? Here is some helpful information on Recipe Attribution. If you want to use a photo or full recipe, just ask. I’m sure we can work something out.  

Coconut Zucchini Pumpkin Pancake Recipe

July 29, 2012
Zucchini in the garden; pumpkin in the freezer.
 
That’s the current situation at our house.

I went a little crazy with the pumpkin purchases last fall, and now the frozen puree is waiting to be used. With all the tomatoes, peppers and summer squash going wild in the garden, the pumpkin needs to move over so we can create more room in the freezer.

Summer squash and winter squash? It can work, and these pancakes are proved it to me. They are soft and tender with just a hint of that fall flavor that will be in full swing in a few months. 


They just happened to end up being vegan if that is your thing, but my husband kindly pointed out that the bacon I served with ours was not. I do like mine with bacon.

And I definitely think these count as having vegetables for breakfast!

 
Coconut Zucchini Pumpkin Pancakes
Yields 10
Write a review
Print
Ingredients
  1. 3/4 cup coconut milk
  2. 3/4 cup pumpkin puree (*very thin)
  3. 1/2 cup shredded zucchini
  4. 3 tsp baking powder
  5. 1/4 tsp salt
  6. 2 tbsp mascavo sugar
  7. 1/8 tsp ground ginger
  8. 1/4 tsp cinnamon
  9. 1 cup white whole wheat flour
  10. Toasted, unsweetened coconut for serving
Instructions
  1. In a medium sized mixing bowl, stir together the coconut milk and pumpkin. Add the zucchini.
  2. Next stir in the baking powder, salt, sugar, ginger and cinnamon. Fold in the flour just until all ingredients are combined.
  3. Pour 3 to 4 tablespoons of batter onto a heated non-stick griddle for each pancake. Cook pancakes 1-2 minutes on each side, or until lightly browned and cooked through. Garnish with toasted coconut before serving.
Notes
  1. *I used fresh pumpkin puree from previously frozen so my puree was very thin. If you are using a thicker puree, or a different type of flour, you made need to adjust things to reach the right pancake batter consistency.
Fake Food Free https://www.fakefoodfree.com/


Matcha Tea Cookies with Gooseberry Filling

July 10, 2012

These matcha tea cookies with gooseberry are filled with a tangy spread made of the fruit! The sandwich cookies combine two unexpected flavors that are delicious together!

Matcha Tea Cookies with Gooseberry Filling Recipe | Fake Food Free

The first time I had green tea in sweets was during our trip to Hong Kong a few years ago. We loved the fast-paced, cafeteria-like bakeries we found on almost every corner. During one quick stop, I picked up a green tea cake with red bean filling, and loved it.

Matcha Cake filled with Red Bean from Chinese Bakeries in Hong Kong. The inspiration for match tea cookies with gooseberry filling. | Fake Food Free


If you do a search for matcha green tea there is no shortage of sweets and bakery creations on food blogs. I’m actually a bit late to the party, but for good reason. I had a difficult time finding the powder around here. I tried to find it when I made the Green Tea Bubble Tea last year without success.

Now I know why.

Since my first experience with green tea baked goods was in Hong Kong, I was associating it with the wrong culture (shame on me). When Matcha Factory contacted me to offer a sample, I learned a thing or two, most importantly that matcha green tea is of Japanese origin.

I’d wanted to bake with it for a while so I gladly took them up on the offer. Matcha tea is ground, shade grown, steamed tea leaves. It’s full of antioxidants, and like most other Asian ingredients, it boasts a variety of health benefits. If that isn’t enough, it also turns everything it contacts into a beautiful shade of green. I definitely need more of this in my kitchen.

When it came to bake goods, just about every idea I had for the matcha tea had been done before, and done well. I first set out with the idea of a tea cake. I wanted to use some of this year’s gooseberries sent from my parents.

I posted about gooseberries last year. If you are unfamiliar it is a small round fruit with an internal texture of a blueberry, but a skin more like a grape. They are tart, and great for a something a little different in baked goods.

My cakes are more like a rich, sweet, chewy cookie, and I’m not complaining. The tart gooseberry filling turned out to be perfect for them. 

Matcha Tea Cookies with Gooseberry Filling Recipe on Fake Food Free


Cookies or cakes, I’m sold on adding matcha tea to baked goods. I loved some of the recipes I found on the company’s website such as the Matcha Butter and Matcha Salt. Next up I’m going to use it in a morning shake or maybe a latte.

Matcha Tea Cookies with Gooseberry Filling

Makes: 8 sandwich cookies

What you’ll need for the cookies:
1 1/3 cups Demerara sugar
¾ cup (1 ½ sticks) unsalted butter, melted
1 large egg
½ teaspoon almond extract
1 1/3 cup unbleached all-purpose flour
½ teaspoon baking powder
¼ teaspoon salt
1 teaspoon matcha green tea powder

How to make the cookies:

Preheat the oven to 350 degrees F, and lightly grease a 9 x 13 in baking dish.

In a mixing bowl, whisk together the sugar and melted butter, until combined. Next, whisk in the egg until incorporated and add the almond extract. In a separate bowl, whisk together the flour, baking powder, salt and matcha tea.

Add the dry ingredients to the wet ingredients, and stir until all is combined. You will end up with a thick batter, kind of like a very soft sugar cookie dough.

Matcha tea cookies


Press the batter/dough into the baking dish, and smooth it so that it is evenly spread to the corners.

Bake for 18 – 20 minutes, until the edges begin to brown and the center is set. Remove from the oven and cool completely. 


Gooseberry Filling

What you’ll need for the filling:

1 ½ cups gooseberries, defrosted if frozen
2 tablespoons Demerara sugar
¼ cup water

How to make the filling:

Combine all ingredients in a medium sauce pan and bring to a boil. Once the berries have burst and it begins to thicken, remove from the heat. Allow to cool for about 5 minutes.

Transfer to a small food processor, or you can use an immersion blender in the pan. Blend until smooth and no skins can be found.

Transfer back to the sauce pan and continue to cook over medium to medium-high heat until the filling becomes thick and spreadable. Set aside to cool completely.

Use a round cookie cutter to cut the cooled matcha tea cookies, or cut into squares. You will get about 16 (8 cookies) with a 1 ½ inch cutter. You will get more if you choose to make squares.

To assemble, spread a small amount of the filling on one cookie, and top with another just before serving.

Matcha tea cookies filled with gooseberries recipe | Fake Food Free


Thanks for reading! All images and content are the property of Fake Food Free and Lori Rice unless otherwise stated. Please do not republish full recipes and images without written permission. What is okay? Feel free to Pin images, share links to my posts or share the photo in a round up post with the title of this recipe and a link back to the post. Confused about copyright and food blogs? Here is some helpful information on Recipe Attribution. If you want to use a photo or full recipe, just ask. I’m sure we can work something out.


Disclosure: A free Matcha Tea sample was sent to me by the Matcha Factory. I was not required to post about it and received no compensation for doing so. All thoughts and opinions are my own.

Salad with Grilled Zucchini and Blackberry Balsamic Dressing Recipe

July 7, 2012

Salad with Grilled Zucchini and Blackberry Balsamic Dressing Recipe | Fake Food Free


If you’ve spent any time at all near a summer squash plant, you know how it goes. One minute you see a tiny little zucchini growing; a day later you have a squash as big as your arm.

Those huge zucchinis always went into bread at our house so I made some zucchini muffins last week. Unfortunately, that only used up ½ of the monster.  Instead of more baked goods, I decided to take the rest to the grill for zucchini steaks.

With summer zucchini always comes blackberries so a blackberry dressing sounded perfect. This dressing drizzled on a salad with a couple zucchini steaks and few extras made a great summer meal.

Blackberry Balsamic Dressing Recipe for Salad with Grilled Zucchini | Fake Food Free


Salad with Grilled Zucchini and Blackberry Balsamic Dressing

Makes:  4 servings

What you’ll need:

Zucchini Steaks
8 – 1 ½ inch thick slices zucchini
2 teaspoons olive oil
1 teaspoons balsamic vinegar
Salt and pepper to taste

Blackberry Balsamic Dressing
½ cup blackberries, defrosted if frozen
5 fresh rosemary leaves
2 tablespoons balsamic vinegar
½ cup extra virgin olive oil
1 teaspoons sugar
¼ teaspoons salt
1/8 teaspoons black pepper

Salad
8 cups greens (I used romaine, cabbage and spinach)
4 oz. blue cheese, crumbled
4 tablespoons sunflower seeds

How to make it:

Place the zucchini slices in a shallow dish and drizzle with the olive oil and balsamic vinegar, and sprinkle with salt and pepper. Coat each piece and set aside to marinade while you prepare the dressing and salad.
In a small food processor, combine all of the dressing ingredients and pulse until it is smooth. If using fresh berries you may need to add 1-2 tablespoons of water. Makes about ½ cup of dressing. Set aside.
Prepare four plates with 2 cups of greens, 1 ounce of blue cheese and 1 tablespoon of sunflower seeds. Set aside.

Preheat the grill or a grill pan on the stove. Place the zucchini slices on the grill and cook on medium-high for 3 to 4 minutes on each side.

Place two zucchini steaks on each salad and drizzle with dressing.

Salad with Grilled Zucchini. A great vegetarian summer meal! | Fake Food Free


Thanks for reading! All images and content are the property of Fake Food Free and Lori Rice unless otherwise stated. Please do not republish full recipes and images without written permission. What is okay? Feel free to Pin images, share links to my posts or share the photo in a round up post with the title of this recipe and a link back to the post. Confused about copyright and food blogs? Here is some helpful information on Recipe Attribution. If you want to use a photo or full recipe, just ask. I’m sure we can work something out.


Blue and White Potato Gnocchi with Fresh Red Tomato Sauce Recipe

July 2, 2012

This homemade potato gnocchi with fresh tomato sauce is made with blue and white potatoes for a patriotic 4th of July meal!

Blue and White Potato Gnocchi with Fresh Red Tomato Sauce Recipe | Fake Food Free
 
As I’ve shared before, this year our garden produced an abundance of Adirondack Blue potatoes. I can’t get enough of them! They are such a fun ingredient to experiment with in the kitchen. As you can imagine, with blue potatoes on hand, I thought it appropriate to create some type of patriotic dish for the 4th of July holiday.
 
Yes, I know they look purple, but bear with me here. It has been a long time since I’ve made gnocchi, but that was the first thing that came to mind when I wanted to get creative with the blue potatoes. Paired with the white potatoes my parents brought me from their garden last weekend, and a few surprise tomatoes that arrived in the garden, I had the makings of a red, white and blue creation. Even if the blue potatoes came out a wee bit purple in the end. 
 
Gnocchi is more of a comfort dish; one that doesn’t sound all that appealing in record high temperatures. For that reason, I kept the tomato sauce raw and fresh. The basil gives the dish a refreshing quality that makes it perfectly acceptable for summer.
 
Blue and White Potato Gnocchi with Fresh Red Tomato Sauce Recipe | Fake Food Free
 
 
Blue and White Potato Gnocchi with Fresh Red Tomato Sauce
Makes: 4 to 6 servings
Write a review
Print
Fresh Red Tomato Sauce
  1. 4 medium tomatoes, cored and diced
  2. ¼ large white onion, minced
  3. 20 – 30 fresh basil leaves, chopped
  4. 2 teaspoons balsamic vinegar
  5. 2 tablespoons extra virgin olive oil
  6. 1 teaspoon salt
  7. 2 tablespoons freshly grated Parmesan, plus more for garnish
Potato Gnocchi
  1. 1 lb. blue potatoes, baked
  2. 1 lb. white potatoes, baked
  3. 1 cup unbleached all-purpose flour
  4. 1 teaspoon salt
  5. 1 teaspoon dried parsley
  6. Olive oil
Instructions
  1. Fill a large soup pot with water, about ¾ of the way full. Bring to a boil as you make the tomato sauce.
  2. In a bowl, combine the tomato, onion and basil. Add the balsamic vinegar, olive oil, salt and Parmesan. Toss to mix the ingredients and set aside.
  3. Place the flesh of the white potatoes and the blue potatoes in separate medium-sized bowls. Mash the potatoes until smooth and no clumps are present. Often gnocchi calls for sending the potatoes through a potato ricer. I don't have one, so I do my best to mash the potatoes well with a hand-held masher or a fork. If you have a potato ricer, feel free to use it.
  4. Next, add ½ cup flour to each bowl of potatoes. Then add ½ teaspoon of salt to each, and a ½ teaspoon of parsley. First take the blue potato mixture and combine the flour and potato by hand. Once it holds together, turn out onto the counter and knead as you would bread dough, until a smooth ball is formed.
  5. Roll the potato dough into a thin log. You may need to do this in 2 to 3 batches. Use a knife or dough cutter to cut the log into small ¼ inch pieces. You can leave the pieces as they are, or roll them gently with a fork to create ridges. Place the gnocchi on a plate or baking sheet.
  6. Set aside the blue potato gnocchi and repeat the process with the white potato gnocchi.
  7. Prepare a place for the cooked gnocchi by drizzling about 1 tablespoon of olive oil in a medium-sized bowl.
  8. Once the water comes to a boil, sprinkle in some salt, about a 1/2 teaspoon. Add the blue potato gnocchi to the boiling water in 3 separate batches. Allow it to boil until it floats, about 45 to 60 seconds. Remove from the water with a slotted spoon and place it in the bowl with olive oil. Repeat with the remaining blue potato gnocchi and then the white potato gnocchi. Toss the cooked gnocchi gently in the the olive oil.
  9. Divide the gnocchi into 4 to 6 portions. Top with the fresh tomato sauce, and garnish with freshly grated Parmesan.
Fake Food Free https://www.fakefoodfree.com/


Blue and White Potato Gnocchi with Fresh Red Tomato Sauce Recipe | Fake Food Free


Happy 4th of July to all my readers in the U.S!
 
Thanks for reading! All images and content are the property of Fake Food Free unless otherwise stated. Please do not republish full recipes and images without written permission. What is okay? Feel free to Pin images, share links to my posts or share the photo in a round up post with the title of this recipe and a link back to the post. Confused about copyright and food blogs? Here is some helpful information on Recipe Attribution. If you want to use a photo or full recipe, just ask. I’m sure we can work something out.  

Spicy Sesame Cucumber Salad Recipe

June 30, 2012
Spicy Sesame Cucumber Salad Recipe | Fake Food Free
We planted our cucumbers late this year. The blooms have started and the plants are coming along nicely, but I’m still a bit envious of the mountains of cucumbers I’m seeing from other gardens.
 
Cucumber Bloom | Fake Food Free


I’ve been practicing patience and it was rewarded last weekend when my parents brought me a few from their garden. I’ve wanted to make Wasabi Cucumber Sesame Salad from She Wears Many Hats for a while. But with no wasabi in the house, I had to use it for inspiration and save the recreation for when our cucumbers arrive. 
 
I went with my favorite chili sauce – Sriracha. These cucumbers have just the right amount of heat, but I will warn you, leave them in the fridge a couple days and the fire begins to build!
 

Spicy Sesame Cucumber Salad

Adapted from Wasabi Cucumber Sesame Salad from She Wears Many Hats
 
3 medium pickling cucumbers, thinly sliced
½ tsp salt
1 tbsp Sriracha Chili Sauce
½ tbsp dark sesame oil
2 tbsp white vinegar
1 tsp sugar
Black sesame seeds for garnish
 
Place the thinly sliced cucumbers in a colander and sprinkle with salt. Allow to drain in the sink or over a bowl while you prepare the dressing.
 
In a small dish, whisk together the Sriracha, sesame oil, vinegar and sugar. Transfer the drained cucumbers to a bowl and pour in the dressing. Toss to coat. You can salt and pepper to taste, but I found I didn’t need to add any more salt. Garnish with the black sesame seeds. Serves about 6. 
 
Spicy Sesame Cucumber Salad Recipe | Fake Food Free


Blue Potato Salad with Lemon Basil Vinaigrette Recipe

June 26, 2012
My favorite thing that I’ve grown in our garden is the Adirondack Blue Potato. These potatoes have a pleasant texture, and they add a pop of color to summer side dishes. 
 
Blue Potato Salad with Lemon Basil Vinaigrette Recipe | Fake Food Free
 
In the spring I started a search for a variety of the blue potato. I didn’t want them to eat, but to plant in our garden this year. I finally learned about the Adirondack Blue, but every corner I turned I found that they were sold out.
 
Then I was surprised at Easter by my parents – Adirondack Blue potato seed from Wood Prairie Farm in Maine!
 
So we went from this:
 
Adirondack Blue Potatoes 
 
To this (they look purple on the inside, but they go by the name blue):
 
Adirondack Blue Potatoes before planting
 
 
And then lots of excitement when we saw this:
 
Adirondack Blue Potatoes sprouted in the garden 
 
Followed by this:
 
Adirondack Blue Potatoes bloom before harvest 
 
And this week, we finally got this – almost 15 pounds!
 
Adirondack Blue Potatoes Harvest 
 
 
Adirondack Blue Potatoes 
With blue potatoes on my hands I’m now challenged to come up with a few recipes that show off their beautiful color. We’ll start with a potato salad.
 
The flavor of the blue potato doesn’t really stand out, but they do have a very smooth texture. When cooked until soft (but still firm enough to hold their shape) they are perfect for potato salad.
 
Now the question is – if you put this on your picnic table would people be adventurous enough to eat it?!
 
Blue Potato Salad with Lemon Basil Vinaigrette Recipe. A great summer side dish. 

Blue Potato Salad with Lemon Basil Vinaigrette Recipe

Makes: 6 servings

Ingredients

~ 1 ¾ lbs. blue potatoes
1 small bell pepper, diced (I used a purple lilac pepper)
¼ large onion, chopped fine
Juice of one lemon
1 teaspoon apple cider vinegar
¼ cup olive oil
1 teasppon sugar
~15 fresh basil leaves
Salt and pepper to taste

Preparation

I cook the potatoes using a method taught by my mom. Place the whole potatoes in a pot, cover with water, cover the pot with a lid and bring to a boil. Once they boil, turn off the heat. Leave the lid on, and let them sit in the hot water until the potatoes are softened. For this recipe they sat about 15 – 20 minutes.

Drain the potatoes and let them cool, chop into bite-size pieces. Add the bell pepper and the onion.

In a small bowl, whisk together the lemon juice, vinegar, olive oil and sugar. Chop the basil and stir into the dressing.

Pour the dressing over the potatoes and toss to coat. Salt and pepper to taste.

Refrigerate for about 15 minutes before serving. Serve soon after making because the potatoes do begin to lighten a bit as they sit. 


Thanks for reading! All images and content are the property of Lori Rice and Fake Food Free unless otherwise stated. Please do not republish full recipes and images without written permission. What is okay? Feel free to Pin images, share links to my posts or share the photo with the title of this recipe and a link back to the post. Confused about copyright and food blogs? Here is some helpful information on Recipe Attribution. If you want to use a photo or full recipe, just ask. I’m sure we can work something out.

Strawberry Recipes

May 15, 2012

A past recap of some of my favorite strawberry recipes on Fake Food Free! As I read this, updating this post comes at a good time! Three years later I’m upgrading to another new camera in a few weeks!

You don’t know how dependent you are on something until it breaks down. For most people this is associated with a car or a washing machine, but for the past week and half, for me, it’s been my camera. I didn’t realize that it was possible to miss a camera, but I do now. I can’t count how many times I’ve seen something I want to photograph and then feel cranky when I remember I can’t do so.

Oh, and did I mention I have also realized how much of a photo snob I am now? I could, of course, use the point and shoot, but then I think – nah, it won’t give me the right depth of field or color. Yeah, it’s that bad.

The camera drama started a little over two weeks ago when my Canon Rebel Xsi body died. I made the decision to upgrade to the 60D so quickly, and the trade in went so smoothly that there was barely a hiccup in my posting. Then I started having problems with the autofocus with the new camera. I called Canon for tech help, and back went the camera for an exchange.

Now it’s been a week, and I’m still waiting…

Instead of keeping these pages blank for too long I thought I would recap some of my favorite recipes from the archives. Our strawberry season is coming to a close, but I know for many it is just starting. So here are a few ways we’ve used strawberries around the Fake Food Free kitchen.

Favorite Strawberry Recipes from Fake Food Free

Strawberry Pecan Pancakes

  
Favorite Strawberry Recipes from Fake Food Free
 

Whole Grain Rhubarb Waffles with Strawberry Butter

 
Favorite Strawberry Recipes from Fake Food Free
 

Strawberry Rhubarb Bread

 
Favorite Strawberry Recipes from Fake Food Free
 

Spring Garden Cobb Salad 

 
Favorite Strawberry Recipes from Fake Food Free 

Easy Fresh Strawberry Ice Cream

 
Favorite Strawberry Recipes from Fake Food Free

Strawberry Rosemary Shortbread


Thanks for reading! All images and content are the property of Fake Food Free unless otherwise stated. Please do not republish full recipes and images without written permission. What is okay? Feel free to Pin images, share links to my posts or share the photo in a round up post with the title of this recipe and a link back to the post. Confused about copyright and food blogs? Here is some helpful information on Recipe Attribution. If you want to use a photo or full recipe, just ask. I’m sure we can work something out.  

Coconut Lime Granola

January 25, 2012

This is how it goes down. 
You open the webpage and think to yourself – what is this?  You scroll down the page, and you spot something. Your brain says – oooooohh, pretty!
Click, repin, and you’re a goner.
The next thing you know two hours have passed, and you have a visual list of things you want to make, how you want to decorate, and where you want to travel. 
Yes, this is Pinterest
When I was younger I used to carefully cut photos out of magazines and paste them on the pages of notebooks. These were my plans, my inspirations, and they most often had to do with fitness goals or dream houses.
It dawned on me today that Pinterest is my modern version of this; the adult me keeping dreams and inspiration alive. Note: This is my positive spin on the fact that I’m addicted. 
I’m not quite sure how to create a natural transition from Pinterest to granola; other than the fact that I probably have some granola recipes pinned on my boards. 
Here it goes anyway. 
Limes are one of the things I miss most about Brazil. I used to go to the market and get a bag of 10 or 12 of the best tasting limes for about 44 cents U.S. Needless to say, 44 cents per lime was tough to handle when we returned to the U.S. So when they are on sale, I stock up. 
I love the combination of lime and coconut, and have included it in breads, but never in granola. So I tried it. Aside from it being a fabulous way to use up some limes, it’s also the perfect excuse to bake with some coconut oil. The flavors came out so well, and it has added quite a positive spin to my yogurt this week. 
Coconut and Lime Granola
¼ cup molasses
¼ cup maple syrup
Juice and zest of 2 limes
¼ cup virgin, cold pressed coconut oil, melted
4 cups old fashioned rolled oats
1/3 cup unsalted sunflower seeds
½ cup raisins
½ cup raw almonds, chopped
1 cup shredded, unsweetened coconut
½ tsp sea salt
Preheat the oven to 325 degrees F.
In a small bowl, whisk together the molasses, maple syrup, lime juice, lime zest and coconut oil. Set aside.
In a large bowl, stir together the oats, sunflower seeds, raisins, almonds, coconut and salt. Pour the molasses mixture over the oats and stir to coat. 
Turn the granola out onto an ungreased baking sheet. Spread in a single layer. Bake for 40 minutes, stirring every 10 to 15 minutes. Cool and store in an air tight container. Makes about 6 cups. (I like to stir in a little plain coconut before serving to add some color and a different texture.)
Pin It

Wheat Berry Salad with Fresh Cranberries and Orange Maple Dressing

January 10, 2012
I first made this wheat berry salad to brighten up a long winter, but with the flavors of fresh cranberries and maple syrup it makes a great side dish for the holiday season or any time of year!
 
Wheat Berry Salad with Fresh Cranberries and Orange Maple Dressing | Fake Food Free | A delicious cold grain salad for Thanksgiving, the holiday season or any time of year!
 
I consider citrus season a bright spot in a long winter. When everything is brown and wilted, citrus shows up with its bright oranges and yellows. 
 
It’s the one time of year when I gladly say – send my fruit on over from Florida and California. Because let’s be honest. No orange, lemon or grapefruit trees are going to be popping up anytime soon in Kentucky. 
 
Well, except for my dwarf Meyer Lemon trees in the back room. I have full confidence that I may get a lemon from them one day, but they have a long way to go. 
 
An added bonus to citrus season is that if you are lucky, you still have some holiday ingredients hanging around such as fresh cranberries. I was in the mood for a cold grain salad this week, and the combination of tart, fresh cranberries and the sweet juice of an orange seemed the perfect match. The kale and maple syrup were added for good measure.
 
Wheat Berry Salad with Fresh Cranberries and Orange Maple Dressing
Makes: 4 to 6 servings
Write a review
Print
Ingredients
  1. 1 cup whole, fresh cranberries
  2. 3 cups cooked wheat berries
  3. 3 green onions, whites and greens sliced
  4. 1 large leaf of kale, stem removed and very thinly sliced
  5. Juice of half an orange
  6. 1 ½ tablespoons maple syrup
  7. 1 tablespoon olive oil
  8. 1 teaspoon apple cider vinegar
  9. ½ teaspoon fine ground sea salt
  10. ¼ teaspoon ground black pepper
Instructions
  1. Place the cranberries in a small food processor. Pulse until chopped into small pieces; about the size of the wheat berries. Transfer to a mixing bowl.
  2. Add the wheat berries, green onion and kale to the bowl. Toss the ingredients to combine.
  3. In a small bowl, whisk together the orange juice, maple syrup, olive oil, cider vinegar, salt and pepper. Pour dressing over the wheat berry salad. Toss to coat. Serve at room temperature or cold.
Fake Food Free https://www.fakefoodfree.com/
 
Wheat Berry Salad with Fresh Cranberries and Orange Maple Dressing | Fake Food Free | A delicious cold grain salad for Thanksgiving, the holiday season or any time of year!
 
Thanks for reading! All images and content are the property of Fake Food Free unless otherwise stated. Please do not republish full recipes and images without written permission. What is okay? Feel free to Pin images, share links to my posts or share the photo in a round up post with the title of this recipe and a link back to the post. Confused about copyright and food blogs? Here is some helpful information on Recipe Attribution. If you want to use a photo or full recipe, just ask. I’m sure we can work something out.  
Want to create beautiful food and product photos that you can't wait to share?!
Discover your style, control the light, and shoot using the tool you know how to use (yes, your phone included). Learn about free resources, Live Q&As with Lori, and online courses you can take from anywhere in the world!
We respect your privacy. Unsubscribe at any time.