Browsing Category

Seasonal

Sweet Orange-Sesame Bok Choy Recipe

January 24, 2013
Sweet Orange Sesame Bok Choy Recipe | Fake Food Free
 
During the winter months, my love for dark, leafy greens comes second only to my love of citrus. For me, putting these two favorites together is nothing short of mind blowing. 
 
Yes, I realize that I might be the only person ever to consider greens mind blowing. But if you can’t get enough of kale, bok choy and chard, you must try them with a twist of citrus.
 
When I mix orange and greens I almost always lean towards adding Asian flavors. If orange and greens are good, then orange, greens and sesame or soy are even better. 
 
Bok Choy with Orange-Sesame Glaze | Recipe | Fake Food Free
 
 
Alone, with rice, with rice and an egg on top – there so many options for these simple, citrusy greens. The biggest challenge is not eating them all before they get to the table.
 

Sweet Orange-Sesame Bok Choy Recipe

Makes:  2-3 servings

Ingredients

Juice of one large naval orange
Zest of half an orange
2 tablespoons raw sugar
2 cloves garlic, minced
Splash of rice wine vinegar
½ tablespoon dark sesame oil
1 small head bok choy, greens and part of the whites chopped (about 4 cups)
Orange slices for serving (optional)
 

Preparation

In a small dish, stir together the orange juice, orange zest, sugar and garlic. Add this to a wok or large skillet and heat to medium-high. Continue to heat the juice, stirring often, until it begins to thicken slightly, about 2-3 minutes.
 
Add the bok choy and toss to coat in the juice. Add the splash of vinegar. Cook until the bok choy wilts, about 2 more minutes. Stir in the sesame oil. Serve warm. 
 
 
Sautéed Sweet Orange and Sesame Bok Choy Recipe | Fake Food Free


Thanks for reading! All images and content are the property of Fake Food Free and Lori Rice unless otherwise stated. Please do not republish full recipes and images without written permission. What is okay? Feel free to Pin images, share links to my posts or share the photo in a round up post with the title of this recipe and a link back to the post. Confused about copyright and food blogs? Here is some helpful information on Recipe Attribution. If you want to use a photo or full recipe, just ask. I’m sure we can work something out.

Page Tangerine Walnut Muffins Recipe

January 22, 2013
Page Tangerine Walnut Muffins Recipe | Fake Food Free

One change that goes along with living in the Bay Area is that I can no longer complain about the endless cold days of January and February. No, no complaining here. In fact, you can’t get much closer to perfect for me. Sunshine and jacket weather, nicely balanced with a gloomy day that requires a scarf and maybe gloves.

I’ve always considered citrus season a bright spot in a long, dreary winter. Now it’s a bonus during an already enjoyable time of year. And wow, did I completely underestimated how amazing citrus season would be around here!

California Oranges

I’m not unfamiliar with regular access to amazing oranges. I had my pick of them when we lived in Brazil, but four varieties of oranges, mandarins, tangerines, lemons and sweet limes is a whole new ball game. We’ve purchased so much the past two weekends, we can barely carry them back to our apartment. Yet the fruit basket is completely empty come the following Saturday.

California Citrus

I’m incredible picky about my citrus. Mainly the seeds and tough membranes. It’s such an issue for me that I still serve my oranges old school cafeteria-style, sliced in quarters and eaten like a fourth grader. I’ve just now come around to the peel-and-eat citrus like mandarins, if they are small, tender and sweet.

Last week I was introduced to a new favorite that meets all my criteria – Page Tangerines. They are a cross of clementines and minneolas (tangelos). They are unbelievably sweet and tender. Some people at the Farmer’s Market stall complained that they are a little hard to peel, but I didn’t mind this too much.

Page Tangerines, a cross of clementines and minneolas (tangelos). | Page Tangerine Walnut Muffins Recipe | Fake Food Free
California Citrus | Ferry Building Farmers Market, San Francisco | Fake Food Free

Given that I can’t seem to control myself, and always buy way too much citrus, I decided to use some in muffins this past weekend. Along with the sweet citrus, I added walnuts for a little crunch and a sprinkle of raw sugar on the top.

Page Tangerine Walnut Muffins Recipe

Makes: 12 muffins

Ingredients:
2 cups white whole wheat flour
3 tsp baking powder
1/2 tsp salt
1/3 cup raw sugar
3/4 cup milk
1/3 cup olive oil
1 large egg, beaten
1 tsp vanilla
3-4 Page tangerines, peeled and finely chopped
1 tsp Page tangerine zest
1/3 cup chopped walnuts
Raw sugar to top the muffins

Prep:
Preheat the oven to 400 degrees and grease the bottom of each muffin tin. Sift together the flour, baking powder and salt. Set aside. In a separate bowl whisk together the sugar, milk, olive oil, egg and vanilla.

Gradually add the wet ingredients to the dry, mixing just until combined. Fold in the tangerines, zest and walnuts.  Divide into 12 muffins. Sprinkle the top of each muffin with about a 1/2 tsp of raw sugar. Bake for 18 to 20 minutes or until muffins are browned and a toothpick inserted in the center comes out clean. Cool and remove from pan. 

 
Page Tangerine Walnut Muffins Recipe | Fake Food Free
 Thanks for reading! All images and content are the property of Fake Food Free unless otherwise stated. Please do not republish full recipes and images without written permission. What is okay? Feel free to Pin images, share links to my posts or share the photo in a round up post with the title of this recipe and a link back to the post. Confused about copyright and food blogs? Here is some helpful information on Recipe Attribution. If you want to use a photo or full recipe, just ask. I’m sure we can work something out. 

Watercress with Smoked Almond Goat Cheese Scoops and Grapes in Red Wine Syrup

December 4, 2012

  
Have you ever found a recipe that makes you want to have a party? You know, just so you can show it off to your guests? Not because it was a brilliant feat on your part, but because it was just that good.

I hadn’t. Until I found this.

This is Watercress with Smoked Almond Goat Cheese Scoops and Grapes in Red Wine Syrup.

This little salad-slash-starter is party worthy. It even felt like a party when I ate it alone for lunch yesterday. As mentioned above, it is just that good.

It came from what I now consider my absolute favorite cookbook of 2012 – Home Made Winter by Yvette van Boven. You might remember my review of Home Made last year. I assure you, things only got better.

And by things I mean recipes I want to make, pictures I want to look at and tips I want to incorporate. Home Made Winter is all the warm, fuzzy, comforting feelings you look for in winter and the holiday season in cookbook form.

I am so inspired by Yvette’s style. It makes me want to take myself to the kitchen on a cold night and cook, bake and create for hours. There are wonderful do-it-yourself standards such as homemade cured beef sausage, butter, yogurt, apple cider and Irish cream liqueur. (What? Irish cream isn’t a standard necessity? I’m ready to make it one.)

Then things get fancy – fancy and completely do-able and tasty. Butternut Crème with Goat Cheese Cream and Sage, Whole Organic Chicken Stuffed with Pork, Veal and Sage Sausage and Guinness Fruitcake only scratch the surface.

The best part of the book is the introduction where Yvette announces that she’s already started working on a second volume – Home Made Summer! This winter edition proudly displays Irish influence, while Home Made Summer will show its French roots.  I can’t wait!

This book is full of holiday-inspired baked goods, and hearty meat and vegetable dishes, but I decided to pick something on the lighter side – a nice salad full of seasonal flavors.

The intro to the recipe suggests using fresh cranberries instead of grapes, and that is what I did, with amazing results! After stopping at two stores to find watercress, I finally settled on arugula. It tastes wonderful with the other flavors of the salad, but I’ll be trying it again with watercress as soon as I can get my hands on some.

I encourage you to give the recipe a try, but I offer fair warning.

You are going to want to have a party!

Watercress with Smoked Almond Goat Cheese Scoops and Grapes in Red Wine Syrup Recipe

Reprinted with permission from Abrams Books

An awfully simple recipe that looks very flashy. Instead of the grapes you could use fresh cranberries or quartered fresh figs. If you can’t find smoked almonds, you can use regular almonds.

½ of a 750-ml bottle red wine
½ cup plus 2 tbsp (125 g) turbinado or Demerara sugar
3 star anise
8 cardamom pods
5 oz (150 g) seedless red grapes
salt and freshly ground black pepper
7 oz (200 g) soft goat cheese
⅓ cup (50 g) smoked almonds
1 bunch fresh watercress, stems removed
Heat the wine in a medium saucepan over medium-high heat. Add the sugar and stir to dissolve, then add the anise and cardamom and bring to a boil. Boil the syrup for about 25 minutes, until it’s slightly thicker. Reduce the heat to low and add the grapes. Warm the grapes in the syrup for about 7 minutes.

Remove the pan from the heat and let the syrup cool. Taste and add salt and pepper if needed.

Divide the goat cheese into 12 equal portions. With clean hands, roll the portions into small balls.

Pulse the almonds in a food processor until coarsely ground. Roll the goat cheese balls in the almonds to coat them. Place the cheese balls on a tray or baking sheet, cover them, and place them in the fridge for 1 hour to firm up.

To serve, wash and dry the watercress. Arrange some nice leaves over 4 plates. Arrange the goat cheese balls on top and spoon grapes in syrup around the cheese.


Disclosure: This book was sent to me for review purposes. I was not required to write about it and received no compensation for doing so. It goes without saying, thoughts and opinions here are my own.

20 Holiday Cookie Recipes

November 30, 2012
Even though I compiled this list in 2012, I return to it every year during the holiday season. It contains links to my favorite holiday cookie recipes which have all been featured here on Fake Food Free.
 
 
20 Holiday Cookie Recipes | Fake Food Free
 
Friday is a good day for news, right?
 
As in, big news.
 
As in, life is being flipped upside down, but in a very good way kind of news. 
 
As in, we’re moving from central Kentucky to the East Bay in California news!
 
Perfect because I was so ready to share that! And we are so excited!
 
From the food perspective, just in case you are unaware (although I doubt you are), the East Bay is a incredible food destination. Well, really the entire area. In addition to a past stop in San Francisco, I’ve visited twice so far in the moving process. In that short amount of time I’ve enjoyed Peruvian cuisine, vegan soul food, seafood, Montreal-style bagels, Hong Kong-style bakeries, craft beer, and of course, wine. 
 
Then there are the amazing Farmer’s Markets. The fact that I will have access to fresh figs, nuts, artichokes and avocados is surreal for me. Yes, you should expect some posts soon! 
 
And fortunately, there are lots of places to run. I think all the food access may have subconsciously played a role in my decision to register for the San Francisco Marathon in 2013! 
 
I should finally arrive in California on New Year’s Day so Christmas will be light around here, but I still plan to get in plenty of baking. I may not have a tree up, but I refuse to pack the mixing bowls and cookie sheets just yet. 
 
As for right now, I just got back from a California visit and you’ve probably noticed my week long blogging break has turned into almost two. I’ll be back in the kitchen this weekend, but I want to kick off the Christmas season with a cookie round up. 
 
If you are looking to add some cookies made with whole grain flours and minimally refined sugars to your baking list, look no further. Some traditional treats are mixed in, but many of these fit those criteria. 
 
I’ll be back next week with a review of what is turning out to be my favorite cookbook of 2012! Meanwhile, tell me what you are baking this year!
 
(Clicking on the name will take you to the recipe.)
 
Chocolate Covered Marzipan Cookies


Matcha Tea Cookies with Gooseberry Filling


Chocolate Almond Oatmeal Cookies


Jamaican Coffee and Spice Biscotti


Honey Cinnamon Oatmeal Raisin Cookies


Peanut Butter Chocolate Chip Cookies 


Lemon Rosemary Thumb Prints with Peach Jam


Ginger Rum Molasses Cookies


Chocolate Crinkle Cookies


Whole Wheat Double Chocolate Cranberry Cookies 


Russian Tea Cakes


Cherry Nut Cookies


Fiery Peanut Butter Cookies


Bourbon Chocolate Chip Pecan Cookies


Spicy Chocolate Peanut Butter Cookies with Curry Glaze


Crunchy Peanut Butter Date Balls


Whole Wheat Black Sesame Cookies


Chewy Chocolate-Tahini Puffed Grain Squares


Chocolate Snowballs


Pumpkin Peanut Butter Cookies


Thanks for reading! All images and content are the property of Fake Food Free unless otherwise stated. Please do not republish full recipes and images without written permission. What is okay? Feel free to Pin images, share links to my posts or share the photo in a round up post with the title of this recipe and a link back to the post. Confused about copyright and food blogs? Here is some helpful information on Recipe Attribution. If you want to use a photo or full recipe, just ask. I’m sure we can work something out.

Brussels Sprouts with Ginger, Honey and Tamarind Recipe

November 15, 2012
Fresh ginger, sweet honey and rich tamarind make a delicious glaze for skillet-cooked Brussels sprouts in this recipe. It’s perfect for the holidays, but don’t hold back. Enjoy it any time of year! 
  Brussels Sprouts with Ginger, Honey and Tamarind | Fake Food Free
 
Whew! For a second there I thought I was getting burned out on Brussels sprouts. Fortunately, I just needed a short break (i.e. about one week). Now I’m ready for them again and just in time for Thanksgiving.
 
As much as I love these mini-cabbages simply prepared with bacon and Parmesan cheese, it’s time to start changing up the flavors. I have a never-ending jar of tamarind concentrate to use up so my first thought was to add an Asian twist. 
 
Tamarind, ginger and honey all come together to make a rich glaze for my favorite veggie. The tangy tamarind and spicy ginger will add a little something different to your standard turkey and stuffing this year!
 
Brussels Sprouts with Ginger, Honey and Tamarind | Fake Food Free


Brussels Sprouts with Ginger, Honey and Tamarind Recipe

Makes: 4 servings

Ingredients

1 tbsp extra virgin olive oil
1 lb. Brussels sprouts, cleaned and halved if large
1 clove garlic, grated
1 tsp grated fresh ginger
1 tbsp of tamarind concentrate
2 tbsp soy sauce or tamari
2 tsp honey
Sesame seeds for garnish
 
Prep
 
Heat the olive oil over medium-high heat in a deep skillet. Add the Brussels sprouts and stir to coat with the oil. Cook for about 2 minutes. Reduce the heat to medium and add ¼ cup of water. Stir the sprouts and allow the water to cook off, 5 to 7 minutes. Continue to cook until they reach your desired doneness. For me, it’s about 3 more minutes.
 
In a small bowl, whisk together the garlic, ginger, tamarind, 2 tbsp of water, soy sauce and honey. Pour the mixture over the Brussels sprouts and stir to coat. Allow to cook 2-3 minutes so the sauce will thicken slightly. Sprinkle with sesame seeds before serving. Serves 4. 
 
Brussels Sprouts with Ginger, Honey and Tamarind | Fake Food Free


Thanks for reading! All images and content are the property of Fake Food Free unless otherwise stated. Please do not republish full recipes and images without written permission. What is okay? Feel free to Pin images, share links to my posts or share the photo in a round up post with the title of this recipe and a link back to the post. Confused about copyright and food blogs? Here is some helpful information on Recipe Attribution. If you want to use a photo or full recipe, just ask. I’m sure we can work something out.
 

Chicken with Spicy Cranberry Citrus Relish Recipe

November 1, 2012


I used to eat chicken breasts all the time, but when we made the switch to whole pastured birds, dishes featuring them became rare. This was a positive change. I’ve enjoyed the challenge of tackling a whole bird and it is much more budget friendly, but sometimes I just want a chicken breast.

Yes, I know you can cut them off a whole bird yourself, but I can’t cut up a chicken correctly to save my life. I end up with pieces, but they certainly aren’t pretty. Fortunately, we can still buy breast cuts from our pastured chicken sources so last weekend I splurged a little and let the butcher do the work.

I also bought my first bag of fresh cranberries this season, and you know how I can’t stop thinking about the holidays. I thought a cranberry relish would be perfect for the poultry.

In past years, I’ve neglected fresh cranberries thinking I always needed to cook them into a sauce. Not so. I now love grinding them up in the food processor to eat them fresh.

My very favorite fresh relish recipe is Cranberry-Jalapeno Relish by Emeril. I’m constantly changing it up a bit, and I set out for a new version for my chicken.

Surprisingly, I have a few Scotch Bonnet peppers that have hung on in the fridge since I took out the garden. I subbed those for the jalapeños, added some onion and then some maple syrup.

I know spicy and tart is not a common combination, but with just a touch of maple syrup, this relish is so good! It works well with fish and poultry, and I also eat it alone as a salad.

Chicken with Spicy Cranberry Citrus Relish Recipe 

1 1/2 cups fresh cranberries
Zest and segments from 1/2 an orange
2 tbsp choppped onion
1-2 small hot peppers, seeds and ribs removed
1 tbsp maple syrup
4 3-4oz chicken breasts, seasoned and grilled or baked

Place the cranberries, orange and orange zest, onion, hot peppers and maple syrup in a small food processor. Pulse until all ingredients are finely chopped. Makes 1 3/4 cups of relish. You may find you want to add a little salt to taste, but  I like mine without it.

Serve about 1/4 cup of the relish at room temperature over warm chicken breasts. Store leftovers in the fridge, but know that the heat intensifies as it sits!


Pumpkin Stuffing Loaves Recipe

October 24, 2012
If you love pumpkin this stuffing is a must! It’s packed with seasonal flavors and then baked into loaves for easy serving. 
 
Pumpkin Stuffing Loaves | Fake Food Free
 
I realize that it’s not even Halloween yet, but my brain has already jumped ahead to Thanksgiving. All I can think about is cranberry sauce, pumpkin pie and stuffing. Now, this may be because I read way too many food blogs and food magazines, but I like to think it’s simply because I’m in the holiday spirit a little early!
 

Despite my timing, I thought I should start thinking about this year’s stuffing, and get in a practice round or two. I like to do something just a little different every year, and this time around I mixed things up in both flavor and shape. 


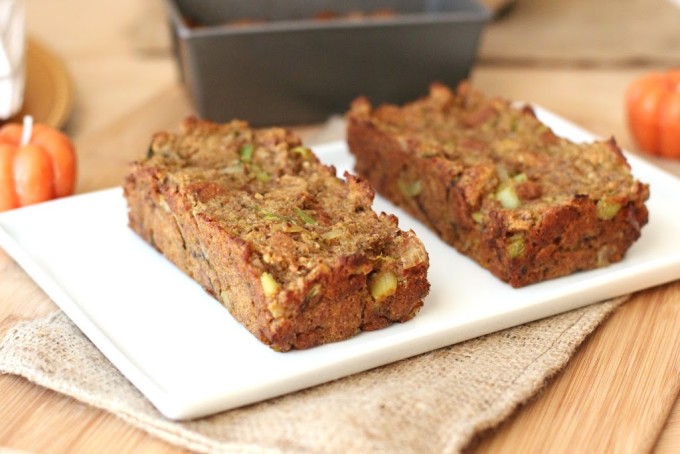
If you’ve already done stuffing in the bird, stuffing baked in a casserole dish and stuffing in a muffin pan, try this – stuffing in mini loaf pans.  If you like your stuffing a little on the drier side (like I do), these are perfect. 


The small portions dry out a bit faster and leave plenty of crispy edges. You can then slice off servings and it gives a little something different to the presentation.  If you happen to have any leftovers, the little loaves make fridge and freezer storing super easy. 


 Pumpkin Stuffing Loaves | Fake Food Free


I am way behind in my pumpkin use this year so that’s what I decided to add to the stuffing, giving it a seasonal twist. It doesn’t have to be pumpkin, though. It can be any puree of winter squash.
 

For the bread I used a whole wheat variety full of nuts and seeds that I get at the local Great Harvest. This made the stuffing even more flavorful! Just let the bread slices dry out over night, or you can help them along by tossing them in the toaster. Then cut them in to cubes or tear them into pieces. 

  
Pumpkin Stuffing Loaves | Fake Food Free
 
 
The pumpkin makes the stuffing a little richer, and you’ll use less stock due to the moisture. I used a puree from a roasted pumpkin and chicken stock I made myself earlier this year. 
 

Pumpkin Stuffing Loaves Recipe

Makes: 6 – 9 servings

Ingredients

3 tbsp unsalted butter
4 stalks celery, sliced
½ large onion, diced
3 cloves garlic, minced
½ cup pumpkin puree (or any winter squash)
1 tsp salt
1 tsp poultry seasoning
1/8 tsp pumpkin pie spice
¼ tsp ground black pepper
6 to 7 cups dried bread pieces
1 ½ – 2 cups unsalted chicken stock
 

Prep 

Preheat the oven to 375 degrees F. Grease 3 – 2×4 inch mini loaf pans with butter. Set aside.
 

Heat the butter in a medium skillet over medium-high heat until it is melted. Add the celery, onion and garlic. Cook, stirring often, for about 5 minutes, or until the vegetables begin to soften. 


Reduce the heat slightly and stir in the pumpkin. Next add the salt, poultry seasoning, pumpkin pie spice and black pepper. Remove from the heat.


Transfer the bread pieces to a large mixing bowl. Pour in the onion and celery mixture and stir well. Next add the stock a little at a time. You can add more or less depending on how you like your stuffing. I like mine on the dry side so 1 ½ cups was all I needed.


Divide the stuffing evenly into each of the 3 loaf pans. Press down gently and smooth the top with a spatula. Bake 30-35 minutes or until the edges are brown and crispy. 


Allow to cool in the pans 2-3 minutes and then remove and serve. If your family likes a lot of stuffing, cut each loaf in half which will result in 6 servings. For smaller portions cut the loaves into thirds and you can serve 9.

 
Thanks for reading! All images and content are the property of Fake Food Free unless otherwise stated. Please do not republish full recipes and images without written permission. What is okay? Feel free to Pin images, share links to my posts or share the photo in a round up post with the title of this recipe and a link back to the post. Confused about copyright and food blogs? Here is some helpful information on Recipe Attribution. If you want to use a photo or full recipe, just ask. I’m sure we can work something out.


Spiced Gooseberry Oat Bars Recipe

September 29, 2012

A few weeks ago, a slight freezer malfunction caused a hiccup in my food storage. All is good now, but there were a few things that managed to completely thaw before I was able to catch them. One of these was the gooseberries that my parents had given me earlier in the summer. 
I spent a few days staring at them in the fridge, and then decided that baking was the only answer. (I’ve learned that baking is the answer to a lot of things. I recommend trying it the next time you have a problem.)
I decided that these tart little berries would go great in my favorite oat bars. Since this gave me the opportunity to make the recipe again, I decided I’d experiment with a few other ingredients as well.
I made this batch with virgin coconut oil, which worked great. Keep in mind that this makes them a delicate, crumbly bar; one you will want to eat with a fork and not pack in your snack bag. I also had some gluten-free flour. Since this is a recipe that doesn’t need to rise, I felt it was safe to substitute all the white whole wheat flour for the gluten-free mix. Another winner. (Although, as you probably know if you eat gluten-free, oats are a tricky food. So I won’t be quick to name these 100% gluten-free.  But you can easily make yours that way, if you need it.) 
With fall finally arriving, I decided to spice this batch up a bit with ginger, nutmeg and cinnamon. I loved the way the flavors went with the tart berries. If you can’t get your hands on gooseberries, almost any berry will work. Cranberries and blueberries have been two of my past favorites. 

Spiced Gooseberry Oat Bars Recipe

Adapted from Blueberry Oat Bars, Bryant’s Blueberries

1 ¾ old fashioned rolled oats
1 ½ cups flour (I used Bob’s Red Mill Gluten-free All Purpose Baking Flour in this batch)
¾ cup mascavo (muscovado) sugar (or brown sugar)
½ cup chopped walnuts
½ tsp baking soda
1 tsp salt
¼ tsp ground ginger
½ tsp ground nutmeg
1 tsp ground cinnamon
¾ cup melted virgin coconut oil

2 cups thawed gooseberries
¾ cup raw sugar
1 tbsp cornstarch or arrow root
2 tbsp water
1 tbsp lemon juice

Preheat the oven to 350 degrees F.  Grease a 9 x 13 inch baking dish with coconut oil. 

In a medium bowl combine the oats, flour, mascavo sugar, walnuts, baking soda and salt. Add the ginger, nutmeg and cinnamon. Pour in the melted coconut oil and stir to mix well. You should have a crumbly mixture that is wet enough to hold when pressed together. Reserve about ¾ cup of the mixture. 

Press the remaining oat mixture into the baking dish. Spread it evenly and press it firmly into the pan. Bake for 10 minutes. Remove from the oven and set aside. 

In a sauce pan combine the gooseberries, and raw sugar (you can add more or less sugar to your taste). Bring to a boil, then simmer, for about 2 minutes. Stir to break up the berries. 

In a small dish, stir together the cornstarch, water, and lemon juice to make a paste. Add the paste to the gooseberries and stir until the fruit is thickened. Remove from heat.

Spread the fruit over the oat crust leaving just about a ¼ inch edge on all sides. Crumble the reserved topping evenly over the fruit. Bake for 18 to 20 minutes or until the edges of the crust begin to brown. Cool the pan on a wire rack. 

Once cooled completely, cut into bars. Makes about 15 bars.

Homemade Garden Chili Slow Cooker Recipe

September 19, 2012


Chili is one of those foods that I get burned out on by December, but every time the next September rolls around, I’m ready for it all over again. My cravings for it this year started this past week, and they are just about spot on, considering we are moving towards the end of the month.

As you can probably tell from my posts, it has been a great garden year. We are still bringing in more tomatoes than I know what to do with, and I have plenty of frozen veggies from harvests earlier in the summer. With the weather turning cooler here, chili seemed like the ideal way to use them up.
My goal was to use a lot of fresh tomatoes, so this recipe does take some prep work. For me, this is just the kind of thing I enjoy doing on a quiet Sunday. Once it’s all in the slow cooker, it’s low maintenance from there on out. 
Feel free to substitute different kinds of vegetables. I’ve been shredding and freezing zucchini all summer, and we also had some sweet corn tucked away in the freezer. Both ended up being a great addition to this chili.

Homemade Garden Chili Slow Cooker Recipe

6 – 8 lbs of tomatoes (you’ll need about 6 cups of sauce)
5 cloves garlic
1 small onion, chopped
2 cups black beans, soaked overnight
2 cups shredded zucchini, thawed if frozen
1 cup sweet corn, thawed if frozen
1 cup water
2 tbsp chili powder
1 tsp chipotle chili powder
1 tsp cumin
2 tsp salt
½ tsp ground black pepper
2 scotch bonnet peppers (or your favorite hot pepper)
Preheat the oven to 400 degrees F. Cut de-stem and core tomatoes if necessary, and cut in half. (I used a mix of San Marzano, Beefsteak and heirlooms.) Arrange cut side down on a baking sheet with the garlic and drizzle with a little olive oil. In batches, roast for 20 minutes. Set aside to cool.
Add the onion and black beans to your slow cooker. Remove the skins from the tomatoes and place the pulp and the garlic cloves in a blender. Blend in batches until a smooth sauce results. Pour the sauce into the slow cooker. Set to high.
Add the zucchini and corn. Add the water. Stir in the chili powders, cumin, salt and black pepper.  Take the scotch bonnet peppers and de-stem them. Cut a small slit in the side of each. Place the whole pepper in the soup. Put on the lid and cook on high for about 4 1/2 hours, or until the beans are tender.
Before serving, remove the two peppers and discard. Serve with your favorite toppings. Makes about 6 servings.

Roasted Corn Salad and Gardening at Gastronomical Sovereignty

September 10, 2012

It wasn’t my intention to take such a long break from the blog. I’ve been traveling, and posts (and internet access) didn’t go as planned. I’m back, though, and ready to get in the kitchen! I also have a few delicious meals to share with you from our 2,500 mile cross-country trip.

Today you will find me over at Gastronomical Sovereignty talking about gardening and sharing my favorite roasted corn and pepper salad with wheat berries!

Come say hi, and check out Kristy’s great blog while you are at it!

Want to create beautiful food and product photos that you can't wait to share?!
Discover your style, control the light, and shoot using the tool you know how to use (yes, your phone included). Learn about free resources, Live Q&As with Lori, and online courses you can take from anywhere in the world!
We respect your privacy. Unsubscribe at any time.