Browsing Category

Lunch and Dinner

January in Food

February 2, 2011

Last year I started off strong with a commitment to a Project 365 of food where I photographed something edible or drinkable that ate or saw each day. Well, almost each day. I went strong through July, dwindled, tried to pick it back up in October, and then gave up completely.

Despite my inability to finish the full project last year I am trying once again in 2011. It’s fun to look back and see what I’ve eaten and more importantly it forces me to practice with my camera.

Not that I don’t want to practice, but knowing I need to take a food shot forces me to make time. I often let other things get in the way even though I’d rather have my camera in hand. It also allows me to do a bit of a post recap for the month which I hope is fun for you.

I’m not expecting to get a shot every single day, but with 22 photos I didn’t do so badly this past January. It will be easier and easier as the days get longer and the fresh foods get more plentiful.

So here you have the January 2011 recap!

Millet in coconut milk with pecans and mascavo sugar
Honey Pecan Baked Brie
Homemade Butter Pecan Ice Cream
Buffalo Turkey Sandwiches with Yogurt Celery Spread
70% Dark Chocolate (and the day I got my new lens!)
Roasted Acorn Squash and Garlic Pizza
Pimento Cheese Burger from Boone Tavern Restaurant – Berea, KY
Local, Pastured Prosciutto from Marksbury Farm Market
Fetzer Cabernet in our Alltech FEI WEG souvenir glass
Manner Cookies with some backwards packaging
Traditional Chocolate Chip Cookies
Spinach Dhal
Fiery Peanut Butter Cookies
Steel Cut Oats with Pecans and Maple Syrup
Starbucks Apple Bran Muffin – Road Trip Breakfast
John’s Cocoa-Coffee Brownies
Prosciutto Grilled Cheese with Tomato Soup
Kale and Bacon Quiche
Potato Soup
Selection of Local Meats at Marksbury Farm Market
Roasted Pumpkin
Mujadara – Lentils, Rice & Onions

Roasted Acorn Squash and Garlic Pizza

January 30, 2011

When it gets around to this time of year, I’m always so happy to see the end of January. It’s not that I dislike winter. In fact, I tend to annoy most of the people around here with my enthusiasm for it. I don’t like treacherous driving, but now that we live out in what could be called the country, the snowy white is just beautiful.

Winter in Kentucky
That being said, despite the fact that January has the same number of days as months such as March, May and July it often feels like it will never end. So I’m glad to see February come with Valentine’s Day quickly followed by Easter, springtime 10Ks, gardens and the farmer’s market.

However, with another month of full-on winter ahead, at least in this part of the US, I’m not ready to give up warm, comfort foods. I still have some winter squash around and a few weeks ago I was thumbing through my RR magazine. Yes, although people find her annoying I owe much of what I’ve learned about cooking to watching endless hours of 30 Minute Meals back in the day.

When I saw her Butternut Squash Pizza, it inspired to me to create something similar myself. My ingredients are little less exotic as I only had a few things on hand, but it turned out pretty tasty, nonetheless.

Roasted Acorn Squash and Garlic Pizza recipe

I roasted a whole head of garlic until soft and creamy, and then spread it on the pizza crust. It was a bit of work, but I also peeled the squash and diced it before roasting it until just barely tender. Plan ahead with this one because it will take you a little while to get your roasting done.

I will say that while I loved this pizza, my husband thought it was just okay. This was mainly because it is so sweet. However, I found that sprinkling on a little crushed red pepper just before serving really balanced the flavors.

Roasted Acorn Squash and Garlic Pizza recipe

Roasted Acorn Squash and Garlic Pizza
Adapted from Everyday with Rachel Ray’s Butternut Squash-and-Red Onion Pizza


1 large (14 inch) pizza dough (I make the Spelt Crust from Off Her Cork)
Olive oil
1 head of garlic
1 small acorn squash, peeled and flesh cubed
1 medium onion, sliced
1 cup whole milk mozzarella cheese, shredded
¼ cup freshly grated parmesan
Crushed red pepper (optional)

Preheat the oven to 400 degrees F. Carefully cut off the top 3rd of the head of garlic so that the cloves are exposed. Place in the center of a square sheet of aluminum foil, drizzle with olive oil and wrap loosely. Bake for 45 minutes to 1 hour, until tender. Set aside.

Spread the cubed squash in a single layer on a baking sheet. Drizzle with olive oil and toss to coat. Roast 15 to 20 minutes, just until tender. Meanwhile, drizzle a skillet with olive oil, add the onions and cook over medium-high heat. Cover and continue to cook, stirring often, until the onions are slightly browned and soft.

Squeeze the garlic flesh into a small bowl and stir to mash any clumps. Spread evenly over the pizza crust. Top with the squash and caramelized onions. Cover evenly with the cheeses. Bake for 20 to 25 minutes, until the cheese is melted and bubbly and the crust is slightly browned. Garnish with crushed red pepper, if desired.
Roasted Acorn Squash and Garlic Pizza recipe

Spinach Dhal

January 26, 2011

One of my new year’s resolutions was to cook more ethnic foods. Well, not only to cook them, but to learn more about them and the authentic ways to prepare Indian and Thai ingredients.

Let’s just say I’ve gotten off to a very slow start.

I’m still motivated to reach my goal though and last week I finally broke into a bag of moong dhal I’ve had in the pantry for a long while now. Moong dhal is a variety of mung bean, kind of like a yellow split pea.

I was flipping through the ThinkFood Cookbook I talked about last year and felt inspired when I found the Spinach Dhal recipe from Tastes Like Home.

After being soaked overnight moong dhal cooks up to be thick with a porridge-like consistency. This particular recipe has a spicy kick that is full of flavor with the whole spices that are added. I ate it with rice, but it could have easily been thinned slightly to create a delicious soup.

My husband was the real test though. He has a major aversion to peas. He dislikes them so much that it seems he can’t even be at the same dinner table with them. I’ll never forget the time we ordered a sandwich in Brazil and we bit into it to find it was filled with peas! Needless to say he went home that night and looked up the word for peas right away.

It’s ervilha in case you are wondering. This word guided our menu selection when dining out for the next 2.5 years.

So with the dhal’s similarity to split peas (more so than lentils, in my opinion) I thought he’d avoid it like the plague. Turns out he enjoyed it as much as I did.

This is the type of simple foods I want to focus on throughout our new year. They are so simple, yet the spices make them so complex in flavor.

This recipe will be emailed soon as part of the ThinkFood Cookbook listserv. If you are signed up, you will receive a recipe a week via email from the book. The ThinkFood Cookbook is also available for purchase.

Overlooking the fact that a Fake Food Free recipe is in the book, I have to say that it is a fabulous cookbook with all kinds of delicious recipes. I have made two recipes thus far and they have received rave reviews!

How to Make Homemade Chicken and Dumplings

January 9, 2011

In my family, a high standard has been set for Chicken and Dumplings. One so high that few people or recipes can successfully reach it. Why? Well, because we grew up with my mom making my great grandmother’s Chicken and Dumplings.

My mother did such a great job perfecting the recipe that even my grandmother would fail and call my mom to make them for her.

As you can imagine, we tend to judge other recipes by this high standard. Let’s start by saying that noodles that try to pass as dumplings are insulting. We’ll pass on those drop biscuit dumplings as well.

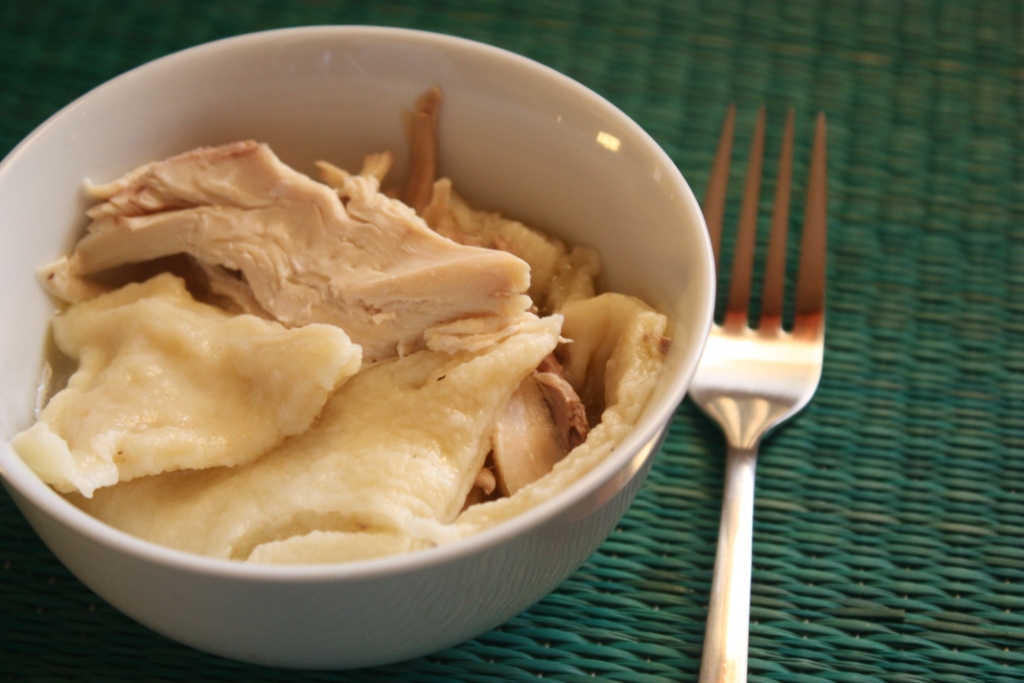
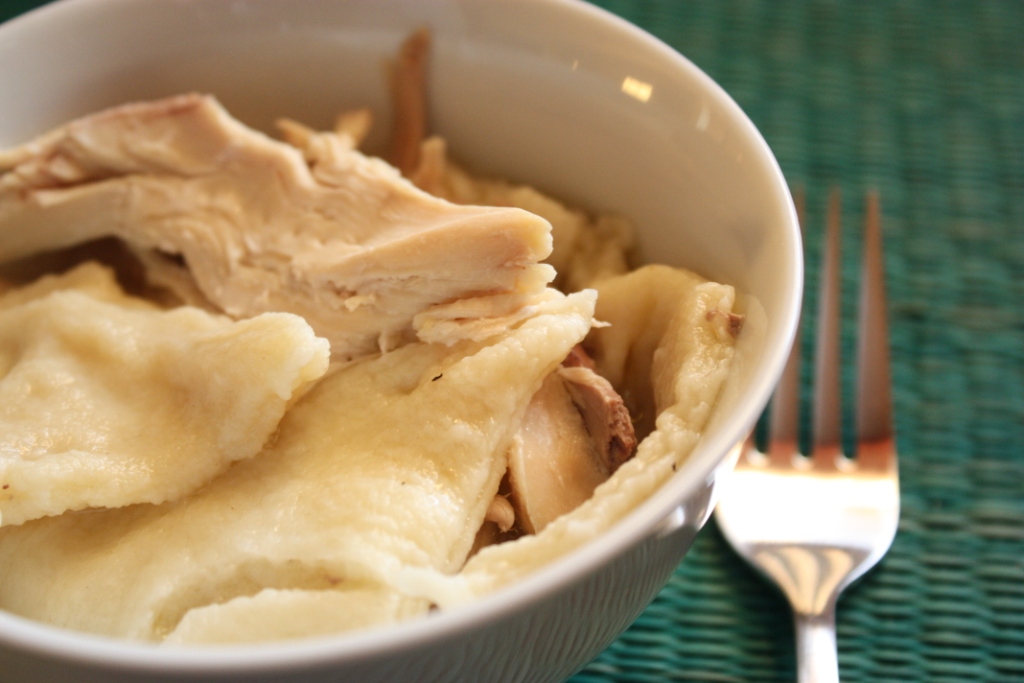
The dumplings must be flat, yet puffy with a firm bite, and most importantly, homemade.

I realize now that these dumplings are a lot like a large version of spaetzle. This makes complete sense considering my family is of German descent. There is a good chance that these dumplings were spaetzle at one point in my family history.

As a kid I would fish out all the dumplings from the pot and leave the chicken for my dad. I can’t say that this has changed too much, but as an adult I do include some chicken too, but mostly the white meat.

When we started buying locally raised, pastured chickens from nearby farms, and once I finally mastered cooking a full chicken and not just pieces, I knew it was time to try my great grandmother’s chicken and dumplings.

The whole process is actually quite simple and requires few ingredients. To summarize, you make a stock with the whole chicken, make your dough for the dumplings and cut it, remove the cooked chicken, cook the dumplings, then add the shredded chicken back in.

My mom warned me before I started that the key to the perfect dumplings is no stirring. Once you drop them in the boiling water, resist the urge to stir. Simply use a spoon to push them gently to the side and add more. If you stir them, they will break up and you’ll be left with a doughy mess instead of individual dumplings.

Are you ready to try it yourself? Well, here you go. It’s only 8 easy steps.

Homemade Chicken and Dumplings

1 whole chicken
3 eggs
1 tsp salt
3 tsp baking powder
¼ cup oil (I used olive oil, the original recipe calls for lard)
¼ to ½ cup milk
3 cups unbleached white flour

Step 1:

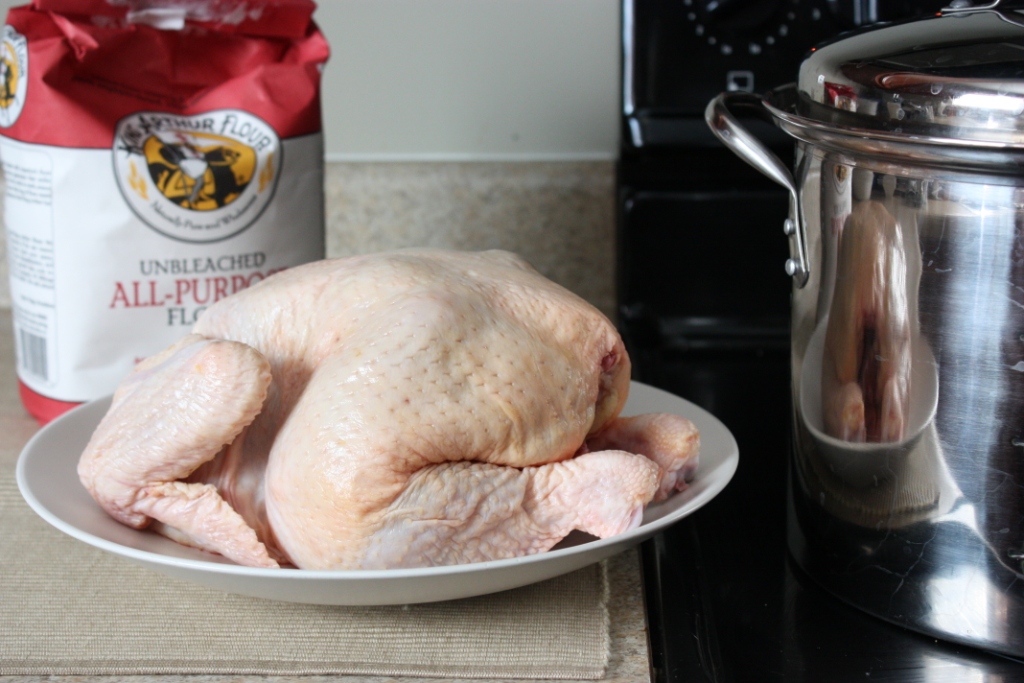
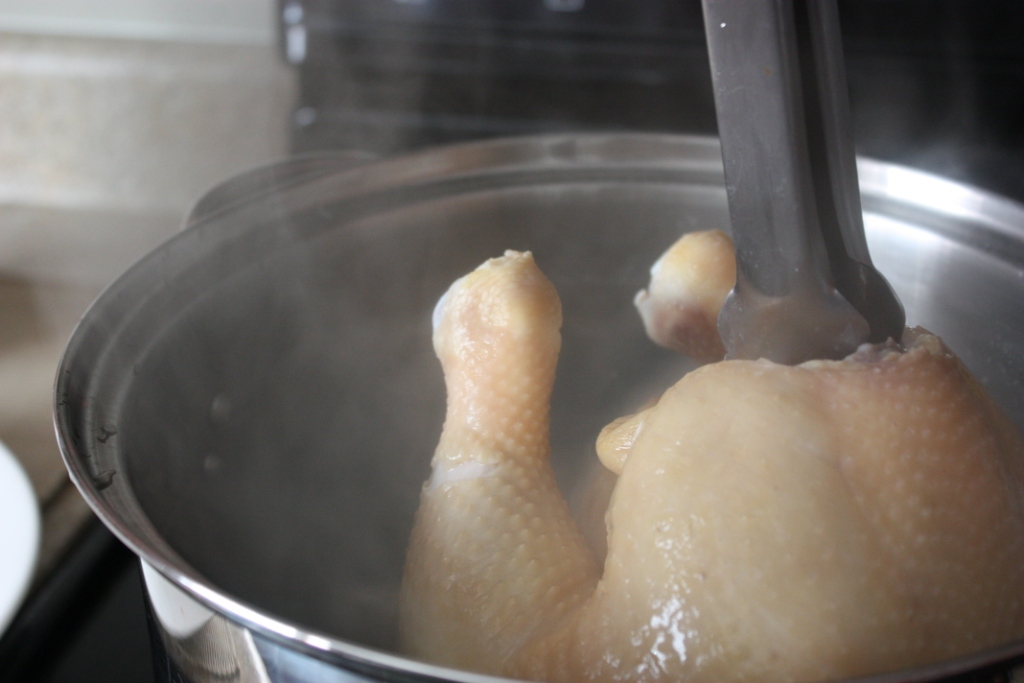
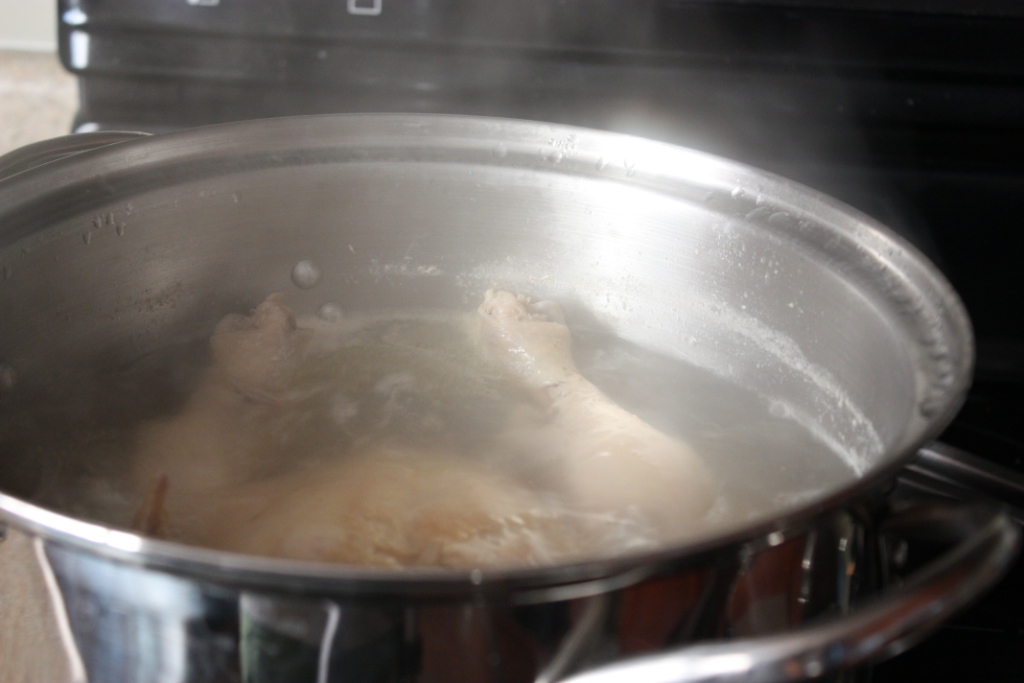
Place your chicken in a large soup pot. Cover it completely with water. Bring the water to a boil, reduce the heat to just above a simmer and partially cover the pot.

As the water begins to boil the chicken will be making your broth. Once the water is hot, the skin will begin to cook immediately and look a bit like this. Be sure you have a pair of tongs handy to work with the chicken.

Continue to cook the chicken for 45 minutes to 1 hour.

Meanwhile, begin your dumplings.

Step 2:

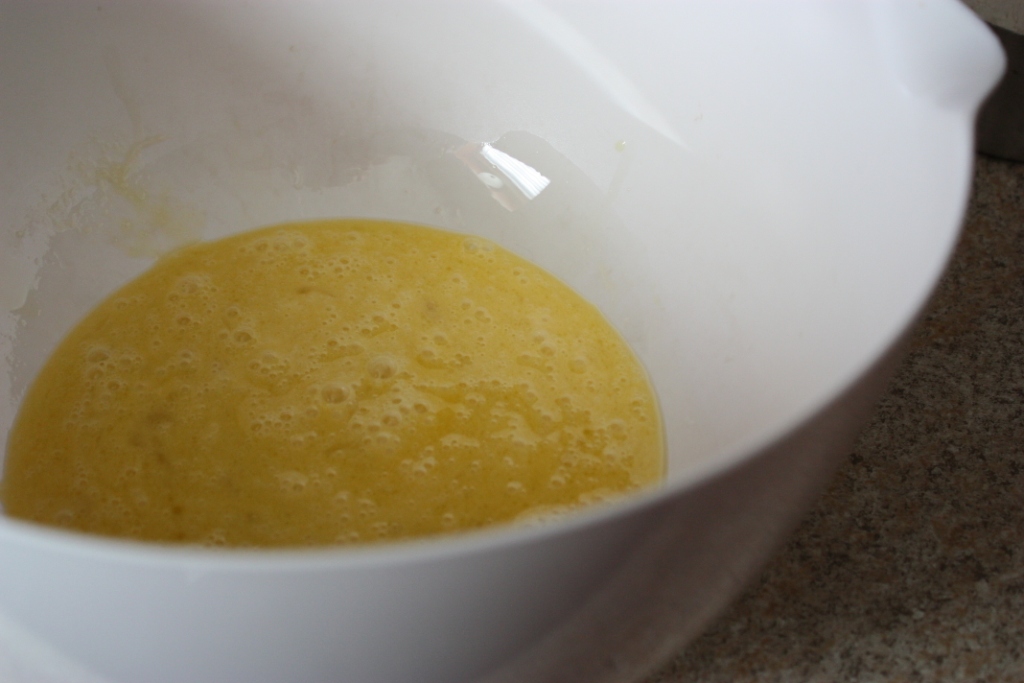
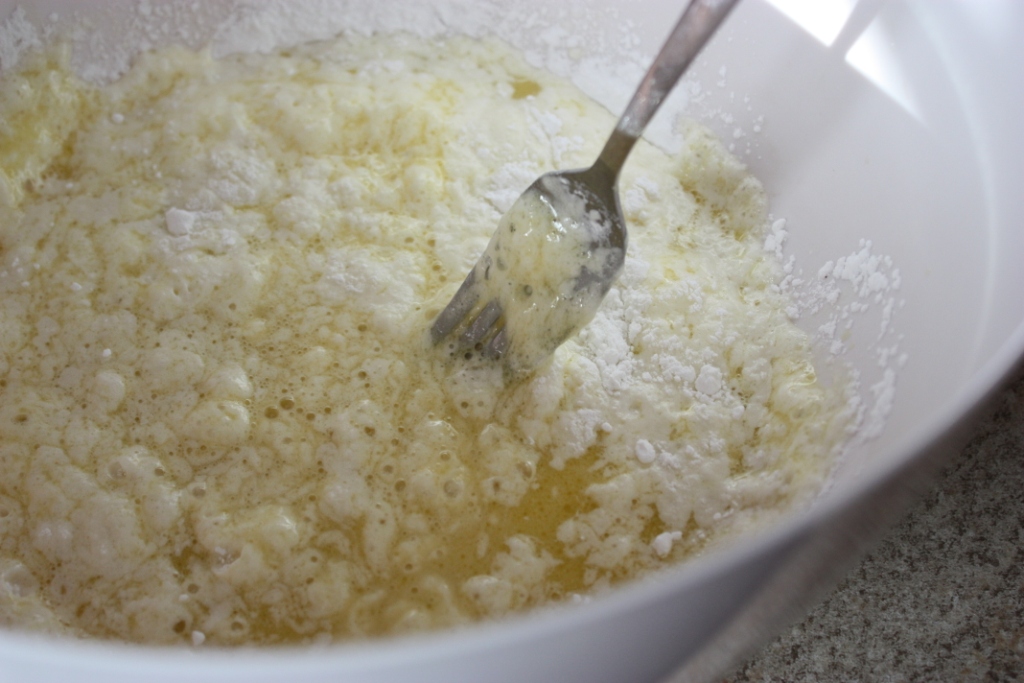
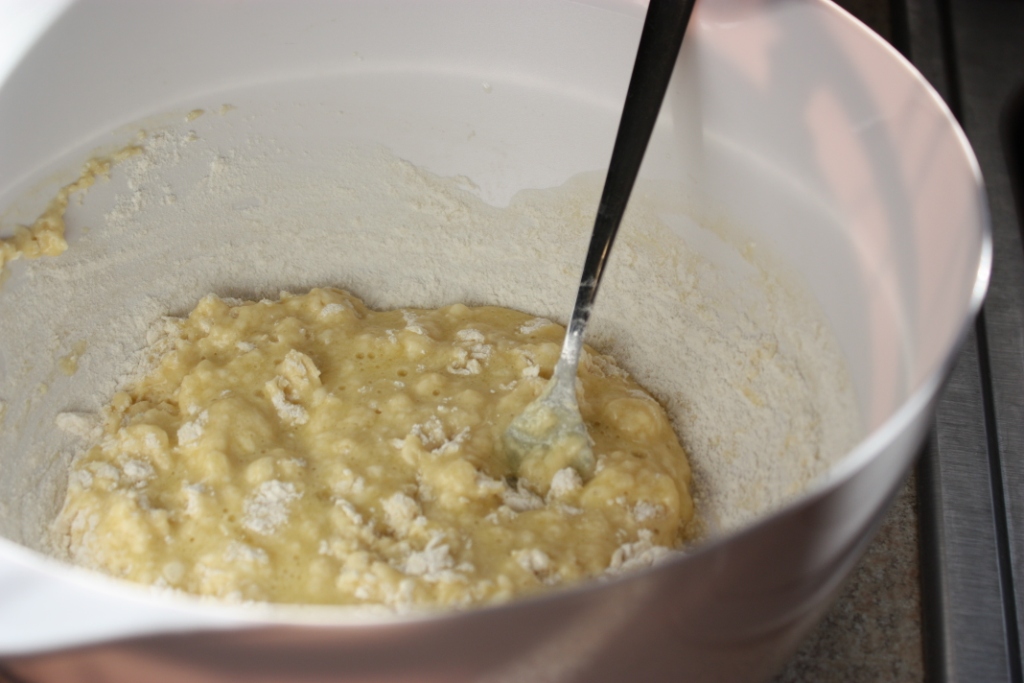
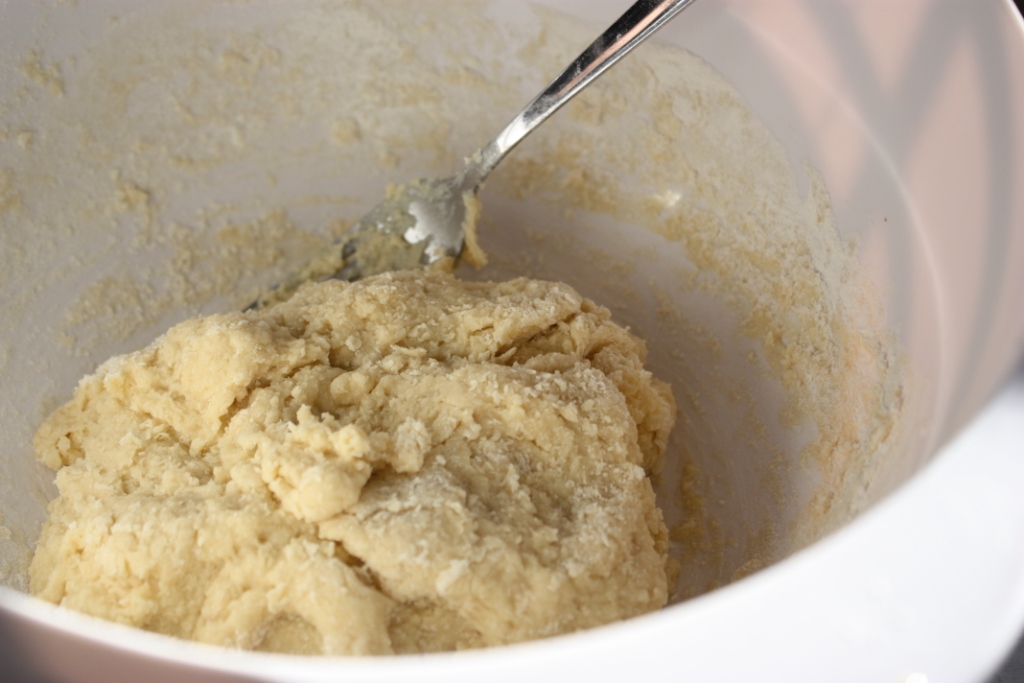
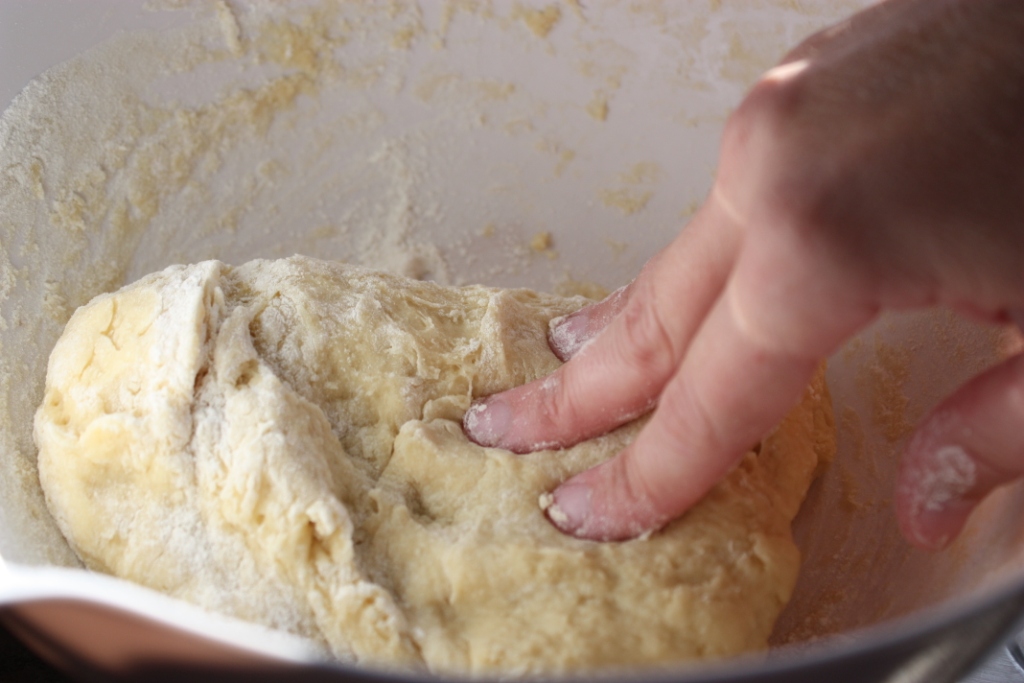
In a bowl, combine the eggs, salt, baking powder, oil and ¼ c milk. Whisk with a fork. Begin to add in the flour, a little at a time, until a dough is formed. It should be firm and only slightly stickier than a bread dough. If the dough is too dry, add in more milk until you reach the right consistency for the dough.
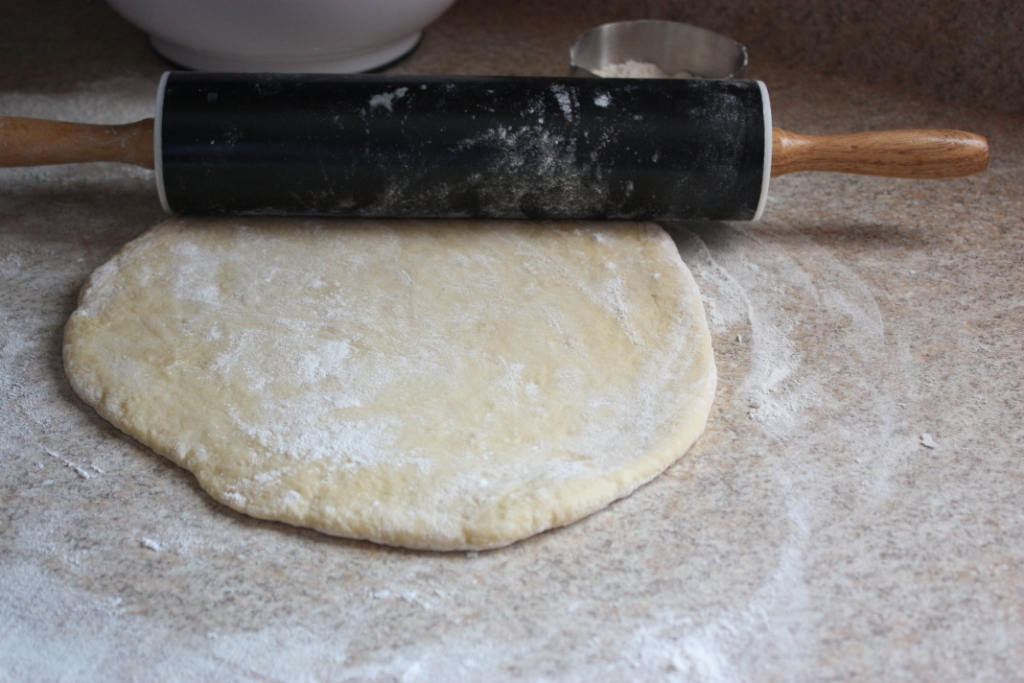
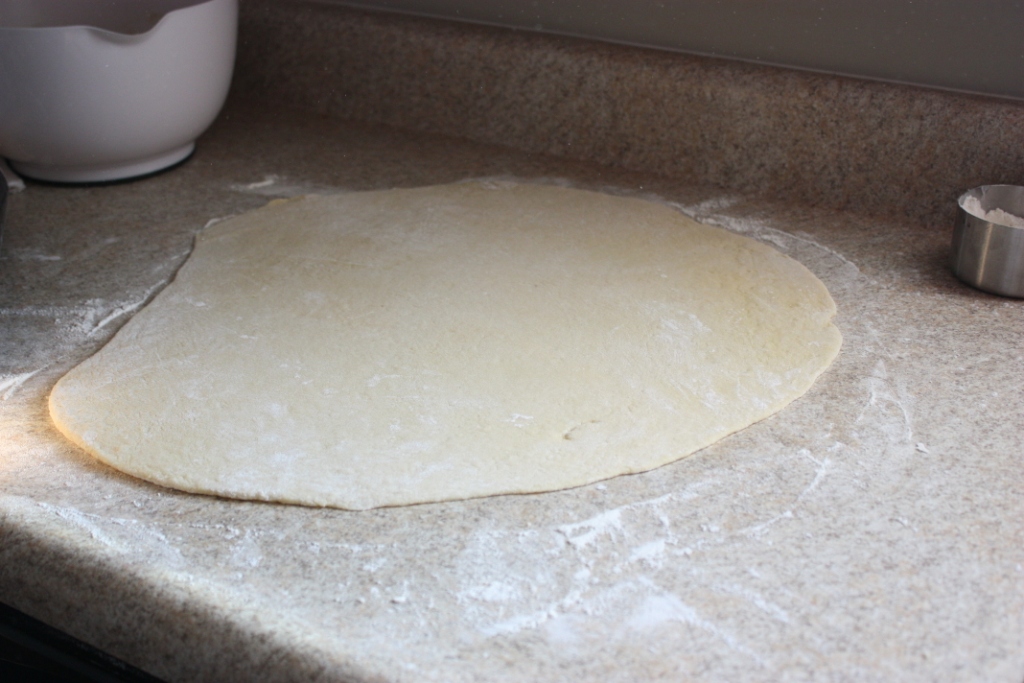
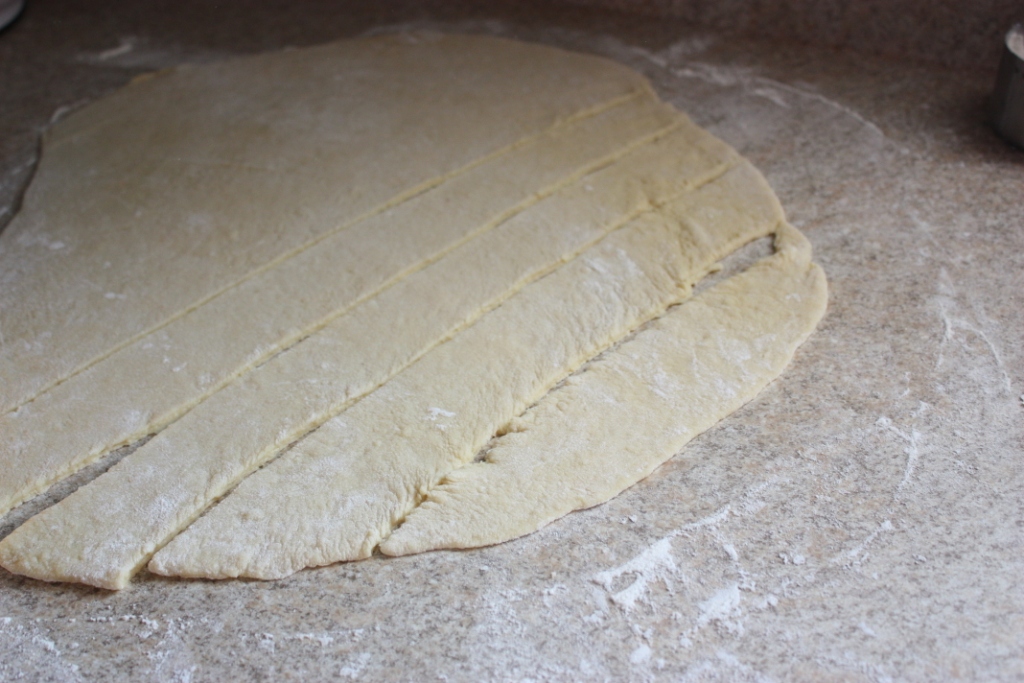
Step 3:

Place the dough on a floured surface and begin rolling it out into a large circle. You want it to reach about 1/8 to 1/4 inch in thickness. Continue to sprinkle the dough with flour as you roll to keep it from sticking.

Step 4:

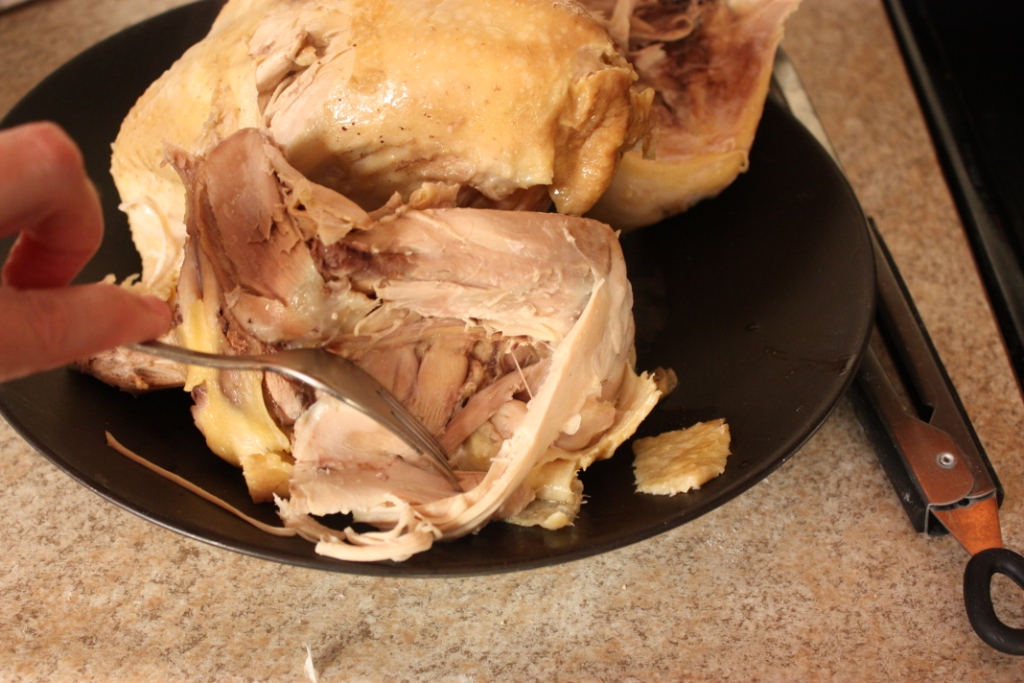
Next, check your chicken. It is best to allow it to cook until the chicken begins to fall apart. Use a large spoon and tongs to help you carefully remove it from the hot water. Transfer it to a plate and let it cool to the point where you can shred it with your hands or with a fork.

Ensure that your broth is at a low boil, you may need to increase the heat a bit after removing the chicken.
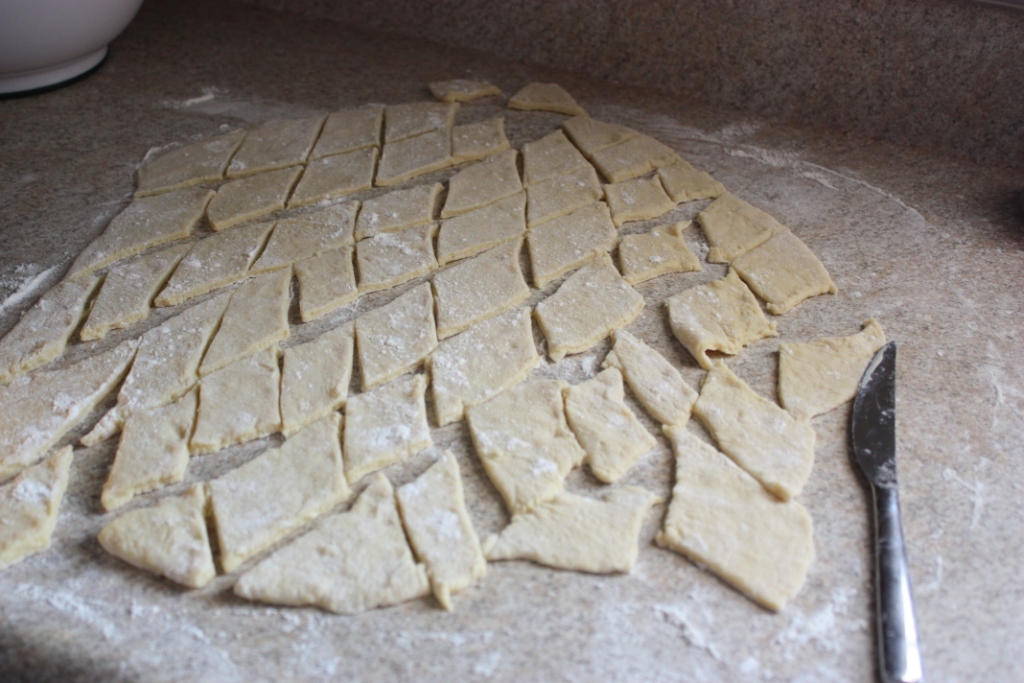
Step 5:

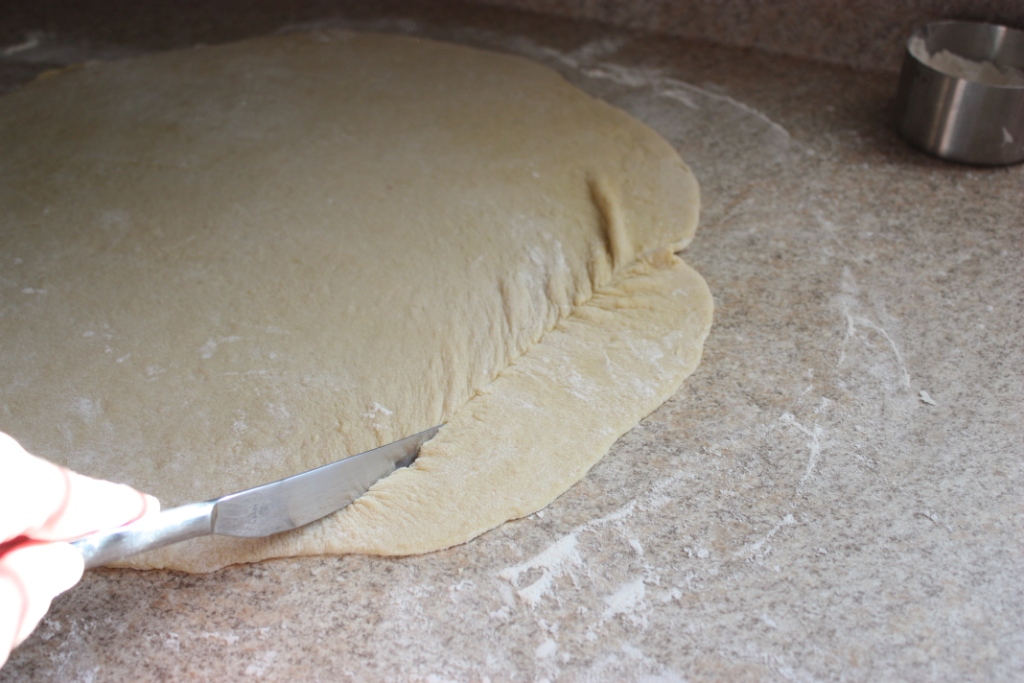
Return to your dumplings and begin slicing them. I used a steak knife with a serrated edge. Cut the dumplings into strips about 1 to 1 ½ inches wide. Cut across from the opposite direction to create diamond shapes.
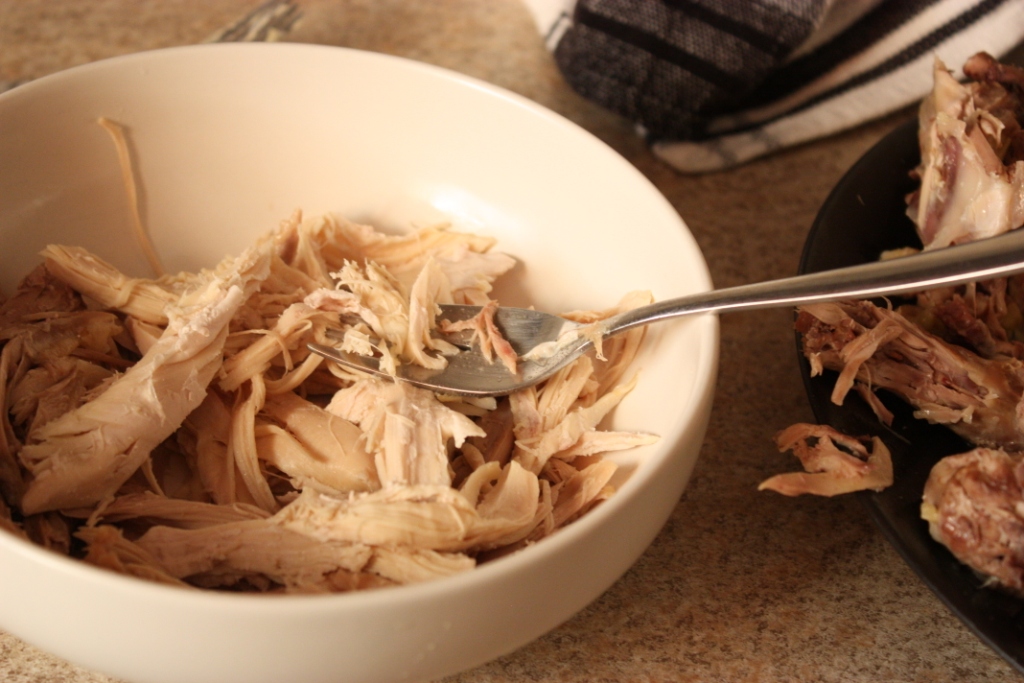
Step 6:

If your chicken is cool enough to work with, begin shredding the meat you want to use for your dumplings. You can use all the dark and white meat you are able shred off the bone, or reserve some of the meat for later use. It really depends on how meaty you want your dumplings and how many people you are serving.

Shred the chicken and set aside. If all of the meat isn’t cool enough to touch continue on with the dumplings and you can shred the rest of the meat once the dumplings are cooking.
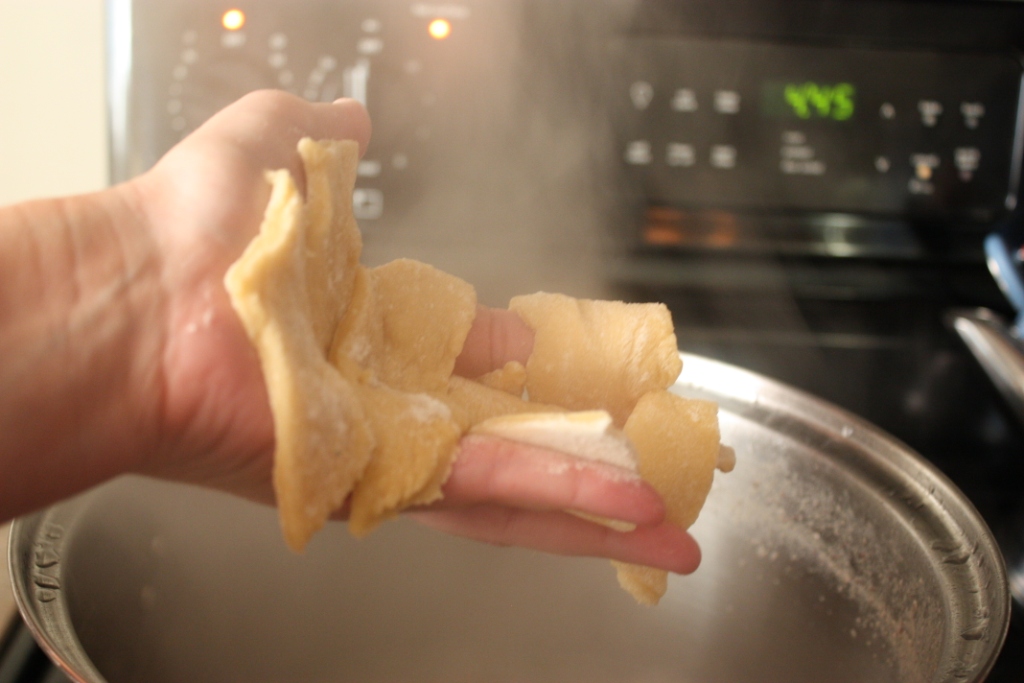
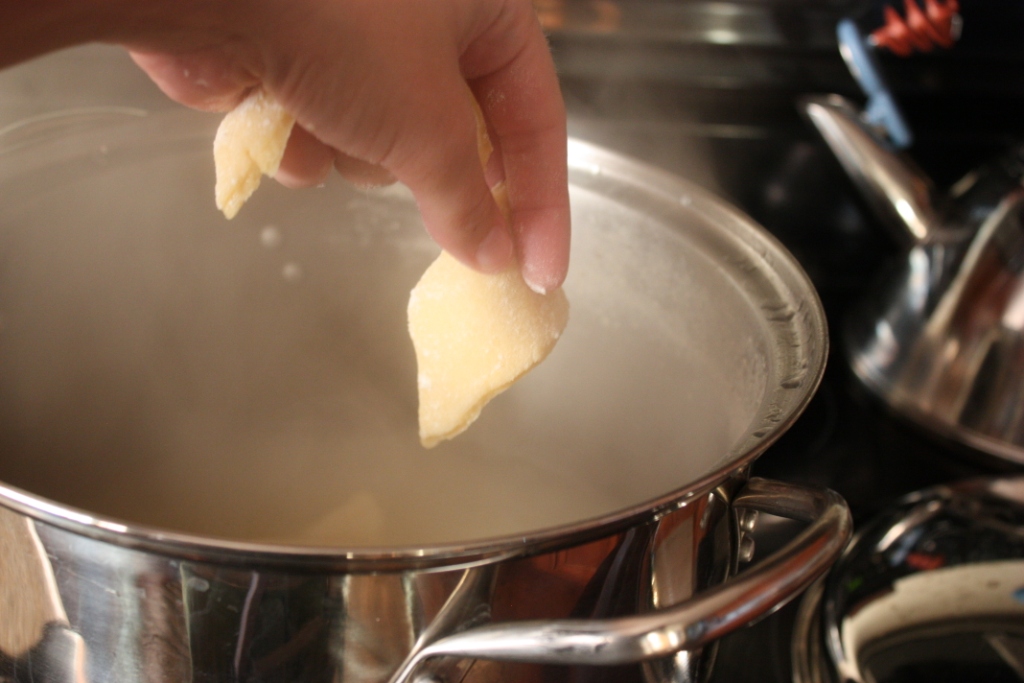
Step 7:

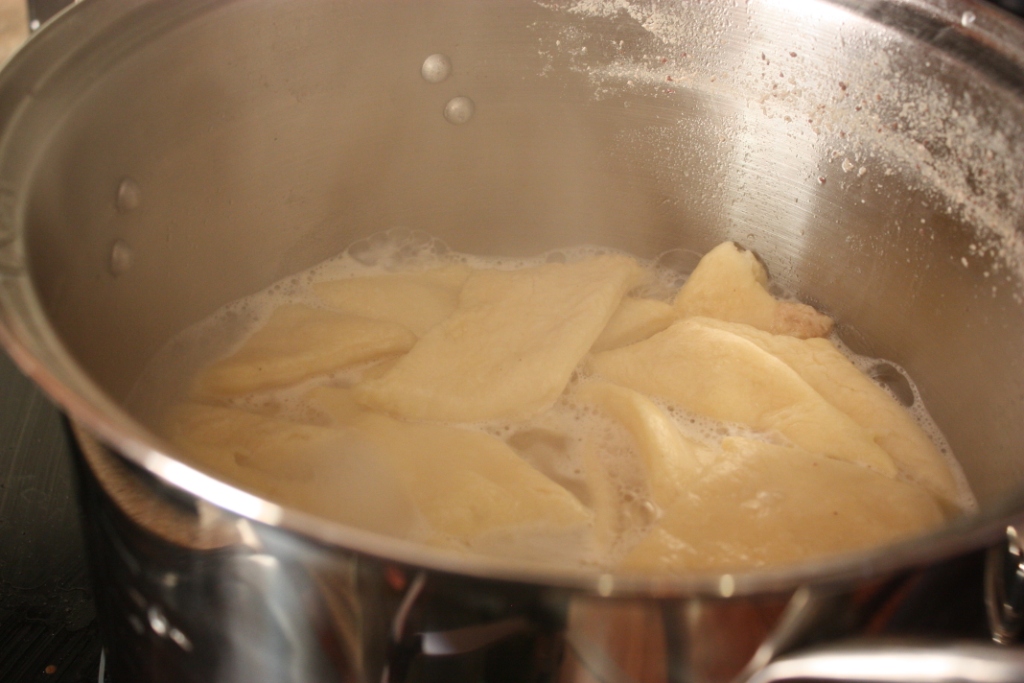
Carefully grab a handful of dumplings, keeping them somewhat separated and slowly add them to the boiling broth. Continue dropping the dumplings in one to two at a time and be cautious of hot water splashing out.

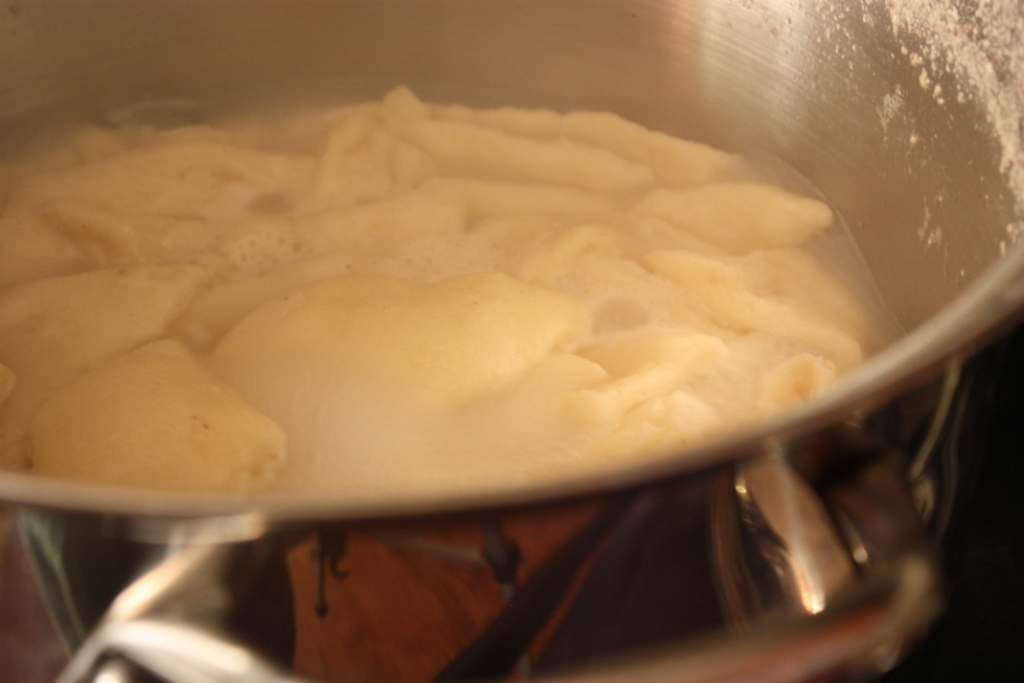
The dumplings will immediately rise to the top as they cook. As you need space, use a spoon to gently move the cooking dumplings to the side of the pot as you add in more. Do not stir! Continue this process until all your dumplings are in the pot.

Once they are all in the pot, allow them to cook 2 to 3 minutes and test one. They should be firm and cooked through, yet they will be soft and flexible, a little like a noodle.
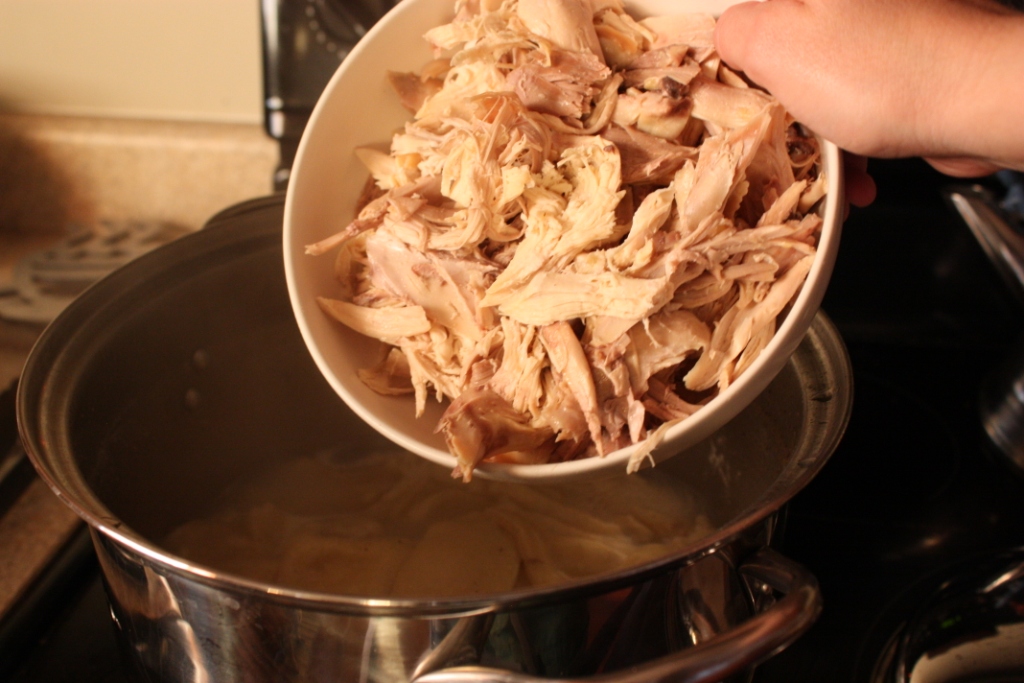
Step 8:
Once the dumplings are done, or are very closing to being done, begin to add in the shredded chicken. At this point you can gently stir the chicken and the dumplings.

Allow the chicken to heat through and the meal is ready to serve! Season with salt and black pepper to taste. Serves about 6.

Hearty Tomato, Kale & Mushroom Sauce (Over Handmade Pasta)

January 6, 2011

Have you ever just thrown something together and it turned out great? I think I’m about 50/50 when it comes to experiment success. Sometimes I get ideas and begin throwing things in the skillet and the result in inedible. Other times, the cards seem to be stacked right and I end up with a great meal I can’t wait to make again.

Or in this case, a sauce.

We decided to close out 2010 with a homemade meal, and my husband and I tried making pasta for the first time. I put that part in parenthesis because a handmade pasta post will come later once I gather some good photos. I do have to say that it was so wonderful, I’d be willing to put in the effort on any busy week night to make pasta again.

But this post is about the sauce.

I love rich and hearty red sauces. The kind of sauce that is so good even a meat lover would forget that it is vegetarian.

This sauce is it. It was perfect for the pasta we made and I’m ready to try it with a different version like ravioli or lasagna.

Hearty Tomato, Kale and Mushroom Sauce

1 tbsp olive oil
2 medium tomatoes, peeled (I used thawed, frozen ones from the garden)
3 cloves garlic, minced
5 button mushrooms, chopped
2 cups kale, finely chopped
¼ cup water
1 tsp mascavo or brown sugar
1 tbsp balsamic vinegar
1 tsp dried oregano
1 tsp dried parsley
1 tsp salt
½ tsp ground black pepper
¼ tsp crushed red pepper

Heat the oil in the skillet, add the garlic. If using a thawed, frozen tomatoes place them in the skillet and break up with your spoon. Otherwise, roughly chop the tomato and place in the skillet. Add the mushrooms and cook for 2 to 3 minutes over medium heat.

Add the kale, stir to coat with any oil and the other ingredients. Add the water, place a lid on the skillet. Simmer for 10 minutes stirring occasionally. The tomato should break down completely and the kale should be tender.

Remove lid and stir in the sugar, balsamic vinegar, basil, oregano, salt, black pepper and red pepper. Cook for 1 to 2 minutes more and serve over pasta. Makes 2 servings.

Wild Mushroom Mac and Cheese

November 17, 2010

It seems to be the battle of the carbs in our kitchen lately. I’m trying hard to keep my carb selections smart as I clean up my diet before we enjoy a Jamaica vacation filled with unlimited food and rum in just a few short weeks. Meanwhile, my husband will be running a challenging trail marathon the first weekend of December.

Now, you see my dilemma. Him – lots of carbs and calories in general. Me – not needing so many of either at this specific time of the year.

Over last weekend I came to the conclusion that he could use some mac and cheese, and I’ve been craving it. So I struck a deal with my craving – use whole grain, healthy ingredients, and quality ingredients with lots of flavor. I also paired it up with a side of broccoli, cauliflower and bok choy sautéed in virgin coconut oil.

I had some wild mushrooms left over from the Marx Foods Mushroom Recipe Challenge so I decided to use up the Lobster Mushrooms (my new favorite) and Matsutake. This turned out to be a great flavor combo with the sharp cheddar and sweet smoked Swiss cheese.

Now, I will admit. This isn’t a gooey, cheesy mac and cheese which I often prefer. It is more of a casserole, but it has definitely taken care of the craving and the “carbs wanted” sign around here.

Wild Mushroom Mac and Cheese

2 oz dried wild mushrooms
1 box (~14 oz.) whole wheat pasta
1 tbsp olive oil
¼ cup onion, diced
2 cloves garlic, minced
2 tbsp unsalted butter
2 tbsp white whole wheat flour
2 cups milk
1 cup sharp cheddar cheese, finely shredded
¼ cup smoked Swiss, finely shredded
Salt and pepper to taste
¼ cup bread crumbs
1 tbsp butter

Place the mushrooms in a bowl and cover with 2 cups boiling water. Allow to soak for at least 20 minutes. Cook pasta according to package directions, drain and set aside.

Squeeze mushrooms and pat dry. Chop. Heat olive oil in a skillet over medium-high heat. Add the mushrooms, onion and garlic. Cook for about 5 minutes, or until the onions are translucent and browned. Set aside.

In a saucepan, melt the butter over medium heat. Whisk in the flour to create a roux. Slowly whisk in the milk. Whisk vigorously to avoid any clumps. Continue to cook and stir until the milk thickens slightly. Remove from heat. Reserve about 2 tbsp of cheese and stir the rest into the milk until melted. Stir in the mushrooms and onions, then salt and pepper to taste.

Preheat the oven to 375 degrees F. Grease a casserole dish with butter. Melt the 1 tbsp of butter and combine it with the bread crumbs for a topping.

Combine the pasta with the cheese sauce, stir well. Transfer the mixture to the baking dish. Top with the reserved cheese and bread crumbs. Cover the baking dish with a lid or foil, and bake for about 15 minutes. Remove the covering and bake for an additional 5 minutes until the toppings are browned. Makes 6 to 8 servings.

Potato, Chickpea and Lentil Curry

October 1, 2010

When I set out to cook Indian cuisine, sighs can often be heard throughout the kitchen. While I don’t consider most dishes difficult, I can never get them turn out like the foods I have in Indian restaurants (we haven’t been to India ourselves yet.)

Since I can’t seem to make the perfect authentic dish, I typically end up making something that incorporates a handful of different recipes. Our dinner on Tuesday night was a good example of this.

I intended to make aloo cholay which is one of my favorites. I ended up with different spices which likely created a different dish all together, but this time I have to say it wasn’t too bad at all. In fact, it has made quite a nice lunch the past couple days, perfect for the fall-like weather that has finally arrived!

On the side this time, I tried out some Cinque e’ Cinque, also called Farinata. Lucini Italia contacted me several weeks ago with an offer to give this gluten-free, vegan product a try. I almost composed a short response and deleted the email immediately because I was asked if I want to try their new mix. Knowing how I feel about mixes, I figured it would not be for me.

I decided to check out their site though and learned that the mix was actually just flour from chickpeas, custom proprietary milled flour. Some of the varieties also had added spices. As the mixer, I had to add water, olive oil and sea salt.

So I said send it on, and along came a generous box consisting of hand-picked, estate grown Italian olive oil, basil infused olive oil, pasta sauces in three flavors with minimal natural ingredients in BPA-free pouches, no sugar added pizza sauce, 10 year aged balsamic vinegar and bread dipping sauce.

So far everything has been outstanding. I was incredibly impressed by their use of quality ingredients and lack of fillers.

Yes, I realize that the Cinque e’ Cinque is Italian, but with it being chickpea flour I thought it would go wonderfully with an Indian dish. I was right. I received 3 flavors – traditional, rosemary and chili. I chose traditional and it was the perfect replacement for the usual couscous or rice. It has a look similar to baked polenta, but much smoother without all the graininess. With the simple olive oil and sea salt the flavor is delicious.

So, as you can see, not only do I seem to mix dishes of the same cuisine, but now I’ve taken it so far as to mix two cultures as well. Fortunately the Indian and Italian influences complemented each other nicely.

Potato Chickpea and Lentil Curry

2 medium potatoes, peeled and cubed
1 cup lentils
2 medium tomatoes, chopped
2 cups cooked chickpeas
3 tsp garam masala
1 tsp turmeric
2 tsp sea salt
Plain yogurt (optional)
Cilantro (optional)

Place the potatoes and lentils in a soup pot. Cover with water. Bring to a boil over medium high heat, reduce to a simmer and cook, partially covered with a lid, for about 5 minutes.

Add the tomatoes and chickpeas and cook 5 more minutes. Stir in the garam masala, turmeric and about 1 cup of additional water. Cook about 10 to 12 minutes more until the tomatoes have cooked down and disappeared, and the lentils and potatoes are tender.

Stir in the salt and top each serving with plain yogurt and chopped cilantro. Makes 4 to 6 servings.

Stuffed Poblano Peppers with Tomato Chile Sauce

August 25, 2010
Stuffed Poblano Peppers with Tomato Chile Sauce Recipe | FakeFoodFree.com

Peppers are plentiful all over the Farmer’s Markets in central Kentucky right now. The varieties don’t get especially exotic, but I have been impressed by the diversity of the selection. In addition to colorful banana peppers and poblanos, I have seen some Hungarian wax peppers and habaneros. That’s in addition to the Anaheims, jalapenos, bell and cayenne peppers we have in our garden.

Mixed peppers at the Lexington, Kentucky farmers market 

I made it to the Lexington Farmer’s Market this past weekend and I bought some small poblanos which put me in the mood for some pepper stuffin’. I finally decided to go with some pastured Heritage breed pork sausage I had left over for the stuffing and mixed it with a cornbread-like filling.If you haven’t used poblano peppers they are mild, especially once you remove the seeds and veins to stuff them. I did detect a little bit of heat in a couple bites, but it was not overwhelming at all.

Next, I needed a sauce. I decided to wing it a bit and cook down some tomatoes and onions for a puree. I haven’t cooked with our cayenne peppers at all so I added a half of one to the mix.

I was thrilled with the sauce. It ended up much sweeter than I had anticipated, but it went well with the mild heat from the cayenne. Once it got on the stuffed poblanos, it was even better!

Stuffed Poblano Peppers Recipe


The only thing I might change about this recipe in the future is to add just a touch more milk to the cornbread filling. I thought I had plenty and worried it wouldn’t bake well, but it actually ended up drying out more than I would have liked. Otherwise, this is going in the make-again folder.

Stuffed Poblano Peppers with Tomato Chile Sauce


Sauce:
1 large tomato, peeled and diced (about 1 ½ cups)
2 small Anaheim peppers, sliced
¼ cup onion, diced
1 clove garlic, sliced
½ large cayenne pepper, sliced
1 tsp salt

Peppers:
6 small poblano peppers, halved, seeds and veins removed
¾ cup cornmeal
1 tbsp white whole wheat flour
2 tbsp onion, minced or grated
1 tsp salt
¼ tsp black pepper
½ tsp cumin
¾ cup milk
½ cup cooked sausage, crumbled
¼ cup shredded cheese (I used Farmer’s cheese)

Stuffed Poblano Peppers Recipe

In a medium sauce pan, bring all the ingredients to a boil on medium-high heat. Reduce slightly to a simmer, cover partially with a lid and allow to cook down for about 15 minutes, stirring occasionally.

Once all the vegetables are very tender, transfer to a blender. Puree until a smooth sauce results. Transfer back to a sauce pan and add the salt. You can set it aside and heat it back up later, or keep it at a low simmer while you make the peppers.

Preheat the oven to 400 degrees F. Coat a baking dish will olive oil and line the peppers, cut side up in the dish.

In a medium mixing bowl, stir together the cornmeal, flour and onion. Add the salt, black pepper and cumin. Slowly add the milk a little at a time. You want the batter about the same consistency as it would be for cornbread or brownies. Stir in the sausage.

Spoon the cornmeal mixture into the peppers and divide evenly. Sprinkle each pepper with cheese. Bake for 18 to 20 minutes, or until the cheese begins to bubble and brown. Serve with the warm sauce. Makes 3 to 4 servings.


Thanks for reading! All images and content are the property of Fake Food Free unless otherwise stated. Please do not republish full recipes and images without written permission. What is okay? Feel free to Pin images, share links to my posts or share the photo in a round up post with the title of this recipe and a link back to the post. Confused about copyright and food blogs? Here is some helpful information on Recipe Attribution. If you want to use a photo or full recipe, just ask. I’m sure we can work something out.  


Bacon and Brussels Sprouts Pasta with Parmesan

August 13, 2010

Our local Farmer’s Market is small. We have about 20 members and an average of 5 to 8 sell on Saturdays and often only 2 or 3 on Sundays. Despite the size, it is amazing the amount of produce you can get your hands on by stopping by.

I’ve been helping out with media for the market this year and I enjoy heading out early when I can and chatting with the farmers and vendors. I have learned a lot about growing practices in Kentucky through my conversations. I usually try to help them get set up as we talk, which for me secretly means I get to go through their available produce first.

This led me to discover the small bag of Brussels sprouts one of the farmers had available on Tuesday. It was just a cup or two, and I immediately bought them as soon as I discovered the bag. I have only had Brussels sprouts on a couple occasions and have never cooked with them, but inspired by all the recipes on the web, I’ve had my eye out for some.

First of all, when you buy them from the farm, they don’t look like the ones in the supermarket. I wish I had taken a before picture, but let’s just say there was a ton of peeling off outer leaves and trimming stems involved. I ended up being very happy that my bounty included only a couple handfuls.

Once cleaned, however, they looked beautiful and I couldn’t wait to get cooking!

A few months ago I picked up a discounted pack of pastured heritage breed bacon pieces from St. Asaph farm. These are the little bits they trim off the pretty bacon. They are perfect for beans, or in this case, a pasta dish with Brussels sprouts.

I checked out a few recipes on the web and finally decided to modify the Braised Brussels Sprouts in Bacon and Shallots from White on Rice Couple. What I really needed from this recipe was the cooking method which worked out wonderfully.

I tossed the final dish with some whole wheat pasta and stirred in some freshly grated parmesan. The bacon was slightly crispy and the sprouts nice and tender. This is a dish I will be making more of as the Brussels sprouts become more available this fall!

Bacon and Brussels Sprouts Pasta with Parmesan
Modified from Braised Brussels Sprouts from White on Rice Couple

10 ounces dry whole wheat pasta
½ to ¾ cup bacon, chopped into small pieces
¼ cup onion, diced
2 cloves garlic, minced
1 ½ cups Brussels sprouts, halved if large
½ cup chicken stock
¼ cup grated parmesan

Cook the pasta according to package directions, drain, reserving ¼ cup pasta water, and set aside. In a deep skillet add the bacon and cook over medium-high heat. Cook for 5 to 7 minutes, you really want the fat to immerge in the pan.

Once bacon is browned, quickly stir in the onion, garlic and Brussels sprouts. Stir well and lower heat as necessary to avoid burning the garlic. Pour in the chicken stock and simmer on medium heat, stirring often, until the Brussels sprouts are tender about 5 more minutes.

Add the pasta to the skillet along with the reserved pasta water. Stir to incorporate all ingredients. Turn off the heat and stir in the parmesan cheese. Serves 3, for us anyway.

Vegetable Fried Rice

August 6, 2010

Is anyone else experiencing a cooking low right now? I’m feeling uninspired and I blame it on the current season. Just weeks ago I was still giddy over garden goodness and content with fresh salads, light vinaigrettes combined with the occasional grilling.

The grilling is still interesting, and for that matter I could bake and bake, but I am stumped for main courses to cook. Nothing sounds good at all.

While part of me is saying – it’s still summer, enjoy fresh and light meals, another tiny voice which grows by the day is saying – fall is right around the corner. I think about pumpkin, casseroles, stews and dumplings, and then I realize it is still much too hot for all that heavy food. As a result, I got nothing.

How will I combat this problem? Well, I’ve decided that I will devote much of the month of August to making other people’s recipes. I’ve been pulling out the cookbooks and revisiting all the great food blogger recipes I have bookmarked.

Otherwise I’m going to try to combine the two seasons – light and summery with filling and comforting. That is how I decided on Vegetable Fried Rice.

My mom made the best fried rice when I was growing up. I’ve made it myself before, but after enjoying it last week I have no idea why I don’t make it more often.

I used a variety of vegetables from our garden and tossed in some shiitake mushrooms. (Those came from Indiana.) The eggs are from friend nearby who has her own chickens and runs a small sustainable homestead at Wonder of Life Farm.

The rice is white. Why? Well, because I love white rice. I eat plenty of whole grains on a regular basis so I have no issues with including white rice from time to time. Brown rice has its place, and feel free to substitute it here, but when traveling all around Southeast Asia I rarely saw it eaten. White rice is more traditional to me so that is what I stick with.

This dish didn’t pull me out of my cooking blahs completely, but I think it was a good start. Now I’m off to check out some more cookbooks, two of which I hope to review for you next week.

Vegetable Fried Rice

1 tbsp olive oil
2 cloves garlic, minced
1 small candy onion, diced
½ cup shiitake mushrooms, chopped
1 small zucchini, diced
1 red bell pepper, chopped
½ orange bell pepper, chopped
2 Anaheim peppers, sliced
3 cups cold, day old rice
2 eggs
3 tbsp tamari

In a large, deep skillet heat the oil and add the garlic and onion. Cook for 1 to 2 minutes. Add the mushrooms and zucchini and cook about 2 minutes more. Finally add the peppers and continue to cook until all vegetables are tender.

Add the rice and stir to incorporate, heating the it through. Push all of the ingredients to one side of the pan and add the two eggs to the empty side of the skillet.

Break the yolks with your spatula and allow the eggs to cook for 30 to 60 seconds. Once they are almost cooked through, stir them into the rest of the rice, distributing the egg evenly.

Stir in the tamari and you are ready to serve. Add salt and pepper to taste if you desire. I find the tamari is enough for me. Serves about 4.

Want to create beautiful food and product photos that you can't wait to share?!
Discover your style, control the light, and shoot using the tool you know how to use (yes, your phone included). Learn about free resources, Live Q&As with Lori, and online courses you can take from anywhere in the world!
We respect your privacy. Unsubscribe at any time.