Browsing Category

Grains Nuts and Seeds

Lemon Tuna and Chickpea Salad

March 30, 2011

So this was the plan. A few days ago, when it actually felt like spring, I made a tasty, healthy and refreshing dish that I just couldn’t wait to share with you. I put it off for a bit so I could get some other posts up, then it happened.

Winter came back.

While we haven’t fared as badly as those getting snow, it is in the 30s and misty here. It might as well be blizzard conditions as far as I’m concerned.

It is as if my body was so excited for spring that the few days of 70s we had, it rapidly adapted. Now I have no tolerance. My husband and I even wimped out on our outdoor runs yesterday and waited until we could make it to the warm and toasty gym today.

I’m more than willing to attribute a good mood to sunshine, but I don’t like to blame a bad one on the cold, gloomy weather. I’ve been trying everything to maintain my positive spring attitude.

I did yoga yesterday for enlightenment. I slapped on some coconut lotion to remind me of the beach. We had salad last night for dinner.

Nothing.

Sadly, I’ll just curl up in a blanket and hope the kale, berries and herbs toughen up and hang in there.

So while this salad did nothing for helping me hold onto spring, maybe it will help you quicken its return.

Lemon Tuna and Chickpea Salad

1 ½ cups cooked chickpeas, rinsed and drained
1 can albacore tuna, drained
2 green onions, sliced
½ cup mild banana pepper rings
Juice and zest of one lemon
1 tbsp olive oil
Salt and pepper to taste

Place all ingredients in a medium size bowl and toss to coat everything with olive oil and lemon juice and break up the tuna. Garnish with more banana pepper rings or green onions if desired. Serves 2.


This post has been submitted to Souper Sundays at the Kahakai Kitchen.

Pastured Sausage and Shrimp Rice

March 16, 2011

I’ve only had jambalaya a couple times in my life and I’m certain I’ve never had what could be considered the real thing. So I have no idea why I was craving it earlier this week. There was just something about shrimp, sausage and rice with a slight tomato-y flavor that sounded really good. Not to mention our temps dropped back to mild winter status so some warm comfort food was necessary.

Since my version follows no authentic recipe, I decided it really should be called by the official name. We’ll just say it is similar to some of the versions I’ve had before. Regardless of its authenticity, it did fulfill the comfort food craving.

I used local, pastured Italian sausage so that added a lot of the flavor to the dish. Except for the onion and garlic, all my veggies were thawed from frozen. I had a variety of frozen peppers from last summer so I used sweet banana and one red jalapeno for a kick. My tomatoes were Romas from last year’s garden as well. You can use raw or cooked shrimp. If you use cooked, just throw it in at the end and heat it through.

Pastured Sausage and Shrimp Rice

¾ lb pastured Italian sausage
20 – 25 shrimp, peeled and deveined, chopped into pieces
5-6 small peppers (any variety), sliced
½ large onion, diced
1 clove garlic, minced
6 small tomatoes, peeled, seeded and chopped
1 ½ tsp smoked paprika
½ tsp garlic powder
1 ½ tsp chili powder
¼ tsp black pepper
1 tsp salt
4 cups cooked long grain rice

In a large, deep skillet brown the sausage over medium-high heat until fully cooked. If using raw shrimp, add and cook until just barely cooked through. Drain, rinse if needed, and remove from the skillet to set aside leaving a small amount of fat in the skillet for the veggies.

Add the onion, garlic and peppers. Cook over medium-high heat for about 3 minutes. Add the tomatoes and cook 5 to 7 minutes or until all vegetables are slightly browned and tender and the tomatoes begin to soften and break up.

Add the paprika, garlic powder, chili powder, pepper and salt. Stir to coat all of the vegetables. Add the rice, stirring to incorporate it and cook 2 to 3 minutes or until heated through. Stir in the sausage and shrimp and cook for another minute. Serves 6.

****************************************************************

I know I’m a bit behind schedule and I apologize for the delay, but I finally selected the winners of my new book – The Everything Guide to Food Remedies. I stole a fun idea from Deb at Kahakai Kitchen and copied everyone’s name taken from the comments. I put them all in my cute cupcake bowl, shook it, closed my eyes and drew.

So here you go.

The three people who will receive a copy of my book are Joanne at Eats Well with Others, Aoife of The Daily Spud and Pearl! Please email me your address at lori (at) fakefoodfree (dot) com and I will send you a copy.

I will email you if you provided me an address and will give everyone one a week to respond, so by next Wednesday. After that I will select another winner.

Thank you for all the congrats and the thoughtful comments! I really enjoyed reading your philosophies on health and food.

Irish Soda Bread with Pistachio Vanilla Butter

March 14, 2011

This pistachio vanilla butter makes a quick and easy spread for a favorite St. Patrick’s Day staple, Irish Soda Bread!

I’m finally back in the kitchen! After travel with family to Hilton Head Island last week and then a trip to Charleston, SC for work I’m settling back into shopping and meal planning this week. I’ll recap the food portion of my trip later, but right now I’m happy to say I made it back to the kitchen just in time for St. Paddy’s Day.

Last year, I let the holiday slip by without a celebratory food in sight. I must admit I didn’t go over the top this year with a full meal, but I guess I do still have a few days left.

Pistachio Vanilla Butter for Irish Soda Bread | Fake Food Free | An easy spread for a St. Patrick's Day staple.

While Irish Soda Bread may be the St. Patrick’s go-to for many, this is the very first time I have baked it. To add to the Irish flavor, I made sure I got the recipe from one of my favorite Irish chefs, Rachel Allen. We are headed to Ireland this summer and I already have space and weight set aside to stock up on several of her cookbooks.

So I tried my hand at her Irish Soda Bread and it was a hit! Crusty and chewy on the outside and soft on the inside. I guess it would be difficult to mess up so few ingredients, but given my baking history I can never be too sure. I used unbleached all-purpose flour for this one and substituted Demerara sugar. I also added some raisins for color and sweetness.

Pistachio Vanilla Butter for Irish Soda Bread | Fake Food Free | An easy spread for a St. Patrick's Day staple.

Once I had the bread, I felt the need to spread on something green. Pistachios were the first thing that came to mind. I chopped them up, added them to some butter and added just a drizzle of pure vanilla. The nutty vanilla flavor goes so well with the slightly sweet raisins in the bread. Not to mention, the finished product is flecked with festive pieces of green.

The White Soda Bread recipe can be found on Rachel Allen’s website. The quick and easy butter is below.

Pistachio Vanilla Butter

Makes: 1/4 cup

Ingredients


½ stick unsalted butter
25 to 30 shelled, salted pistachios, finely chopped
1/8 tsp pure vanilla extract.

Prep

Place all the ingredients in a small food processor and pulse until the butter is softened and everything is combined. If you’d like the butter slightly sweet you can add a teaspoon of honey or confectioner’s sugar to the butter before mixing.

Pistachio Vanilla Butter for Irish Soda Bread | Fake Food Free | An easy spread for a St. Patrick's Day staple.

This post has been submitted to the St. Paddy’s Day Food Parade at The Daily Spud.
 

Almond Coconut Chocolate Pudding

February 18, 2011

This homemade chocolate pudding combines the flavors of one of my favorite candy bars. The creamy pudding is made from scratch with few ingredients and then topped with crunchy almonds and coconut. 

Almond Coconut Chocolate Pudding | Fake Food Free

Anytime I have a recipe that uses half of an ingredient I must find another recipe that will use of the other half. It took me a little while to get this post up, but do you remember when I made the baked oatmeal?

Well, that recipe used egg whites which meant I had two egg yolks begging to be included in something equally delicious. As much as I love pudding, I rarely make it. I’ve seen some incredible puddings online so I’ve had it on my mind lately. When I found a recipe using 2 egg yolks, a match had been made.

First I decided to use coconut oil instead of butter. That led to all kinds of flavor ideas. I finally settled on coconut almond with chocolate pudding. Not unlike that popular candy bar.

I have to admit that I have not fully perfected my pudding. I need to get it a bit smoother and be careful when adding the hot liquid to the eggs, but all in all this dessert was delicious!

Almond Coconut Chocolate Pudding
Modified from Vanilla Pudding, Betty Crocker’s Cookbook: Bridal Edition

Makes: 3 to 4 servings

Ingredients

¼ cup unsweetened coconut
¼ cup chopped almonds
½ cup Demerara sugar (or any raw sugar)
1/3 cup unsweetened cocoa powder
2 tsp of cornstarch (arrowroot would work well too)
1/8 tsp salt
2 cups 2% milk
2 large egg yolks, slightly beaten
1 tsp almond extract
2 tbsp virgin coconut oil, melted

Prep

Place the coconut and almonds on a cookie sheet. Toast at 400 degrees F for 5 to 7 minutes or until the coconut has slightly browned. Set aside.

In a saucepan, whisk together sugar, cocoa powder, cornstarch and salt. Gradually whisk in the milk. Cook over medium heat, stirring constantly. Gently bring to a boil and cook for 1 minute.

Place the egg yolks into a small bowl. Gradually add the hot liquid to the yolks about a tablespoon at a time, stirring constantly. Once about half of the hot liquid has been added, pour the egg yolk mixture back into the saucepan. Gently boil and stir 1 minute.

Stir in the coconut oil and almond extract. Pour the pudding into 3 or 4 dessert dishes (depending on the serving size you desire), cover and refrigerate at least 1 hour. Garnish with the toasted coconut and almonds before serving. 

 
Almond Coconut Chocolate Pudding | Fake Food Free

Thanks for reading! All images and content are the property of Fake Food Free unless otherwise stated. Please do not republish full recipes and images without written permission. What is okay? Feel free to Pin images, share links to my posts or share the photo in a round up post with the title of this recipe and a link back to the post. Confused about copyright and food blogs? Here is some helpful information on Recipe Attribution. If you want to use a photo or full recipe, just ask. I’m sure we can work something out.

Hummus with Almond Butter

February 8, 2011

No tahini? No problem. This delicious hummus without tahini uses almond butter for a rich and creamy snack, spread or dip!

Hummus made with peanut butter instead of tahini seems to be all the rage. I was thrilled to see this substitution on food blogs because I have a hard time keeping tahini in the house. I love it, but I find I only end up using it for hummus and a huge can goes to waste.

   Hummus with Almond Butter | Fake Food Free

Over the weekend, I set out to give this crazy new hummus a try. My true mission was to get some type of vegetable into our Super Bowl spread and carrots serve as a great dipper for hummus.

I found Turbo Hummus from Alton Brown and decided it would be the one I would try. I cooked my chickpeas from dried earlier in the week, so I added water to make the hummus creamier. If you use canned chickpeas, the liquid would likely take the place of the added water. It all depends on how thick you like it.

I also made another change.


At the last minute I decided to use almond butter instead of peanut butter. Now, I’m not claiming this to be some brilliant creation. I’m sure others have made it the same way, but wow, was it good! I still need to try it with peanut butter, but it may be hard to break away from the almond butter version.

Hummus with Almond Butter | Fake Food Free


Hummus with Almond Butter
Adapted from Turbo Hummus by Alton Brown


2 ½ cups cooked chickpeas
3 cloves garlic
2 tbsp almond butter
Juice and zest of one lemon
1/3 cup olive oil
¼ cup water
2 tsp dried parsley
½ tsp salt
¼ tsp black pepper

Place the chickpeas, garlic, almond butter, lemon juice and zest in a food processor. Attach the lid and process until blended to a thick paste. Add the olive oil as you process on low and blend well. Next add water, more or less, depending on how thick you like your hummus.

Finally stir in the parsley, salt and pepper. Refrigerate for 30 minutes before serving.

Hummus with Almond Butter | Fake Food Free


Thanks for reading! All images and content are the property of Fake Food Free unless otherwise stated. Please do not republish full recipes and images without written permission. What is okay? Feel free to Pin images, share links to my posts or share the photo in a round up post with the title of this recipe and a link back to the post. Confused about copyright and food blogs? Here is some helpful information on Recipe Attribution. If you want to use a photo or full recipe, just ask. I’m sure we can work something out.

Peach Baked Oatmeal

January 31, 2011

   Peach Baked Oatmeal | Fake Food Free

I’ve hit that point in the winter when the freezer digging begins. I’m about out of tomatoes and chicken stock, and making mental notes to myself that I need to freeze more during this coming summer.

During this process, I also end up uncovering a few things I had forgotten about. For example, this weekend I found a couple white peaches I bought last July from a local orchard. Instead of letting them go bad before I could use them up, I peeled, chopped and froze them thinking I’d add them to a pie or other dessert this winter.

When I found them the first thing I thought of was baked oatmeal. I’ve been seeing it all over blogs lately, but have yet to make it myself. I thought the peach would make a nice variation to the apple, cinnamon and maple varieties I’ve come across.

I used a recent recipe I found at Two Peas and Their Pod and adjusted it so that I could use my peaches and my favorite varieties of cane sugar. I cut the liquid back a bit to account for the peaches, but I may have cut it back a little too much. My baked oatmeal came out almost like a cross between an oatmeal bread and cookie. However, this morning when I poured about 3 tablespoons of milk over it before heating it up in the microwave, it was perfect. Hearty and filling.

Peach Baked Oatmeal | Fake Food Free


It’s only slightly sweet so I paired it up with just a dollop of my homemade peach jam. Maple syrup would work well, too. Then, as with most of my breakfasts, it had to be topped with some chopped walnuts.

I’m now a huge fan of baked oatmeal! It’s perfect to have on hand for busy mornings.

Peach Baked Oatmeal

Adapted from Apple Cinnamon Baked Oatmeal by Two Peas and Their Pod

Makes: 6 servings

Ingredients

Peaches
2 peaches peeled, pitted and chopped (defrosted if frozen)
1/8 cup water
1/8 cup Demerara sugar

Oatmeal
3 cups rolled oats
¼ cup mascavo sugar (or any evaporated cane sugar)
1 tsp baking powder
1 ½ tsp ground cinnamon
¼ tsp salt
½ cup milk
½ cup water
2 egg whites
1 tsp vanilla

Prep
 
In a sauce pan, combine the peaches, sugar and 1/8 cup water. Bring to a low boil and cook, stirring often, until peaches are broken down and sauce is thickened, about 10 to 15 minutes. Set aside to cool.
 
Peach Baked Oatmeal | Fake Food Free
Preheat the oven to 350 degrees F. In a large bowl, combine the oats, mascavo sugar, baking powder, cinnamon and salt. In a separate bowl, whisk together the milk, ½ cup of water, 2 egg whites and vanilla. Stir the wet ingredients into the dry ingredients and mix well.
 
Slowly stir in the cooled peach mixture. Spoon the oatmeal into a greased casserole dish and spread evenly. Bake for 20 minutes. Serve warm. To serve leftovers, add 3 tablespoons of milk before reheating in the microwave. 
 
Peach Baked Oatmeal | Fake Food Free
 
 Thanks for reading! All images and content are the property of Fake Food Free unless otherwise stated. Please do not republish full recipes and images without written permission. What is okay? Feel free to Pin images, share links to my posts or share the photo in a round up post with the title of this recipe and a link back to the post. Confused about copyright and food blogs? Here is some helpful information on Recipe Attribution. If you want to use a photo or full recipe, just ask. I’m sure we can work something out. 
 

Fiery Peanut Butter Cookies

January 24, 2011

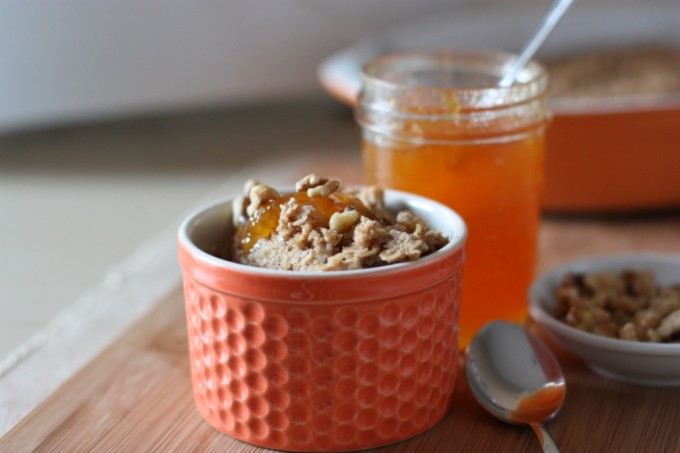
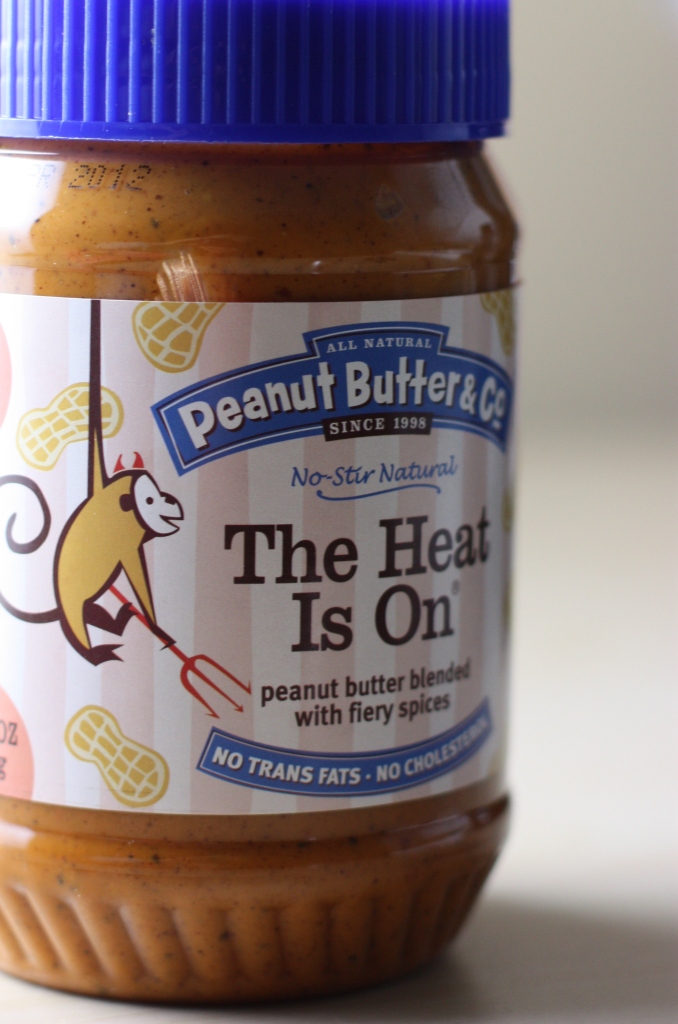
I love a bit of heat in my dessert baking. A few years ago I experimented with spicy peanut butter in my cookies and they were a hit. These are made with PB & Co The Heat Is On peanut butter that was sent to me to try back then. As expected, I was an instant fan.

Fiery Peanut Butter Cookies Recipe | Fake Food Free | A classic peanut butter cookie with a spicy twist!

I know what you are thinking – spicy peanut butter cookies?

To that I answer a resounding – YES!

I’m sure you are no stranger to peanuts with a little spice. Chicken satay with spicy peanut dipping sauce, or maybe roasted peanuts coated in seasonings like chili powder. I love the combination and when a touch of sweetness is added, I think it is even better!

A while back I hosted one of Peanut Butter Boy’s Peanut Exhibitions and Peanut Butter & Company sent us a few new products to try. In email conversations with their PR person, I mentioned that I had wanted to try their spicy peanut butter, The Heat Is On, but it wasn’t available in stores around here. I was thrilled when she emailed a while later and told me she had thrown in a jar of it into my box before it mailed.

I had no idea what to expect from it. I knew it would be spicy, but I was also expecting it to be somewhat sweet.

Well, I was half right. The peanut butter contains no cane sugar, just peanuts and savory, fiery spices. Chili powder, cayenne peppers, crushed red peppers and paprika to be exact.

Fiery Peanut Butter Cookies Recipe | Fake Food Free | A classic peanut butter cookie with a spicy twist!

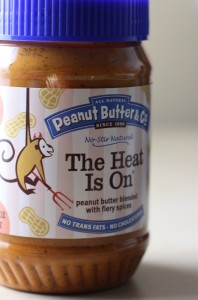
Now, it is super spicy and I like it a lot, but other than a Thai peanut sauce, I wasn’t quite sure what to do with it. Then cookies came to mind.

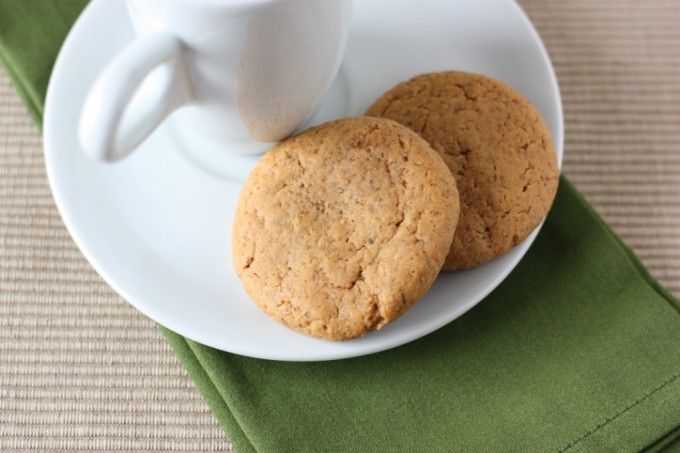
It seems a little strange at first, but if you like anything sweet and spicy you will love these cookies. I used my favorite recipe from Simply Recipes, but changed the sugars and flour.

As a result you get a slight crunchy texture from the Demerara sugar within a soft and chewy cookie. The first bite is sweet and then it is followed by a slow, building heat on the back of your tongue. 


Fiery Peanut Butter Cookies Recipe | Fake Food Free | A classic peanut butter cookie with a spicy twist!


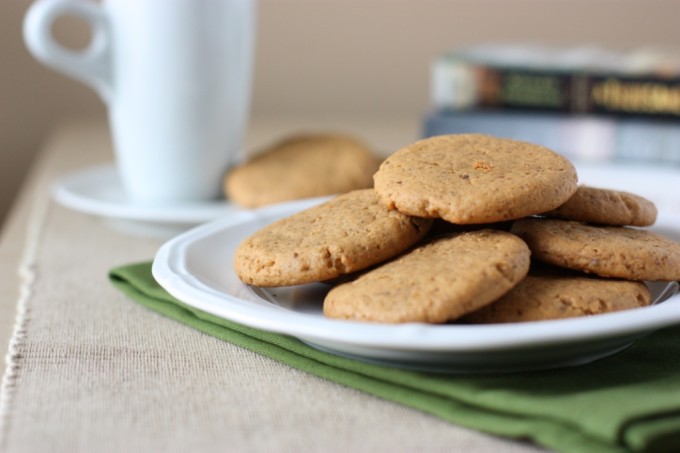
They are way too complex for a cookie! To me, they hold a sense of international flavor with the peanut and spice. Perfect as a snack when you catch up on some travel-inspired reading.

Fiery Peanut Butter Cookies
Recipe adapted from Simply Recipes

Makes: About 2 dozen cookies

Ingredients

½ cup Demerara sugar
½ cup mascavo sugar
½ cup unsalted butter
½ cup Peanut Butter & Co The Heat Is On Peanut Butter
1 large egg
1 ¼ cups white whole wheat flour
¾ teaspoon baking soda
½ teaspoon baking powder
¼ teaspoon salt

Prep

In a bowl of a mixer, cream together the sugars and butter on medium high. Cream for 3 to 5 minutes to really incorporate the Demerara sugar. Add in the peanut butter, and then the egg. Mix until all ingredients are combined. Scrape the sides of the bowl as needed.

In a separate bowl, whisk together the flour, baking soda, baking powder and salt. Gradually add the dry ingredients to the mixing bowl. Mix just until the flour is incorporated. Cover the dough and refrigerate for at least an hour.

Preheat the oven to 350 degrees F. Remove the dough from the fridge and roll into balls and flatten. Mine were about 2 to 2 ½ inches wide. Bake on an ungreased cookie sheet for 10 to 12 minutes. Cool on a wire rack before serving.

Fiery Peanut Butter Cookies Recipe | Fake Food Free | A classic peanut butter cookie with a spicy twist!


Disclaimer: Peanut Butter & Co sent me this peanut butter free of charge. I was not obligated to blog about it and received no compensation for doing so.


Thanks for reading! All images and content are the property of Fake Food Free unless otherwise stated. Please do not republish full recipes and images without written permission. What is okay? Feel free to Pin images, share links to my posts or share the photo in a round up post with the title of this recipe and a link back to the post. Confused about copyright and food blogs? Here is some helpful information on Recipe Attribution. If you want to use a photo or full recipe, just ask. I’m sure we can work something out.

Shrimp and Grits with Kale Chips

January 17, 2011

Why in the world did it take me so long to try kale chips?!

I’ve seen them all over food blogs and kept thinking – oh, I need to try those at some point – but just never got around to it.

My husband did the grocery shopping last week and I had kale on the list. While I’d much rather buy local kale in the bunch this time of year, well, that just isn’t happening. The second choice, supermarket kale by the bunch, has looked awful lately. So he picked up one of those monster bags of chopped kale.

At first I thought, what in the world am I going to do with all this before it goes bad? I mean, I like kale, but that is A LOT of kale. Then I remembered kale chips. Perfect solution.

If you haven’t made them, it is so easy. Spread your chopped kale out on a baking sheet in a single layer. Drizzle with olive oil and toss gently to coat. Sprinkle with salt and pepper. Bake at 350 degrees F for 15 minutes.

There you go. Crispy, smoky little vegetable chips. Amazing that a veggie turns into such a great salty snack. We practically ate them all off the pan before dinner.

I picked up some locally ground grits from a festival a while back and I’ve had shrimp and grits on my mind. Once I had the kale chips I knew right away they would provide the perfect way to add a dark leafy green to this southern staple. The crispy green leaves add a crunchy texture and smoky flavor to the shrimp and creamy, cheesy grits.

Shrimp and Grits with Kale Chips

3 cups chopped kale leaves
1 cup dry grits
4 cups water
1 cup shredded cheddar cheese
2 tbsp olive oil
3 cloves garlic, minced
1 lb raw shrimp, peeled and deveined
½ tsp smoked paprika
¼ tsp crushed red pepper
½ tsp salt
¼ tsp black pepper

Preheat your oven to 350 degrees F and prepare kale as described above. Lay it out on a baking sheet, sprinkle with olive oil, salt and pepper and bake for 15 minutes. Set aside.

Meanwhile, bring the 4 cups of water to a boil. Add the grits and stir often until it reaches a porridge-like consistency, about 20 minutes. Stir in the cheese until mixed well. Add salt and pepper to taste, if you desire.

While the grits are cooking, heat the olive oil over medium-high in a skillet. Add the garlic, cook one minute.
Add the shrimp and cook until they turn opaque, or a whitish, pink color. Sprinkle in the paprika, red pepper, salt and black pepper.

To serve, divide the grits into 4 bowls. Top with ¼ of the shrimp. Layer on kale chips to your taste. Serves 4.

Honey Pecan Baked Brie

January 7, 2011
This easy baked brie is covered in sweet honey and crunchy pecans. Serve it with slices of crisp apple or your favorite crackers.  Honey Pecan Baked Brie Recipe | Fake Food Free | A simple appetizer on game day or for holiday parties!

When it comes to big sporting events I have to admit, it is all about the game food. Our game food has stepped up a notch in recent years. Sure, we still have nachos, and we can even find chicken wings and drummies from local farms which I can coat with buffalo sauce. But beyond that, I become a bit of a snack snob.

If I have my way there will also be some gourmet cheeses, maybe some bruschetta or pesto. This baked brie is a perfect example. 

Honey Pecan Baked Brie Recipe | Fake Food Free | A simple appetizer on game day or for holiday parties!
I’ve had baked brie at parties and restaurants, but I rarely make it myself. On New Year’s Eve I decided to give it a try and now (regardless of whether or not we care about the teams) I’ll be making it for game day, too!

There are lots of baked brie recipes out there. I originally wanted to make one with a jam on top, but couldn’t find the jam I wanted in an HFCS-free version. Instead, I combined pecans, mascavo sugar and honey. It formed a praline-type topping that was delicious with the cheese.

This recipe is super simple and you’ll have warm, gooey, sweet and salty goodness in a matter of minutes!

Honey Pecan Baked Brie Recipe | Fake Food Free | A simple appetizer on game day or for holiday parties!

Honey Pecan Baked Brie
Write a review
Print
Ingredients
  1. 1 round Brie cheese
  2. ¾ cup pecans, chopped
  3. ¼ cup mascavo (or brown) sugar
  4. 2 tablespoons local honey
Instructions
  1. Preheat the oven to 350 degrees. Place the unwrapped wheel of brie in a shallow baking dish. In a small bowl, mix together the chopped pecans, sugar and honey. It will form a thick, sticky paste.
  2. Spoon the pecans and sugars over the cheese and spread evenly. Bake the cheese for 10 to 15 minutes, until the pecans and sugar begin to caramelize. Let sit 3 to 5 minutes before serving.
Fake Food Free https://www.fakefoodfree.com/
 

Honey Pecan Baked Brie Recipe | Fake Food Free | A simple appetizer on game day or for holiday parties!

Honey Pecan Baked Brie Recipe | Fake Food Free | A simple appetizer on game day or for holiday parties!
 
Thanks for reading! All images and content are the property of Fake Food Free unless otherwise stated. Please do not republish full recipes and images without written permission. What is okay? Feel free to Pin images, share links to my posts or share the photo in a round up post with the title of this recipe and a link back to the post. Confused about copyright and food blogs? Here is some helpful information on Recipe Attribution. If you want to use a photo or full recipe, just ask. I’m sure we can work something out.  

Hearty Tomato, Kale & Mushroom Sauce (Over Handmade Pasta)

January 6, 2011

Have you ever just thrown something together and it turned out great? I think I’m about 50/50 when it comes to experiment success. Sometimes I get ideas and begin throwing things in the skillet and the result in inedible. Other times, the cards seem to be stacked right and I end up with a great meal I can’t wait to make again.

Or in this case, a sauce.

We decided to close out 2010 with a homemade meal, and my husband and I tried making pasta for the first time. I put that part in parenthesis because a handmade pasta post will come later once I gather some good photos. I do have to say that it was so wonderful, I’d be willing to put in the effort on any busy week night to make pasta again.

But this post is about the sauce.

I love rich and hearty red sauces. The kind of sauce that is so good even a meat lover would forget that it is vegetarian.

This sauce is it. It was perfect for the pasta we made and I’m ready to try it with a different version like ravioli or lasagna.

Hearty Tomato, Kale and Mushroom Sauce

1 tbsp olive oil
2 medium tomatoes, peeled (I used thawed, frozen ones from the garden)
3 cloves garlic, minced
5 button mushrooms, chopped
2 cups kale, finely chopped
¼ cup water
1 tsp mascavo or brown sugar
1 tbsp balsamic vinegar
1 tsp dried oregano
1 tsp dried parsley
1 tsp salt
½ tsp ground black pepper
¼ tsp crushed red pepper

Heat the oil in the skillet, add the garlic. If using a thawed, frozen tomatoes place them in the skillet and break up with your spoon. Otherwise, roughly chop the tomato and place in the skillet. Add the mushrooms and cook for 2 to 3 minutes over medium heat.

Add the kale, stir to coat with any oil and the other ingredients. Add the water, place a lid on the skillet. Simmer for 10 minutes stirring occasionally. The tomato should break down completely and the kale should be tender.

Remove lid and stir in the sugar, balsamic vinegar, basil, oregano, salt, black pepper and red pepper. Cook for 1 to 2 minutes more and serve over pasta. Makes 2 servings.

Want to create beautiful food and product photos that you can't wait to share?!
Discover your style, control the light, and shoot using the tool you know how to use (yes, your phone included). Learn about free resources, Live Q&As with Lori, and online courses you can take from anywhere in the world!
We respect your privacy. Unsubscribe at any time.