Browsing Category

Fruits and Vegetables

Spicy Thai Salad with Minced Pork (Larb) Recipe from Everyday Thai Cooking

September 13, 2013
 
Spicy Thai Salad with Minced Pork (Larb) Recipe from Everyday Thai Cooking | Fake Food Free
 

The first time I had Thai food was in Thailand.

That seems a little strange to me considering I was 30 years old. (I actually celebrated my 30th in Thailand. Great birthday.)

Most people would probably also try some of the dishes that hail from the country they are about to spend a few weeks exploring, but not me.

It was more of an access issue than anything else. There wasn’t much Thai food in central Kentucky the few years before that, and I also wasn’t an adventurous eater. I was more of a count your calories, eat whole grains and enjoy your fat-free yogurt kind of eater. (I know. I shutter when I think about it, too.) Then we moved to Brazil and there was good food, but no Thai.

So I learned about Thai food, including the infamous Pad Thai, in its home. That is not a bad situation to be in. Although it will leave you constantly comparing every dish you have after that to your original experience. For that reason, even though we took a cooking class while there, I haven’t made much Thai food at home. I play with Pad Thai and curry, but that is about it.

I think that is soon going to change. See, now I have this wonderful cookbook called Everyday Thai Cooking: Quick and Easy Family Style Recipes by Katie Chin. Just flipping through its pages, I feel empowered to bring Thai into my kitchen.

In addition to gorgeous food photography (and scenic photos from Thailand that make me want to go back), the book starts with three sections that I love to see in a cookbook – techniques, ingredients and the basics (all those pastes and sauces that make Thai food so amazing.)

Trust me, this section will have you feeling empowered, too. The book is split into appetizers, soups and salads, entrees based on the meat selection (and vegetarian), followed up by a hefty dessert section. Some things I have on my list include Fragrant Coconut Fish in Banana Leaves, Thai Garlicky Eggplant and Coconut Thai Basil Ice Cream. It’s page after page of both familiar and different Thai recipes that are simply explained for the home cook. 

Spicy Thai Salad with Minced Pork (Larb) Recipe from Everyday Thai Cooking | Fake Food Free

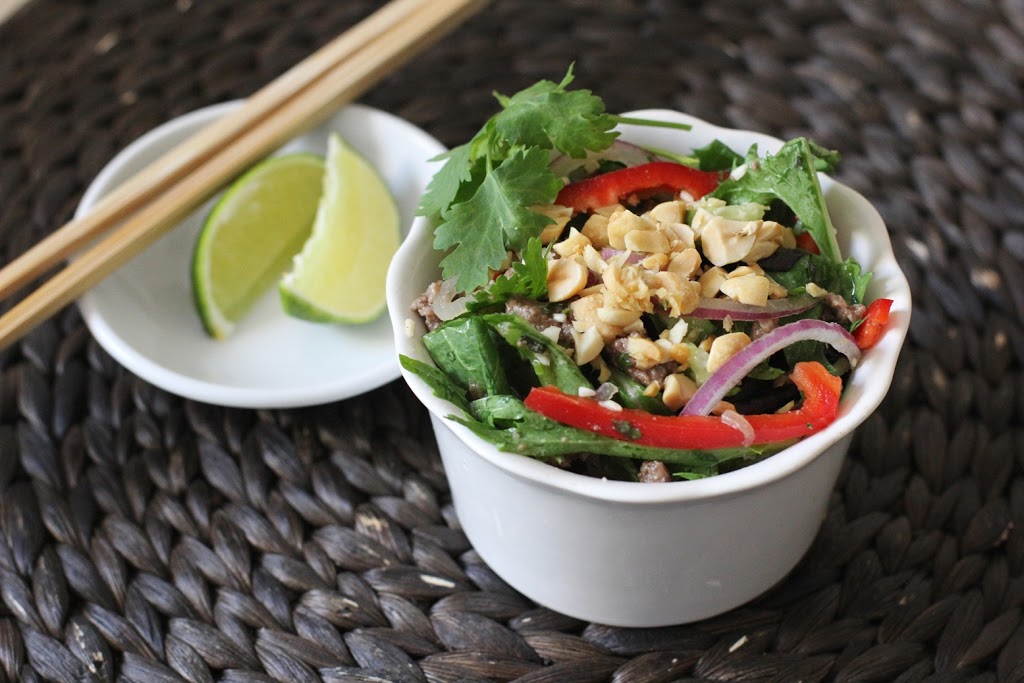
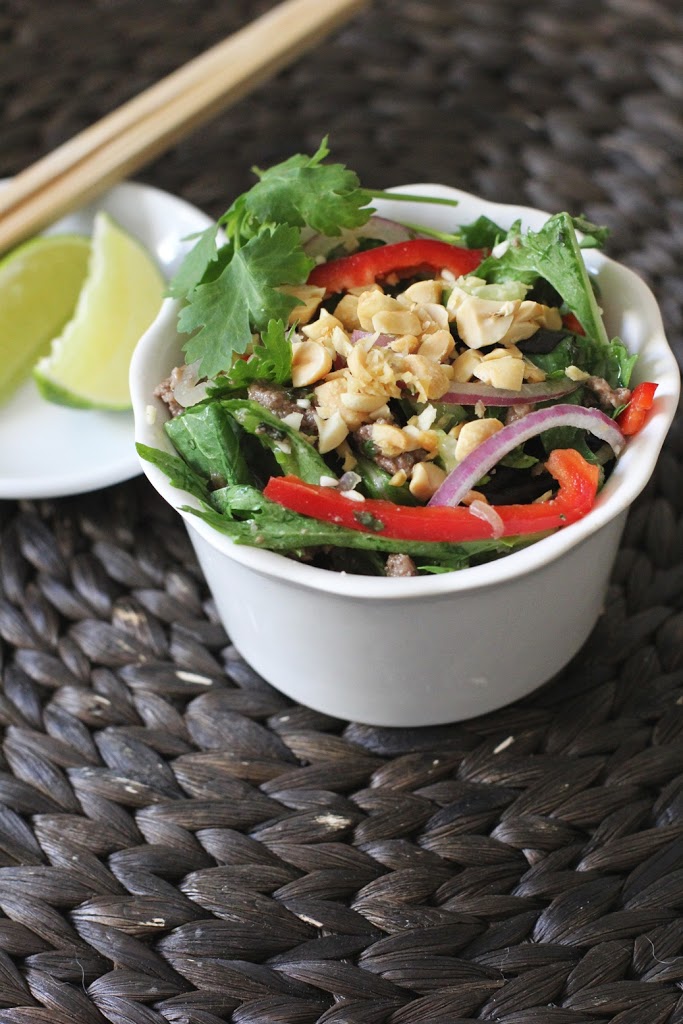
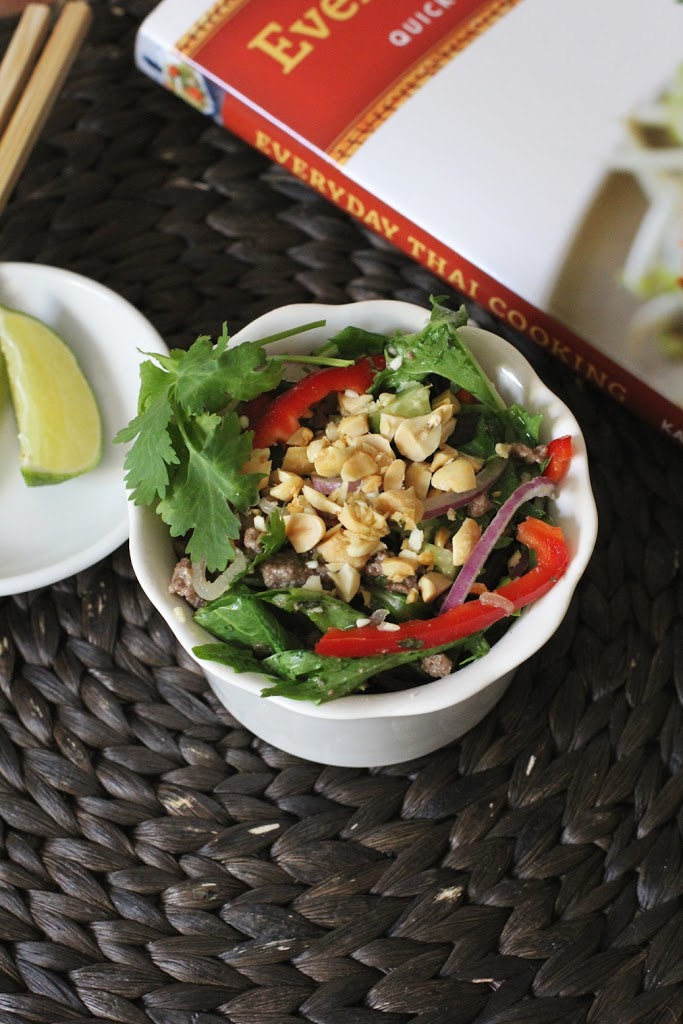
The Spicy Thai Salad with Minced Pork is what caught my eye when I first flipped through the book. It is light and healthy with all the familiar flavors of Thai cuisine. Katie and the publishers graciously gave me permission to share this delicious recipe with you.

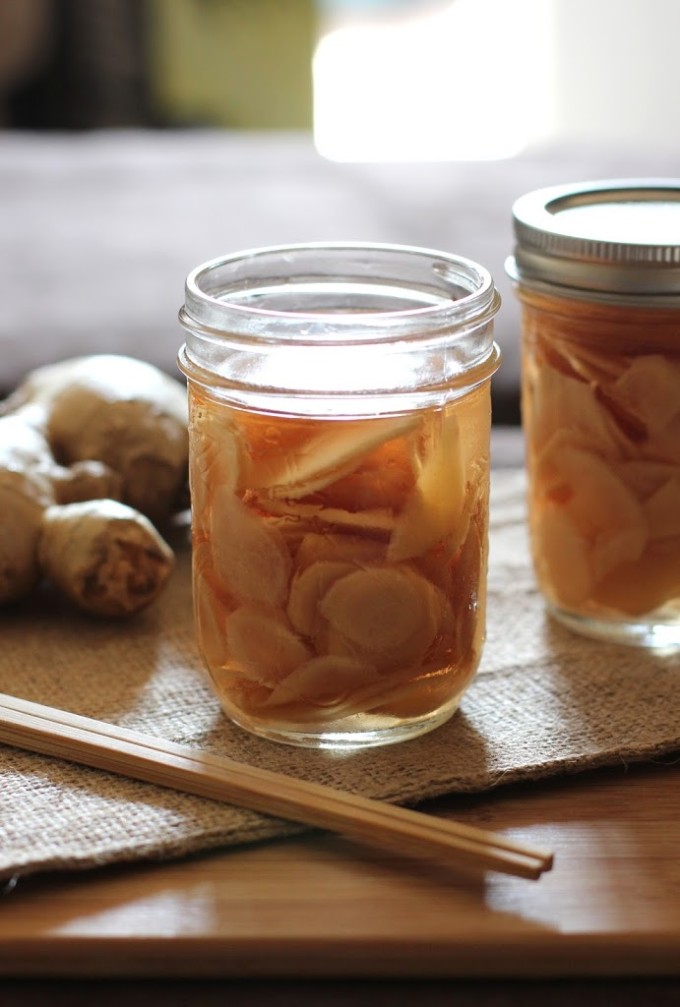
The thing I found most interesting about this dish was the roasted rice powder. I’m now going to be making this nutty, slightly crunchy powder to top other dishes. It adds a special touch. You’ll love this recipe. It’s all the tease you’ll need to get your hands on a copy of the book. 

Spicy Thai Salad with Minced Pork (Larb)

©Katie Chin 2013. Reprinted with permission from Tuttle Publishing

Serves 4 as part of a multi-course meal or for lunch

Preparation time: 20 minutes + cooling time
Cooking time: 30 minutes

Ingredients
1 tablespoon long-grain rice1 tablespoon high-heat cooking oil
1 garlic clove, minced
1 small shallot, finely sliced
1 teaspoon minced lemongrass
1 fresh hot red or green chili, preferably Thai (deseeded if you prefer less heat)
½ lb (250 g) ground pork
3 tablespoons Basic Chicken Stock or store-bought
2 tablespoons fish sauce (nam pla)
3 tablespoons freshly squeezed lime juice
1 tablespoon palm or brown sugar
4 cups (350 g) mixed baby greens
1 red pepper, thinly sliced
½ cup (52 g) peeled, seeded, and diced cucumber
12–14 fresh mint leaves
2 tablespoons finely chopped fresh coriander leaves (cilantro)
2 tablespoons finely chopped fresh Thai or Italian basil
½ small red onion, thinly sliced
4 tablespoons crushed roasted peanuts
Fresh coriander leaves (cilantro) for garnish
Mint leaves for garnish
Lime wedges

Prep

Make the roasted rice powder: Heat the rice in a small dry skillet over medium heat, stirring and tossing for 3–4 minutes, until it turns golden brown. Transfer to a small plate and allow to cool. Use a mortar and pestle or a spice grinder and grind the rice into a coarse powder.

Heat the oil in a wok or skillet on medium-high heat. Add garlic, shallots, lemongrass, and chili; stir-fry until fragrant, about 30 seconds. Add pork and stir-fry, while breaking it up with a wooden spoon until cooked through, about 5–6 minutes. Stir in the chicken stock, fish sauce, lime juice, and palm sugar and bring to a boil. Remove from heat and let stand 10 minutes.

In a large bowl, combine the rice powder, baby greens, mint leaves, fresh coriander leaves, basil, and red onions. Add the warm pork mixture and toss with the greens. Sprinkle crushed peanuts on top. Garnish with fresh coriander and mint leaves. Serve immediately with lime wedges.

COOK’S NOTE: Feel free to substitute the fish sauce with soy sauce, the pork with soy protein crumbles and the chicken stock with vegetable stock for a vegetarian version of this salad.

Spicy Thai Salad with Minced Pork (Larb) Recipe from Everyday Thai Cooking | Fake Food Free
 
Also be sure to check out the Dan Dan Noodles from Katie’s Everyday Chinese Cookbook!
 
 
Disclosure:  This book was sent to me for review purposes. I was not required to post about it and I received no compensation for doing so. This post contains affiliate links.
 
 
Thanks for reading! All images and content are the property of Fake Food Free unless otherwise stated. Please do not republish full recipes and images without written permission. What is okay? Feel free to Pin images, share links to my posts or share the photo in a round up post with the title of this recipe and a link back to the post. Confused about copyright and food blogs? Here is some helpful information on Recipe Attribution. If you want to use a photo or full recipe, just ask. I’m sure we can work something out.  

Japanese Pickled Ginger Recipe from The Joy of Pickling

August 19, 2013

   Japanese Pickled Ginger Recipe from The Joy of Pickling | Fake Food Free

Two of my favorite condiments are served beside sushi. First, it’s that pleasantly spicy wasabi. Second is the pickled ginger. I could eat that ginger on just about anything. It has crossed my mind that I could probably make it at home, but I have never searched for a good recipe. Fortunately, now I don’t have to because this time around a good recipe found me. 

All summer I have been browsing the pages of one amazing cookbook. It contains recipes for pickled everything! Or at least it seems like just about everything. The Joy of Pickling: 250 Flavor-Packed Recipes for Vegetables and More from Garden or Market by Linda Ziedrich

Pickled-Ginger-Cookbook
 
While you will find a huge variety of cucumber pickles, this cookbook goes well beyond the standard dill. Figs. You can pickle figs?! And peaches? There is even pickled pig’s ear should you choose to go there. There is also page after page of interesting condiments and sauces like Hot Orange Ketchup and Rhubarb Chutney
 
There were so many tempting recipes to try in this book, but I knew I finally had to give Japanese Pickled Ginger a try. The best part about many pickling recipes is that they are so easy to make. Top a few fruits or veggies with a liquid, seal and rest. A few days later you have a crisp, tangy snack or condiment. 
 
That is definitely the case with this ginger. Peeling and slicing takes a little time, but I had this recipe done in less than 30 minutes. Now that I have the ginger down, it may be time to start practicing the sushi. 
 
Japanese Pickled Ginger Recipe from The Joy of Pickling | Fake Food Free
 
This book has been out for a while now and I’m so glad that it finally caught my attention. I can tell it will become a well-used resource book for me every year. If you are spending late summer and early fall wondering what to do with all your garden produce, the chances are good that you can pickle it. This cookbook will show you how. 
 
Japanese Pickled Ginger Recipe from The Joy of Pickling | Fake Food Free
Japanese Pickled Ginger
©Linda Ziedrich 2009. Reprinted with permission from The Harvard Common Press.
 
Makes: About 1 Pint
 
From the book:
Use fresh young ginger for this pickle. Available in Asian markets, young ginger is pale, almost white with very thin skin and pink stem stubs. A mandolin may be useful for slicing the root. Your pickled ginger may turn out faintly pink, but it won’t have the hot pink color you’ll see in commercial versions of this pickle, that color comes from food dye. A traditional accompaniment to sushi, pickled ginger refreshes the palate and cleanses the mouth of fishy tastes
.
Ingredients
1 quart water
½ pound fresh ginger, sliced paper thin
1 teaspoon plus a sprinkle of pickling salt
1 cup rice vinegar
3 tablespoons sugar
1 teaspoon light (usukuchi) Japanese soy sauce
 
Directions
Bring the water to a boil in a saucepan and add the ginger. Bring the water back to a boil and then drain the ginger well in a colander. Let the ginger cool.
 
Put the ginger into a bowl and sprinkle the ginger lightly with salt.
 
In a saucepan, bring to a boil the vinegar, the sugar, the 1 teaspoon salt, and the soy sauce, stirring to dissolve the sugar and salt. Pour the hot liquid over the ginger, mix well.
 
Store the ginger in a tightly covered container in the refrigerator. It will be ready to use in a day or two and will keep for several months, at least. 
 

Disclosure: This cookbook was sent to me for review purposes by The Harvard Common Press. I was not required to post about it and I received no compensation for doing so. 

Petrale Sole with Heirloom Tomatoes and Pesto Recipe

August 15, 2013

After 8 months on the West Coast (and with my struggles for finding farm-direct meat), we decided it was finally time to start exploring local fish. I’ve always said I wanted to live by the water where fresh fish and seafood were plentiful and now, here I am. It’s time to take advantage.

So over the past few weeks, instead of passing by the fish vendors at the Farmers Market, I’ve been stopping, looking and asking questions. Most of the fish I’m finding was caught that morning and filleted soon before it got on ice and to the market.

So far I’ve settled on some beautiful Petrale sole from two different vendors at two different markets. (I’ll branch out soon. I’m slow to take on new fish, apparently.) One pack came from Monterey Bay to the south of us and the other Bodega Bay to the north of us.

I’m not an expert in cooking or eating fish, but I really like this variety. The second set of filets was much thicker which made them ideal for baking so I decided to fancy them up a bit. I scanned some recipes on the web and a found a few that baked the fish over onions. You know I always have plenty of heirloom tomatoes around, and there was also leftover homemade pesto from the minestrone soup. With all that, this super simple recipe came together.

I hope you like it as much as I did! As I continue to explore the markets here, more fish recipes are sure to come in the future. If you have a favorite type of fish or recipe, I’d love to hear about it.

Petrale Sole with Heirloom Tomatoes and Pesto

1 tbsp unsalted butter
1 small onion, sliced
2 cloves garlic, thinly sliced
10-12 oz Petrale sole filets
¼ cup fresh pesto
1 medium heirloom tomato
4 lemon slices

Preheat the oven to 375 degrees F.

In a small skillet, heat the butter over medium high. Add the onion slices and the garlic. Reduce the heat to medium and cook for about 5 minutes, just until the onions start to become tender.

Transfer the onions to a baking dish and spread in a single layer. Top the onions with the sole filets. Spread the pesto evenly over each filet. Top the pesto with tomato slices. Add the lemon slices around the perimeter of the baking dish.

Bake for 12 to 15 minutes, until the fish turns white and flakes with a fork. Serves 2 to 3.

A Day at the San Francisco Cooking School

August 14, 2013

From a distance it doesn’t look like a cooking school. It could easily be mistaken for a boutique, or better yet, an art gallery. But once the glare of the windows clears and you open the door, if you have even the slightest interest in cooking, your heart skips a beat. It’s then that you realize that this is an art gallery, a hands-on gallery for the art of cooking.

Beautifully set, modern tables were the first thing I encountered. A clear sign that lunch would be delicious. Then the colorful Dutch ovens and well-organized white dishes that line each shelf caught my attention. I marveled over the ovens and ranges for a bit, and then I found my work station.


This was my first time visiting the San Francisco Cooking School. The 10 or 12 of us there were the lucky ones who responded quickly enough to an email inviting us to attend a Knife Skills workshop for food media.

We received a condensed version of the class with instruction on the various knife cuts while we prepped the ingredients for Minestrone Soup with Pesto. David taught us about batonnet and julienne while Jodi filled us in on the details of the school and the classes they offer.

What a diverse line up of classes. In addition to Knife Skills, you can take courses in Cooking Fundamentals, Soba Making, French Macarons, Recipe Testing and Development along with their Cook the Book series which features recipes from cookbooks focused on a variety of ethnic cuisines. If you want to take your cooking beyond your own kitchen, they also offer full-time and part-time culinary and pastry arts certificate programs.

As we chopped up the ingredients that we later took home to make our own minestrone soup, David finished up the class by making a rustic pesto. Jodi served up the soup they made earlier which would serve as our lunch along with crusty bread, a delicious salad with seasonal stone fruits, and wine.

I’ll admit, I’m not the biggest minestrone fan, but the pesto on this soup made all the difference. After more enjoyable conversation about the school with David and Jodi, we ended our meal with some of the best cookies I’ve had the pleasure of eating – almond, chocolate, candied ginger, and rosemary and cornmeal. These cookies had me scouring the website to find a course that would teach me how to make them.

Jodi granted me permission to reprint the soup recipe for you. It is the perfect summer-to-autumn transition meal. It is warm and comforting for the cooler days ahead, and it uses up late summer and autumn vegetables. 

Enjoy the soup, and when in San Francisco, check out the San Francisco Cooking School. I assure you there are few more inspiring or enjoyable places to cook.

Minestrone with Pesto

Reprinted with permission from Jodi at the San Francisco Cooking School

Soup:
3 tbsp extra-virgin olive oil
1 ½ cups diced onion
2 medium carrots, cut in ½-inch dice
2 medium leeks, white and light green parts only, finely sliced
2 stalks celery, cut in ½-inch pieces
Coarse salt and fresh pepper to taste
2 potatoes, peeled and cut in ½-inch dice
6 cups hot chicken or vegetable stock
1 (14 ounce) can chopped tomatoes
1 ½ cups Savoy cabbage, thinly sliced
1 ½ cups zucchini, cut in ½-inch dice
1 (14 ounce) can cannellini beans, drained and rinsed

Pesto:
2 cups gently packed basil leaves
1 medium garlic clove, chopped
¼ cup toasted pine nuts
½ cup extra-virgin olive oil
½ cup freshly grated Parmesan

In a large stock pot, heat the olive oil over medium heat. Stir in the onions, carrots, leeks and celery with a pinch each of salt and pepper. Cook until the vegetables are lightly browned and begin to soften, 5-6 minutes. Add the potatoes and cook, stirring occasionally, 2-3 minutes more.

Stir in the chicken broth, tomatoes and a pinch each of salt and pepper and cook until all the vegetables are tender, about 1 hour. Add the cabbage, zucchini and beans. Cook until cabbage and zucchini are just tender with a bit of a bite, about 6 minutes more.

While the soup is cooking, make the pesto. Using your knife, finely chop the basil, garlic, and pine nuts together. Place in a small bowl and add the oil until the mixture is shiny and moist. Stir in the cheese and season to taste with salt and pepper.

Serve the soup with a drizzle of the fresh pesto over the top. Serves 6.

Disclosure:  My visit to the San Francisco Cooking School was part of a free food media event. I was not required to post about my visit and received no compensation for doing so.

Bacon, Corn and Brown Rice Stuffed Squash Recipe

August 8, 2013
Summer Squash Stuffed with Bacon, Corn and Brown Rice | Recipe | Fake Food Free
 

 When I tell people that we moved here from Kentucky I get the usual response. It’s the same response I received any time we traveled while living there.

It is something similar to, “I bet this is (that was) different,” or “This must be an adjustment.”

Now, I don’t get cranky or offended. It’s not like I’m out to defend the upper southern part of the U.S. There are a lot of things that are different here in a very good way, and there are a lot of things that are the same.

Regardless of whether you live in rural Kentucky or Northern California, if you rarely go anywhere else, well, there you are. There are as many people here that haven’t seen other parts of the US as there are people who haven’t in Kentucky. So I don’t blame people for having this perception, but as you know from my blog I had myself in a pretty good food situation back East.

California wins when it comes to variety of produce, growing seasons and ethnic cuisines, but it falls way behind in something else – meat.

Oh, it’s here. It’s grass-fed and finished, pastured, organic, whatever you want. But it’s one other thing.

Impersonal.

I really dislike buying meat here. There are a few butchers, but when you add in the price of a quality product along with the fact that it’s being sold in California, ouch. The Farmers Markets have better prices for similar products, but it’s difficult to talk to people about the meat as a line 10 people deep waits behind you.

When people ask me what I miss most about Kentucky, that’s easy. The farms.

I’ve asked about buying farm direct, coming out for a visit, and so far the answer is that they only sell at the market. Although, some do have a dinner for customers one day a year.

I miss knowing the breeds, conditions and getting things like housemade prosciutto, sausage without the casing and blue/eggs that are mixed right in with the brown ones because they all come from the same group of chickens.

I know – cry me a river, Lori. I see all those Instagram and Facebook pictures of produce and landscape. Life is rough. Boo-hoo.

I get it. I’m not complaining. I realize I haven’t covered every base yet. I’m sure there are options out there. I guess my point is that I will, at least for a while, still have a reason to respond to all those who suggest Kentucky is different with – yes, yes it is.

bacon-ends


With all that being said, the meat I have ventured to get here has been very good. I finally found bacon ends last weekend at the Farmers Market. 


Bacon, Corn and Brown Rice Stuffed Squash Recipe | Fake Food Free
It called for a celebration of summer stuffed squash. Feel free to substitute any grain here. Cue ball or patty pan squash will work the best since this is a loose stuffing.


Bacon, Corn and Brown Rice Stuffed Squash

Makes: 6 stuffed squash


Ingredients

½ cup long grain brown rice
Extra virgin olive oil
6 cue ball or small patty pan (scalloped) squash
½ cup chopped pastured bacon ends
Kernels from 2 ears of corn
2 green onions, sliced, green and white portions divided
1 small bell pepper, diced
½ teaspoon finely chopped rosemary
¼ teaspoon salt
¼ teaspoon ground black pepper
½ cup finely grated cheddar cheese.


Preparation

Preheat the oven to 400 degrees. Lightly coat a casserole dish with olive oil.

Bring 2 cups of water to a boil and add the rice. Bring to a boil and reduce heat to a low boil. Cook for 15 minutes until just barely tender, drain and set aside.

Meanwhile, cut the tops off the squash and scoop out the insides with a spoon. Reserve the flesh. Lightly rub the squash with olive oil and arrange in the baking dish. Pre-bake the squash for about 10 minutes.

In a deep skillet, brown the bacon on medium-high for about 5 minutes. Cook until your desired crispness. I like mine super crispy.

Add the corn, whites of the onions (reserve greens for garnish), the bell pepper and the chopped flesh of the squash. Cook for about 5 more minutes on medium to medium-high, until most of the moisture has evaporated.

Stir in the brown rice. Add the rosemary, salt and black pepper. Stir in the cheddar cheese. Transfer the stuffing to each of the squash.

Bake for 20 to 25 minutes, until the squash is tender. Garnish with reserved onion greens. Makes 6 stuffed squash.


Thanks for reading! All images and content are the property of Fake Food Free unless otherwise stated. Please do not republish full recipes and images without written permission. What is okay? Feel free to Pin images, share links to my posts or share the photo in a round up post with the title of this recipe and a link back to the post. Confused about copyright and food blogs? Here is some helpful information on Recipe Attribution. If you want to use a photo or full recipe, just ask. I’m sure we can work something out.

13 Best Tomato Recipes

August 1, 2013

I did it again.

Every year when the end of May rolls around, I forget. Unlike other bloggers who spend weeks building up to the big day, planning giveaways and making special recipes, it passes me by, and few weeks later I think – oops, I forgot again.

I’m talking about my food blogging anniversary. Fake Food Free has been alive and well for over 5 years. It’s overwhelming to think where this blog has taken me since I began typing my first words in our apartment in Southern Brazil.

Things have evolved through my travel, adventures in food culture and gardening. My photos are a bit better than those dark point-and-shoot images I started with, and I’d like to think my recipe writing has improved as well. I’ve met amazing people, and now I’m at a place where health, food and recipe writing, and taking food photos are my work. As you’ll hear me say often – Life is good.

And it all started with this blog.

While things have changed a bit here, and I don’t get to post as much as I used to, this is certainly not a farewell post. It’s a big Cheers, Prost and Saúde to another 5 and beyond!

What better way to celebrate than with tomatoes! Well, okay, a cocktail might be better, but right now we’re in the heart of summer and all I can think about are beautiful heirlooms, sweet cherries and plump Romas.

After 5 years of blogging, I’ve created and adapted my fair share of recipes using my favorite part of this season.

Here are 13 that you must make before the 2013 tomato season passes us by! (Click on the name and it will take you to the post with the recipe.)

Roasted Garlic, Tomato and Black Bean Soup

Grilled Marinara Pasta

Honey Peach and Tomato Black Rice Salad

Hearty Tomato, Kale and Mushroom Sauce

Roasted Tomato, Black Bean and Arugula Salad

Smoky Tomato Jam

Beer Cheese Tomato Soup

Honey-Pecan Tomato Tarts with Blue Cheese

BLT Spinach Salad with Fresh Garlic Dill Dressing

Heirloom Tomatoes and Cantaloupe

Stuffed Poblano Peppers with Tomato Chile Sauce

Poblano Cilantro Salsa

Sweet and Simple Tomato Pepper Salad

Warm Corn and Purple Cabbage Slaw with Coconut Dressing Recipe

July 11, 2013


I was without virgin coconut oil for almost 5 months. How I did it, I have no idea.


Over the past few years it has become my go-to oil – for cooking, baking, to spread on toast. I finished up my last jar before the move in December, thinking I’d get more when I settled into the place. It’s hard to believe it has taken this long. I’m so glad to have it back in the kitchen, and I’m also happy to be able to offer you some for your kitchen too.


Tropical Traditions remains my favorite brand and I’ve done a few giveaways of their products on the blog before. I use their Gold Label Virgin Coconut Oil in my cooking, and aside from the past 5 months, you can always find the 32 ounce jar in my cabinet. Actually, it is even nicer to have around now that we’ve moved to the Bay Area. With the temperatures being more stable and the climate more mild, it always seems to be at the perfect consistency.


Gold Label Virgin Coconut Oil - 32 oz.
I love that this oil comes in small batches, handmade from family producers. If you haven’t checked them out, they have a lot of great products. I’m also a huge fan of their Coconut Peanut Butter. I’ve used coconut oil in many recipes on the blog and I’ve written about the science that convinces me to include it in my diet.


This time I decided to use it in something other than baked goods. In fact, I went a bit crazy with coconut. I love what we always called fried corn in my family, which was basically corn cut off the cob and skillet cooked in butter with onions and bell peppers. I took that idea and added some purple cabbage to make a slaw, and then doused it with some delicious coconut flavor.


Since coconut oil is solid at room temperature, I kept this salad warm. The crazy-with-the-coconut comes in with the dressing. I used coconut oil, coconut vinegar and coconut sugar.


This makes six servings, but I’m not going to lie. I’m pretty sure I ate three for dinner the night I made it. I absolutely love the flavors. I make a lot of recipes I enjoy, but many just don’t make the cut to be repeats in my kitchen. This one will be coming around again, and soon!


Warm Corn and Purple Cabbage Slaw with Coconut Dressing

1 tsp virgin coconut oil
½ medium onion, thinly sliced
3 ears of corn, kernels cut off the cob
½ medium red bell pepper, thinly sliced
1 small head purple cabbage, thinly sliced
3 tbsp coconut vinegar
1 tbsp virgin coconut oil, melted
1 tbsp coconut sugar
¾ tsp salt


Heat the teaspoon of olive oil in a large skillet or wok over medium-high. Add the onion and cook for 30 seconds. Add the corn and cook for 2 to 3 minutes, until the moisture evaporates and corn just barely begins to brown.


Add the red pepper and cabbage and toss to heat the cabbage through. Cook about 30 seconds. You want the cabbage to wilt a bit, but not color the rest of the dish. Remove from the heat.


In a small dish, whisk together the coconut vinegar, 1 tablespoon of coconut oil, coconut sugar and salt. Pour the dressing over the warm vegetables and toss to coat.
Serve warm. Makes about 6 servings.


************************************************
GIVEAWAY CLOSED

So I thought it was about time I give away some coconut oil to you again. And if you haven’t tried it, you are in for a treat! After 5 years of blogging, I’m not much for the bells and whistles of like me here or follow me there. I’m more interested in hearing from you. There are only two requirements to enter.

  • Second, leave a comment here telling me your subscribed AND tell me in your comment what your most memorable experience is with coconut or coconut oil. 
Was it during a trip abroad, or a favorite family recipe? I’ll start. My best memory with coconut is when we traveled to Ubud, Bali and enjoyed a walking tour of a local village. Our guide asked a farmer to climb an amazingly tall palm and cut us a coconut. They then showed us how to cut a spout from the skin and drink it from the coconut. Incredible experience.
I’ll only include valid answers with the required info in the random draw. Leave your comment by Wednesday, July 24th, 11:59 pm PST.
If you’d like to learn more about Tropical Traditions here are some helpful links so you can stay connected.
Tropical Traditions on – Facebook, Twitter, Google+, Pinterest (all appropriate links)
More from Tropical Traditions:
 Win 1 quart of Gold Label Virgin Coconut Oil!
Tropical Traditions is America’s source for coconut oil. Their Gold Label Virgin Coconut Oil is hand crafted in small batches by family producers, and it is the highest quality coconut oil they offer. You can read more about how virgin coconut oil is different from other coconut oils on their website: What is Virgin Coconut Oil?
You can also watch the video they produced about Gold Label Virgin Coconut Oil:
Tropical Traditions also carries other varieties of affordable high quality coconut oil. Visit their website to check on current sales, to learn about the many uses of coconut oil, and to read about all the advantages of buying coconut oil online. Since the FDA does not want us to discuss the health benefits of coconut oil on a page where it is being sold or given away, here is the best website to read about the health benefits of coconut oil.

***************************************

And the winner is:

Meagan of Meagan’s First Kitchen (and you can see what has been keeping her away from the kitchen the past few months at Because Forgetting is Easy). Congrats Megan! Send me your address and I will pass it along to the folks at Tropical Traditions. Your Gold Label Virgin Coconut Oil will arrive soon! 

Kentucky Bourbon-Vanilla Soaked Cherries Recipe

June 26, 2013
Kentucky Bourbon-Vanilla Soaked Cherries | Fake Food Free | The perfect ice cream topping or cocktail garnish!

Last week at the Farmers Market, I saw this sign.

That sad face sums up my feelings pretty well. I have enjoyed my first cherry season in California so much. I think it’s because I wasn’t expecting to have such a selection. It completely took me by surprise.

Aside from a few cherry trees here and there in Kentucky, I’ve always associated cherries with Michigan. My past experience includes picking out a few in the grocery store and barely getting enough from a tree to make a mini cherry pie. This year, I had all the cherries I wanted. I took full advantage, too. I can’t begin to estimate how many pounds I carried home throughout the season.

But alas, it is coming to an end. I know there will be other fruits to take their place, but I will miss them all the same.

Every time I carried home by big bag of joy I said I was going to make bourbon cherries. It was now or never. Well, maybe now or next season, but the pressure motivated me to get on it.

Kentucky Bourbon-Vanilla Soaked Cherries | Fake Food Free | The perfect ice cream topping or cocktail garnish!

I came across these Vanilla-Bourbon Cherries at Sweetsonian a little while back. (Aren’t her pictures gorgeous?) I wanted those same flavors so I adjusted it and then got some exact measures for the ingredients. I know I’ll want to make them again and I’m horrible at remembering what I did from recipe to recipe so I’m hoping this will help me recreate them next year.

Dark red Bing cherries make pretty soaked cherries, but as always, I was steered by the sale. These yellow-red Rainier cherries were priced to sell so my cherries look a little lighter in their bourbon bath.

I’ve had them in the fridge a little over a week and they are delicious. I’ve dropped a few in our cocktails and I hope to use them on a dessert if I can stop eating them straight from the jar.

Kentucky Bourbon-Vanilla Soaked Cherries

Inspired by Vanilla-Bourbon Cherries by Sweetsonian

Ingredients

1 pint cherries, pitted
4 tbsp sugar
3 tbsp water
1 tsp pure vanilla extract
1/3 to ½ cup Kentucky bourbon

Prep

Tightly pack the cherries into a clean pint jar leaving about ½ inch headspace.

In a small sauce pan, heat the sugar and water on medium-high. Bring it just up to a simmer and cook until the sugar dissolves and it thickens a little, about 2 to 3 minutes. Remove from the heat and stir in the vanilla.

Pour the sugar syrup over the cherries. Pour the bourbon into the jar. How much you need will depend on how tightly your cherries are packed in. Ensure that all the cherries are covered, leaving about a ½ inch headspace.

Seal the jar. Give it a shake to mix the sugar syrup and bourbon.

Store in the refrigerator for at least 3 days before eating to allow the flavors to soak into the cherries. Then they should keep in the fridge for about a month.


Thanks for reading! All images and content are the property of Fake Food Free unless otherwise stated. Please do not republish full recipes and images without written permission. What is okay? Feel free to Pin images, share links to my posts or share the photo in a round up post with the title of this recipe and a link back to the post. Confused about copyright and food blogs? Here is some helpful information on Recipe Attribution. If you want to use a photo or full recipe, just ask. I’m sure we can work something out.  

Gluten Free Baked Shrimp Etouffée Recipe

June 14, 2013

I laughed out loud.

I’m not talking about chuckling or giggling here. I’m talking about a huge, hearty laugh. Again, and again, and again.

I’m not sure I’ve ever had a book make me laugh like Gluten Is My Bitch, Rants, Recipes and Ridiculousness for the Gluten-Free by April Peveteaux. At first it might seem odd to laugh at such a serious health condition, but laughter is medicine and humor is healing.

Now I should explain that I don’t have celiac disease or gluten sensitivity, nor do I opt out of eating gluten for personal reasons. I have had my fair share of stomach issues in the past, but mine were corrected by cutting out all artificial sweeteners and fat replacers. In an indirect way, I can relate.

Keeping up on the various ways of eating and nutritional issues is also part of the deal after you spend your college years studying nutrition. The science, the mechanisms, the nutrients – as much as I love food and eating from a creative standpoint my left brain would never be satisfied without the scientific side.

This book has it all, and a little something extra.

When reading about conditions like celiac disease, what you don’t often get is the personal side. A side explaining what it is really like to be forced to change your diet. To eliminate things you love, not because you want to lose weight or reduce risk of disease, but because if you don’t, you will be in serious discomfort. It’s not a choice. There is no option.

I wouldn’t have thought there was a way to make such a serious issue so completely hilarious, but April figured it out. Along the way there are tips for eating out, feeding kids with gluten intolerances, traveling and substitutes for your old favorite foods.

Along with all this laughter and helpful information, there are also lots of recipes, bringing us to reason I wanted to review the book here. Cocktails, cakes, cookies, pasta dishes and meaty main courses like Fried Chicken and Waffles and Italian Meat Loaf.

I knew that the timing of this post would likely align with prepping for my first marathon (it’s Sunday!), so I wanted to make something filling. Something with plenty of (gluten-free) carbs. I also wanted it to be something I hadn’t tried before.

Enter, the Baked Shrimp Etouffée.

This hit the spot. For a gluten free version, April’s recipe calls for millet flour and gluten-free bread crumbs. The flavors are delicious and I love that this baked version is a one pot meal.

Whether you have a gluten intolerance, want to learn more about it, want some great recipes, or simply want to laugh out loud, add this book to your summer reading list.

Baked Shrimp Etouffée 

Copyright © 2013 April Peveteaux, reprinted with permission from Abrams Books

Cajun food makes an impression. Or maybe that’s all the booze you ingested with your boudin. Which is why I still remember an etouffée that had a little extra somethin’-somethin’ from my very first trip to New Orleans, which was ages ago.

After experimenting, I do believe the crust atop this shrimp etouffée is spot on with the roux, and the stew, and now a little cheesy crunch. Laissez les bons temps rouler.

Prep time: 20 minutes  Cook time: 35 minutes
Makes: 10 servings

INGREDIENTS

1 tablespoon butter
1 tablespoon olive oil
5 garlic cloves, minced
1 bell pepper, chopped
1 Spanish onion, chopped
2 celery stalks, chopped
¼ cup millet flour
2 cups chicken stock
½ teaspoon sea salt
1/8 teaspoon freshly ground black pepper
1 teaspoon hot sauce
1/8 teaspoon cayenne pepper
1/8 teaspoon paprika
½ teaspoon oregano
1½ pounds shrimp, shelled and deveined
5 cups cooked rice
2 tablespoons gluten-free bread crumbs
1 tablespoon grated Parmesan
Parsley, for garnish

Preheat the oven to 350ºF.

In a cast-iron skillet over medium heat, heat the butter and oil. Add the garlic, pepper, onion, and celery, and cook until soft.

Whisk the flour into the onion mixture until well combined. Add ½ cup of the chicken broth and whisk to combine. Gradually add the remaining broth and cook until the mixture has thickened.

Add the salt, pepper, hot sauce, cayenne, paprika, and oregano. Stir, reduce the heat to low, and simmer for about 6 minutes. After 6 minutes, add the shrimp and continue cooking for about 4 minutes more, until the shrimp are pink. Do not overcook the shrimp.

Remove the mixture from the heat and pour it into a medium bowl. Place the cooked rice in the skillet, and top it with the shrimp mixture.

Sprinkle the gluten-free bread crumbs and Parmesan evenly over the shrimp mixture and place the skillet in the oven. Bake until slightly golden brown, 10 to 15 minutes.

Remove from the oven, top with the parsley, and serve.

Bacon and Oyster Mushroom Stuffed Squash Blossoms Recipe

June 11, 2013

It’s surprising that with all the squash plants I’ve grown, I’ve never tried cooking with squash blossoms. I always blamed it on bad timing.

Those pretty yellow flowers would appear in early summer and I would think – No way am I picking those. I want a squash out of that. What if the plant doesn’t produce much this year?

Then (as you know if you’ve grown squash) by mid to late summer when I was buried with summer squash up to my eyeballs, I wish I had used some of those blossoms. 

I no longer have my own squash plants, but I did spot some of those pretty blossoms at the Ferry Building Farmer’s Market last weekend. I wasn’t quite sure what I would do with them, but I had oyster mushrooms, bacon, bread and tomato sauce, too, so this is how it went. And when I have my own squash plants again someday, I will definitely be picking those blossoms.

Bacon and Oyster Mushroom Stuffed Squash Blossoms

1.5 ounces oyster mushrooms, chopped
2 slices bacon, chopped
2 tbsp finely chopped onion
1 clove garlic, minced
1/3 cup bread crumbs
3 leaves fresh basil, chopped
Salt and pepper to taste
12 small to medium squash blossoms
¾ cup your favorite marinara sauce
2 tbsp grated Parmesan cheese

Preheat the oven to 350 degrees F.

Preheat a deep skillet over medium-high, add the bacon and mushrooms. Cook for about 3 minutes. Add the onion and garlic. Continue to cook until the bacon is browned and the mushrooms are tender, about 3 to 4 minutes more.

Stir in the bread crumbs and the basil. Add salt and pepper to taste. Remove from the heat.
Fill each squash blossom with about a heaping tablespoon of the stuffing, depending on the size of the blossom. Twist the end of the flower to seal.

Pour the marinara in a baking dish and spread over the bottom of the dish. Arrange the blossoms in a single layer over the sauce. Top with the Parmesan cheese.

Bake for 20 minutes or until the blossoms become tender and the cheese begins to brown. Serves 2 to 3, if the squash blossoms are on the smaller side.


 Thanks for reading! All images and content are the property of Fake Food Free unless otherwise stated. Please do not republish full recipes and images without written permission. What is okay? Feel free to Pin images, share links to my posts or share the photo in a round up post with the title of this recipe and a link back to the post. Confused about copyright and food blogs? Here is some helpful information on Recipe Attribution. If you want to use a photo or full recipe, just ask. I’m sure we can work something out.  


Want to create beautiful food and product photos that you can't wait to share?!
Discover your style, control the light, and shoot using the tool you know how to use (yes, your phone included). Learn about free resources, Live Q&As with Lori, and online courses you can take from anywhere in the world!
We respect your privacy. Unsubscribe at any time.