Browsing Category

Fruits and Vegetables

Kale and Mushroom Quiche

April 28, 2010
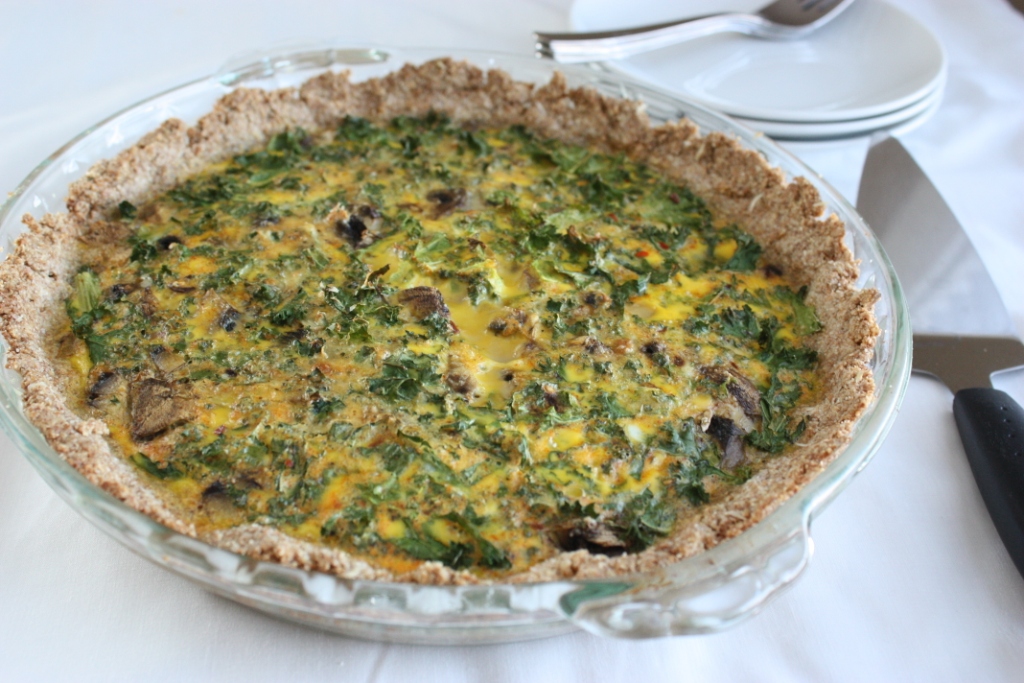
Quiche is such a springtime dish. Funny how I make it this week and the temperature dropped to 35 F last night. Good thing the quiche I made is a little on the hearty side with a whole wheat crust and kale. See, I loved that kale and mushroom combo I made a while back so much that I thought – why not try it in a quiche; take a break from the traditional spinach.

It was so good that I’m bummed my husband took the last piece in his lunch today. Although, I had plenty, I think a piece every day since I made it on Sunday.
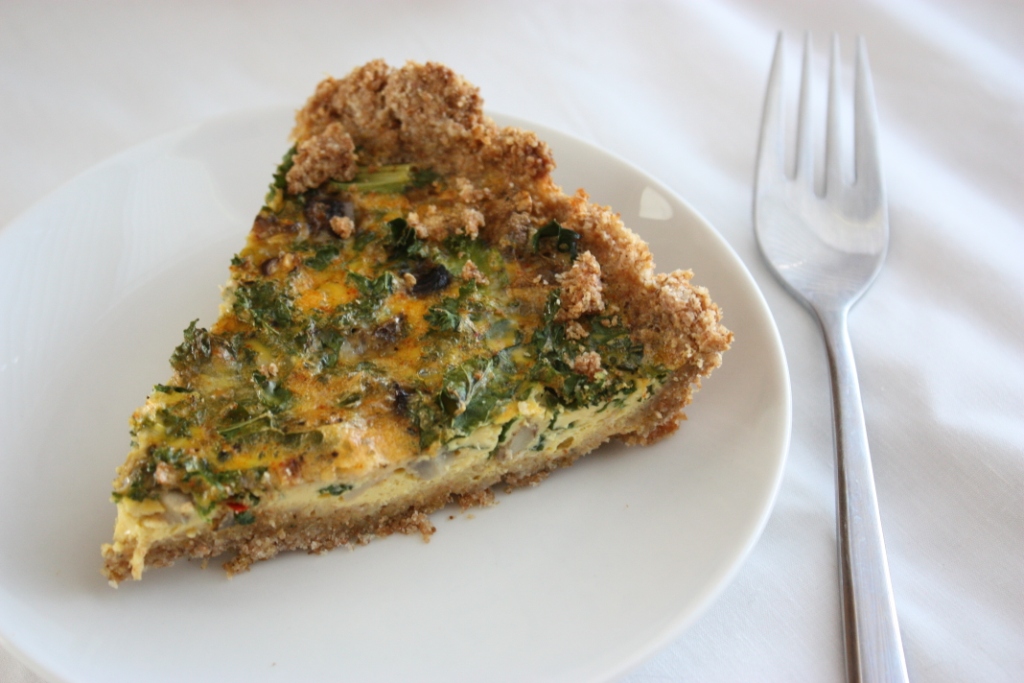
I used my favorite quiche crust that I started making last year. It is a pat-in-the-pan butter crust in which I use stone ground whole wheat flour. It is not a light and flaky pastry crust. It is crumbly and the nutty flavor of the whole grain goes well with any quiche combination. I doubt I’ll ever put my quiche in anything different.
I put raw kale in the egg mixture and the cooking time on the quiche was plenty to make it nice and tender. I also sprinkled in some red pepper and hot sauce for a mild kick.
Kale and Mushroom Quiche
1 ½ cups whole wheat flour
½ tsp salt
½ cup unsalted butter, softened
1 to 3 tbsp milk
½ cup fresh button mushrooms, chopped
1 cup kale, finely chopped
2 tbsp fresh parmesan, grated or shredded
1 cup milk
4 farm fresh eggs
1 tbsp white whole wheat flour
½ tsp salt
½ tsp smoked paprika
½ tsp garlic powder
¼ tsp ground black pepper
¼ tsp crushed red pepper
1 tbsp hot sauce
Preheat the oven to 350 degrees F. In a bowl mix together whole wheat flour and salt, cut in the butter and mix with a fork or pastry blender until butter is incorporated and dough is crumbly. Slowly add milk, one tablespoon at a time until the mixture forms a dry, yet cohesive dough. Press the dough evenly into bottom and sides of a deep, 9 inch pie pan.
On top of the crust sprinkle the mushrooms, kale and cheese. In a separate bowl mix together the eggs, milk, flour, salt, spices and hot sauce. Whisk until light and fluffy, or you can also put the mixture in a blender and pulse. Pour the eggs over the crust and arrange your fillings as needed.

Bake for about 40 to 50 minutes. The egg will rise a bit and the top should be slightly browned and the center set. Allow to cool for five minutes, slice and serve. Makes six to eight servings.

If you like this, you might also like my Zucchini Quiche with Whole Wheat Crust

Jackfruit Muffins

April 26, 2010
Jackfruit Muffins Recipe | Fake Food Free


What exactly is a jackfruit?

Well, it is likely the largest fruit you’ve ever seen. My first encounter with them was in Brazil, the photo at the right was taken in Ubud-Bali, Indonesia. When I say big, I mean when they are sitting on the ground they would come up to about mid-thigh, some perhaps even to your waist.

I might also mention that they are quite scary. There were many growing in the park around the zoo where we lived in Brazil. On more than one occasion I heard a ripe one fall out of a tree and hit the ground. Beneath such a tree you do not want to be. Loudest thud I’ve ever heard.

Jackfruit Tree

I only tasted them once when we were in Brazil at the local farmer’s market. It was a sticky, gooey piece of fruity flesh that tasted somewhat like a mix between a mango, banana and pineapple. I had a difficult time with the texture, but the fruit has a delicious flavor.

Despite my easy access, I never bought one. I often regret that decision now, but there were two reasons for this. The first was their size. About 98% of the time I went to the market by myself and this required a 20 minute walk each way. Yeah, lugging a fruit the size of my lower body back to the apartment wasn’t going to happen.

Jackfruit

Second, anytime we got into a conversation about jaca (the Portuguese word for jackfruit) we were warned of the sticky flesh. Apparently it is no less binding than a good glue and I heard horror stories from friends about how they spent days trying to get it off their hands after they would eat them outdoors as kids. I really didn’t want to tackle that either.

Before we left Brazil, Tracey at the Tangled Noodle posted a recipe for Langka Muffins. Langka is jackfruit in the Philippines. What a language lesson you are getting in this post!

After seeing the recipe, I wanted to try it, but still didn’t get up the courage to buy fresh jackfruit. Then, when we were in Thailand I tried a jackfruit shake that was incredible and my interest grew.

The next thing I knew we had moved back to the US and I found canned jackfruit at our international market. I know it is a bit backwards for a real foodie to have access to the fresh and go for the canned, but the canned I knew I could handle.

 I was a bit surprised by the texture of the fruit in the can. It was much different than what we had in Brazil. This might have to do with the fact that the fruit I had in Brazil was overripe and they probably harvest the canned variety early, or it could have been the syrup, or maybe it is a different variety that grows in different regions. Who knows?

I know one thing though, Tracey wasn’t kidding! Those muffins are delicious! I modified the recipe a bit to use whole grains, coconut oil and some mascavo sugar I have left from Brazil. I also topped some of them with coconut before baking.

Jackfruit Muffin Recipe


Jackfruit Muffins
Modified from Langka Muffins at Tangled Noodle

Ingredients
2 cups white whole wheat flour
3 tsp baking powder
½ tsp salt
¼ cup minimally refined sugar
½ cup milk
1/3 cup virgin coconut oil, melted
1 egg, beaten
1 cup chopped jackfruit with ¼ cup syrup reserved
½ cup shredded coconut,unsweetened (optional)

Preparation
Preheat the oven to 400 degrees and grease or spray the bottom of each muffin tin with coconut oil or non-stick spray. Sift together the flour, baking powder and salt. Set aside. In a separate bowl whisk together the sugar, milk, oil, egg and jackfruit syrup.

Gradually add the wet ingredients to the dry. Stir in the jackfruit just until everything is combined. This batter will be very thick. Divide into 12 muffins. Press coconut into the top of each muffin if using. Bake for 18 to 20 minutes or until muffins are browned and a toothpick inserted in the center comes out clean. Cool and remove from pan. Makes 12 muffins.

An Amateur at Everything: The Garden

April 25, 2010

These days about the only thing that I’m not an amateur at is eating and exercising, everything else is new territory. In fact, I’ve been trying to learn about so many new things lately that it is not uncommon for the mass confusion of new information swimming in my head to become evident in my actions. Between baking, writing and photography, you might find me trying to figure out how to set the aperture and ISO on my oven, or I could be halfway through writing before I realize I don’t need to structure an email to my husband like a query letter.

One of these new activities I’ve taken on is gardening. We had a small garden at our last house and I can handle herbs, but the main reason we moved out of town a bit to our new house was to have more land to grow food. Note to self — big garden is quite the undertaking.

Last weekend was full of outdoor frenzy as my parents came to visit and help put in the garden. My Dad’s truck was loaded with everything from plants, to a tiller, to tomato cages. This proved terribly embarrassing for my Mom who was a bit worried they would run into someone they knew during their 4 hour drive, Beverly Hillbillies-style.

Fortunately, things were strapped down well and it all made it into the garden. The weekend proved to me that I know absolutely nothing about the art. My main problem is I tend to experiment without researching. I mean, I like to research what works and what doesn’t, especially when it comes to nutrition. However, when it comes to things like cooking and gardening I tend to throw things together and see how they do.
I was given some valuable lessons over the weekend including how difficult it is to maneuver a massive tiller through soil. I had done this before when I was younger, but I had forgotten how challenging it was. I also have notes, thoughts and tips floating through my head about how far apart to plant things, which plants need water, when to mound up dirt, what parts to break off a plant, when items will sprout, how to harvest it…….
Yeah, my head hurts too. Good thing my parents are only a phone call away, and that plants can be hearty little suckers because I’m sure I’ll screw a few things up.
This is how it all started last Saturday.
And thanks to the hard work of my parents and husband, this is what we ended up with.
The main thing I have my eye on at the moment are the strawberries. The plants came directly from my Dad’s garden and they were blooming last week and now we even have signs of growing berries!

We’ve planted blackberries and raspberries in the back of our yard. I’ve also got some herbs going up near the house. In addition, there are some new trees around and the beautiful flower we got as a housewarming gift.

So far this is what we have planted:

Carrots, Asparagus, Potatoes (red and white), Tomatoes (Early Girl, Roma, Beef Master and Orange and Red Cherry), Green Beans, Cucumbers, Zucchini (Yellow and Green), Corn, Onions (Red and White), Spinach, Lettuce, Arugula, Bell Peppers (Orange and Yellow), Jalapenos, Banana Peppers, Anaheim Peppers, Strawberries, Kale, Blackberries, Raspberries, Blueberries, Basil, Thyme, Rosemary, Cilantro, Parsley, Dill, Mint. Later will come pumpkins, butternut squash, melons, broccoli and Brussels sprouts.

Whew! Bring on the produce!

What will I master next? Well, canning of course.

PS. Links will be back next weekend!

Quick Side Dishes and Chimichurri Beer Burgers

April 13, 2010

I’ve been on a mission to find quick side dishes lately. I haven’t tired of cooking, but with longer days and more time spent outside in the evenings I haven’t wanted to spend a lot of time cooking at night.
On a related note, I think I also lose my spark of excitement for evening cooking because I know after the sun goes down the pictures won’t be blog worthy. Why bother, right? This little fact that my blog and photo quality determine what time of day I’m motivated to cook may be indication of an issue that needs attention, but we’ll save that for another day.
So back to the quick sides.
Lately, I’ve found myself tossing broccoli in to steam, sautéing mushrooms and onions to toss in with couscous. You know; nothing exciting, but still relatively tasty and healthy.
Last night when we needed something to go with our grilled chicken I decided to make some pasta salad; something I haven’t made in a really long time. I had a few more exciting ingredients to use in the dish, so this one I thought I would share.
I don’t make pasta salads much anymore mainly because I lack ideas for non-bottled dressings. However, with using the cheese and olives in this, it only needed a drizzle of olive oil and a shake of black ground pepper to be complete.
Gorgonzola, Olive & Spinach Pasta Salad

½ cup fresh spinach, finely chopped, firmly packed
15 pimento stuffed green olives, halved
1 – 2 oz Gorgonzola cheese, crumbled
2 tbsp olive oil
3 cups dry, whole wheat pasta, cooked and rinsed to cool
Black pepper to taste

In a medium-sized bowl combine the spinach, olives, cheese and olive oil. Stir to break up the cheese so it is evenly distributed.


Add the drained pasta to bowl and toss to coat. Sprinkle with black pepper. You can add salt too if you wish, but I found the olives and cheese added enough salty flavor for my tastes. Serves 4.

*******************

I also said yesterday that I would tell you a little more about the burgers we grilled on Sunday. If you are at all familiar with Argentinean cuisine, then you know about chimichurri. It is a sauce made of herbs, oil and vinegar that is served with meat or it is sometimes used as a marinade.
Before we left Brazil, my husband took a work trip to Argentina and his colleagues gave him some chimichurri. It is in the dry form and you simply add the oil to make the sauce. I’m sure similar products can be found at Latin markets around the States, or you could make a version of your own like this one from Simply Recipes.
Seeing it in the cabinet the other night I decided to season the burgers with it. The result was fantastic! They were full of flavor and had a slight spiciness that went wonderfully with the grass-fed beef I used.
I finished off the burger-making process by using the Soft Whole Wheat Sandwich Bread from Healthy Bread in Five Minutes a Day to make buns. I was worried they would be too heavy and sweet for the burgers, but they ended up pairing nicely.
Chimichurri Beer Burgers

1 lb grass-fed beef
¼ cup beer (I used a light ale)
¼ cup panko bread crumbs
1 tsp chimichurri seasoning mix
½ tsp sea salt
¼ tsp black pepper
Combine all ingredients in a bowl and mix well to incorporate the spices. Form into 4 equal patties. Grill or pan fry based on your preferences. It took about 8 minutes on our new grill to cook them through.
I topped mine with some Chive and Onion Jack Cheese, and sautéed onions and mushrooms!


I’m submitting the pasta salad to the April Side Dish Showdown at Cinnamon Spice & Everything Nice.

A Boy, His Grill, and a Spatchcocked Chicken

April 12, 2010

Over the past few months I’ve regularly documented all of the things I am thrilled to have returned to since our move back to the States. In fact, I wouldn’t blame you for thinking me annoying because I tend to express my excitement with an over abundance of irritating happiness.

There was the real winter with snow which necessitated the wearing of boots not just for fashion, but for functionality. A full size oven with a temperature setting that goes low enough to prevent burning all my baked goods to a crisp. A washer and dryer that take fewer than 90 minutes for each cycle. My KitchenAid mixer with all its powerful capabilities.

Ahhh, I smile just thinking about it all.

Despite my glowing excitement, I was getting a little bit worried that my husband hadn’t yet experienced such bliss. Sure, he had some of his favorite electronics back, and we now have a nice size garage with a yard to tend to, but something was missing.

Over Easter weekend I learned what it was. This:

Yes, a grill. As much as we enjoyed the food and culture of the Brazilian barbeque, let’s just say, there is no place like home. We talked about it often during our time abroad — grilling different kinds of meats from chicken to pork tenderloin, burgers, hot dogs and even fruits and vegetables; the array of side dishes, and sitting outside all afternoon with a beer in hand.

He had his heart set on a Big Green Egg for a long time, even before we moved back to the US. However, after some research he learned that there are the same style of grills out there (a ceramic pod grill that cooks by charcoal) without the same price tag.

We couldn’t find any sources around here, but some stores in our hometown occasionally carried them. When he learned that two had come in the day we got to Indiana for our Easter visit, off he went with my Dad to grab one before it was gone.

He’s been anxiously awaiting the opportunity to get cooking so this weekend we decided to break out the new grill and see what this baby can do.

First we tried chicken. Until this weekend I had seen the process of spatchcocking a chicken on the web and on tv, but had no idea that “spatchcocking” was the appropriate term. I gave it a try last night. To be honest, I did get a flat chicken out of the process which was the goal, but I really have no idea if I did it exactly as it should be done. In fact, I already discovered a step I accidentally skipped. Shhhh! I’m not telling.

Therefore, you really shouldn’t listen to me about how to spatchcock a chicken when there are much more knowledgeable people out there to tell you. Check out A Good Appetite or this YouTube video for some help.

I can, however, tell you the rub I used on the bird which turned out nicely. My husband wanted something a little more spicy/Cajun in nature since I typically do Italian-style herb rubs. I coated the chicken with the spices below and then rubbed it generously with olive oil.

First Chicken of the Season Spicy Rub

1 tsp chili powder
1 tsp cumin
¼ tsp crushed red pepper
1 tsp garlic powder
1 ½ tsp sea salt
¾ tsp ground black pepper

Combine in a small dish and mix with your fingers to crust of the red pepper with the other spices. Rub over the chicken including under the skin.

After an hour on the grill, the chicken was perfect. Nice and juice with a crispy skin just as was predicted by all the recipes I’d read prior to our attempt. There will be lots of grilled chicken in our near future, especially once Pike Valley has some available again later in the month. They should process 32,000 chickens this year. Not bad for a farm using humane, sustainable practices. The word is really getting out about them.


In addition to the chicken we decided to grill up some burgers for later in the week, as well as some asparagus as a side for our chicken. Grilled asparagus is about the easiest thing you can cook on a grill. I drizzled it with olive oil and sprinkled on some of the herb seasoning I told you about a few days ago. About five to eight minutes on the grill and it’s all done.


Tomorrow I’ll tell you more about the burgers and a new pasta salad I tried out.

Have the grill out yet? What’s on the menu?

Spinach Pesto Spread

April 9, 2010

This week my husband’s family came to visit us and see the new house. Since they arrived on a Wednesday and this is the first full week of horse racing we decided to head out to Keeneland for the afternoon.
I know many people who would argue that the best part of going to Keeneland is the tailgating, not watching the races. I fall into this category. I enjoy going into the stadium, but I’m perfectly willing to put it off for while in order to sit in the sunshine, drink a little beer or bourbon, and feast on an array of snacks.
If you’ve never been to the track, specifically the ones in Kentucky, it is quite the upscale event. People typically get dressed up in collared shirts, suit coats, dresses and hats. The tailgating tends to follow suit. You are likely to find artisanal breads, cheeses and wine spread out along the tailgates of trucks and SUVs.


This is why I love it. Football tailgates with their barbeque and chips are lots of fun, but going to Keeneland gives you the chance to be a little more creative and fancy with your food choices.

One my favorite tailgate items for these occasions is a crusty bread and different types of spreads. A few weeks ago I came across Andrea’s Sundried Tomato and Spinach Dip from Off Her Cork. I had every intention of making it until I came across the sundried tomatoes at the market for $5 a jar. Yikes.

I’m not saying that there are not perfectly good reasons to buy them or that I won’t in the future. I happen to love sundried tomatoes. However, it was one of those instances where I’d already spent a lot on ingredients and I wasn’t willing to tack on the tomatoes. Has that ever happened to you? Hopefully I’m not alone here.


The spinach had been purchased, however, so I decided to replace the basil in my typically pesto recipe with the spinach. It turned out great! I added enough oil to make it a spread. I ended up liking it more as it sat in the fridge a couple days because the walnuts and spinach combined into a creamy paste that was perfect for dipping carrots or pretzels.

Spinach Pesto Spread

5 oz spinach leaves, about 3 big handfuls
2 cloves garlic
¼ cup chopped walnuts
3 tbsp parmesan cheese, grated
Olive oil
Salt and pepper to taste
In a food processor combine the spinach, garlic, walnuts and cheese. Pulse until you create everything is finely chopped and begins to create a paste. Turn on low and slowly drizzle in olive oil. I don’t measure the olive oil, I just add until it reaches the consistency I desire. Add less if you want a thick spread, more if you want a dip or dressing. Remove the lid of the food processor. Sprinkle in about a ¼ tsp of salt and pepper, or more or less to taste. Serve immediately or refrigerate until ready to use.

My favorite picture of the day. Check out his tube socks made of tape.

Salmon-Stuffed Portabella Mushrooms

April 5, 2010

Salmon-Stuffed Portabella Mushrooms Recipe | Fake Food Free

Over the past year or so we have progressively been eating fewer and fewer foods from cans. A positive, healthy move for us, but there are still a few things I grab when I zip down the canned food aisle. One of these is salmon.

Growing up I loved salmon patties which my mom always made from canned salmon. It seems kind of strange now because I don’t really see many kids excited about canned salmon. I think I mostly enjoyed eating the bones as they went from crunchy to magically disappearing altogether in my mouth. As I got older and began studying nutrition it just happened to be a bonus that these little bones are a source of calcium.

It had been a very long time since I’d even thought about salmon patties, but recently I decided to make up a batch. Of course, I was trying to find a way to give them a twist. It seems I rarely cook at all anymore without trying to give things a twist.

I don’t often by portabella mushroom caps, but had branched out and picked up a pack on a trip to the market a few days before. After a little quiet thought in the kitchen I could have sworn I heard them begging to be stuffed with salmon.

So I made up a batch of salmon patty mix, batter, dough – what the heck do you call it prior to being cooked anyway? I formed the nameless concoction into a nice mound inside a mushroom cap coated in olive oil and sprinkled on some parmesan cheese.

After about 25 minutes in the oven, I was greeted with a tender mushroom filled with soft salmon and a slightly browned and crispy edge. A definite winner and a nice change from the same ol’ patty.

This recipe makes enough for four stuffed mushrooms. I only had two portabellas so I just made two salmon patties for lunch later in the week. They are easy to cook, just form them into flat patties, heat some oil in a pan and cook for about three minutes on each side.
Salmon-Stuffed Portabella Mushrooms Recipe | Fake Food Free

Salmon-Stuffed Portabella Mushrooms

Makes 4 servings

1 can salmon, drained
½ cup panko bread crumbs
1 egg, lightly beaten
½ tsp salt
¼ tsp pepper
¼ tsp garlic powder
1 tsp dried parsley
2 green onions, sliced, greens and some of the white
2 tbsp fresh grated parmesan cheese plus extra for sprinkling
4 portabella mushroom caps
Olive oil

Preheat oven to 400 degrees F. In a bowl combine the salmon, bread crumbs, egg, seasonings, onion and 2 tbsp cheese. Mix well until all ingredients are combined. Place mushroom caps in a baking dish that has been coated with olive oil. Rub more olive oil on the mushrooms, coating them well. Turn the caps top (smooth side) down.

Divide the salmon mixture into four equal parts, form into a ball and mound inside the mushroom cap. Sprinkle with parmesan cheese. Bake for 25 to 35 minutes or until the mushrooms are tender and the cheese has browned a little. Serve warm.

Salmon-Stuffed Portabella Mushrooms Recipe | Fake Food Free
Thanks for reading! All images and content are the property of Fake Food Free unless otherwise stated. Please do not republish recipes and images without written permission. Feel free to Pin images and share links to my posts, but please do not copy and paste recipes or photos and share them on other sites. Confused about copyright and food blogs? Here is some helpful information on Recipe Attribution.

Dreaming of Grilled Vegetables

March 23, 2010

For two whole summers I enviously read blog post after blog post about grilled vegetables from around the food blogging world. At that point we were in an apartment in Brazil with no grill of our own. Not to mention, while grills of Brazil and the foods they produce are quite nice, it’s just not the same as our version in the U.S. I’m also not sure a vegetable has ever touched a grill where we were living. Red meat, yes, veggies not so much.
My anticipation of creating my own grilled produce has been building all winter. Now, that we are finally in a house, there is a spot being held for a new grill. However, it has turned out to be the last thing on our shopping list. While we have filled the house with couches, chairs and desks, the yard is still looking a bit bare.

That will change soon enough, but today I just couldn’t wait. After finding some zucchini and mushrooms in the fridge I decided to grab the grill pan and make an indoor version of a grilled vegetable sandwich for lunch.

I sliced up the vegetables, drizzled them with olive oil, and then sprinkled them with this herb rub.

A friend of mine gave me this and it is from Herb ‘n Renewal, a Kentucky company that sells herb products. You may not have access to this exact combo, but you can see the ingredient list here if you want to mimic it.
I cooked everything for a few minutes on each side, layered everything on the bread (Flax Oat Bran from Great Harvest) and then grilled the sandwich itself to make it more of a Panini. It hit the spot, but unfortunately it has made my longing for grilled foods even stronger!

There really isn’t an exact recipe here, but I will list out what I added to my sandwich. You can add whatever veggies you like.

Grilled Vegetable Sandwich

2 slices of whole grain bread
4 slices of zucchini
10 rings of Anaheim pepper
2 white mushrooms, sliced
Sprinkle of olive oil and herb seasoning
1 ½ tbsp cream cheese
1 green onion, sliced
1 tbsp fresh cilantro, chopped
¼ tsp garlic powder
Handful of fresh spinach

Place the veggies on the grill and sprinkle with olive oil and herb seasoning. Cook 3 to 4 minutes on each side or until tender. In a small bowl, mix the cream cheese, green onion, cilantro and garlic powder. Spread on one slice of the bread. Stack the grilled veggies on the second slice and top it with the spinach. Place the first slice on top, cream cheese side down. Return to the grill pan and grill for 1 minute on each side.

This post is being submitted to Souper Sundays at the Kahakai Kitchen.

Nutty Cauliflower Quinoa

March 12, 2010

I have a few races under my belt since first making this nutty cauliflower quinoa, but it still the type of meal I turn to when I  need to refuel for running!

Nutty Cauliflower Quinoa | Fake Food Free
 
With all the running we’ve been doing, me training for my first half marathon and my husband training for his first full, I’ve really been trying to up the vegetable intake in our diet. After reading 50/50 by Dean Karnazes (an incredibly inspiring and informative book even if you are not a runner, by the way), my husband’s request was an increase in dark, leafy greens and cruciferous vegetables.
 
It’s not that we don’t eat these foods, but with our travel the end of last year and our recent move I’ve had a hard time getting back into the groove with my cooking. Things are getting better though. I’ve been relying some on cauliflower for part of our cruciferous intake.
 
Nutty Cauliflower Quinoa | Fake Food Free
 
In the research world, cruciferous veggies get most of their attention for the potential to reduce cancer risk. Cauliflower, specifically, is also an excellent source of vitamins C, K and folate. Cauliflower also happens to be one of my favorite veggies. In addition to liking the flavor, I like that I can prepare it in a variety of ways. We eat it mashed, steamed, raw, and in a bit of a stir-fry or sauté which happens to be how I prepared it for my lunch yesterday.
 
I had some quinoa left over from a meal earlier this week and I decided to make that the base of my lunch. I chopped the cauliflower in small florets, cooked it in a skillet, and then added some chopped walnuts and spices. To finish it off I combined it with the quinoa for a bowl of whole grain and veggie goodness. The nutty flavor of the walnuts and cauliflower and the seed-like crunch of quinoa paired well with the bold spices of the poultry seasoning I tossed in.
 
Nutty Cauliflower Quinoa | Fake Food Free
Nutty Cauliflower Quinoa
Makes: 3 main course servings
Write a review
Print
Quinoa
  1. 1 cup quinoa, soaked, rinsed and drained
  2. 1 ½ cups water
  3. 1/8 teaspoon fine ground sea salt
  4. 1/8 teaspoon ground black pepper
Cauliflower
  1. 1 tablespoon olive oil
  2. 1 medium head of cauliflower, cut into small florets
  3. ¼ cup water
  4. ¾ cup raw walnuts, chopped
  5. ½ teaspoon fine ground salt
  6. ½ teaspoon ground black pepper
  7. ½ teaspoon garlic powder
  8. ¼ teaspoon poultry seasoning
Instructions
  1. Stir together the water and quinoa in a medium saucepan. Bring to a boil over medium-high heat, reduce heat, cover with a secure lid, and allow to simmer for 15 minutes. Remove from heat and fluff with a fork. Stir in the 1/8 teaspoon of salt and pepper.
  2. Heat the oil in a large skillet over medium-high heat. Add the cauliflower and cook until it begins to brown, about 5 to 7 minutes. Add the water, reduce the heat just a bit, cover with a lid and allow to cook until the cauliflower is slightly tender, about 5 minutes.
  3. Remove the lid and ensure all the water has evaporated. Add the walnuts (you can also choose to toast them before adding), and cook 2 to 3 more minutes. Add the remaining salt, black pepper, garlic powder and poultry seasoning. Stir to coat the veggie and nuts.
  4. In a large bowl toss together the quinoa, cauliflower and nuts, and serve.
Fake Food Free https://www.fakefoodfree.com/
Thanks for reading! All images and content are the property of Fake Food Free unless otherwise stated. Please do not republish full recipes and images without written permission. What is okay? Feel free to Pin images, share links to my posts or share the photo in a round up post with the title of this recipe and a link back to the post. Confused about copyright and food blogs? Here is some helpful information on Recipe Attribution. If you want to use a photo or full recipe, just ask. I’m sure we can work something out.  
 
This post contains affiliate links. 

*************************************


More info on cauliflower and cruciferous veggies:
WHFoods: Cauliflower
Oregon State University, Linus Pauling Institute: Cruciferous Vegetables


7-Grain Blackberry Pecan Muffins

March 8, 2010


7-Grain Blackberry Pecan Muffins Recipe
 
I’ve been in a breakfast rut lately. Between oatmeal, muesli and some fruit I haven’t broken my pattern in a few weeks. However with a newly completed kitchen, all the kitchen boxes unpacked and a freezer still full of last summer’s berries I decided to climb out of my rut and get baking.
 
I was at Whole Foods last week and picked up my favorite 7-grain cereal from the bulk bin. I just love the bulk bins. You can get so many grains at a great price. Since I have yet to make it down the aisle without bumping someone with my basket or receiving an accidental elbow I don’t worry too much about lack of turnover. The grains seem to fly off the shelf there.
 
I cooked up a big batch 7-grain cereal for us to eat throughout this week and I thought it would make a good addition to the muffin batter. Then I decided on a blackberry and pecan combo. I used butter this time, but next time, when I have fresh berries, I want to try these muffins with coconut oil. I was worried the coconut oil would solidify in the batter when I added the frozen berries since this has happened to me before.
 
The muffins baked up beautifully. They have a hearty, yet soft texture on the inside and are overflowing with tart berries. The pecans add a toasty crunch with each bite. This combo would work for a lot of different grain cereals, even steel cut oats, and with a lot of different berry/nut combos. I like this one because the muffin itself is sweet, but the blackberries add a strong pucker effect because they are a tart variety.
As of this week, the breakfast pattern has been broken, at least for a little while.
7-Grain Blackberry Pecan Muffins

1 cup milk
½ cup grain cereal, cooked
¼ cup butter, melted
1 egg
½ cup minimally refined sugar (I used mascavo)
2 tsp baking powder
½ tsp salt
2 cups white whole wheat flour
1 ½ cup frozen blackberries
1/3 cup pecans, chopped
 
Preheat the oven to 400 degrees F and lightly grease the bottoms of a 12 serving muffin pan. In a bowl, whisk together the milk and cooked cereal. Stir in the butter, egg and sugar. Add the baking powder and salt and then gradually stir in the flour. Stir just until combined, the batter will be very thick. Gently stir in berries and nuts.
Divide batter into 12 muffin cups. Bake for 18 to 20 minutes. Cool in muffin pan for about 5 minutes and remove to a cooking rack or enjoy warm.


********************************************************
Our fridge is finally in its appropriate spot and the kitchen is complete! I still can’t get over all the space I have. I love that I have to actually take a few steps to walk to the fridge from the stove! I’m looking forward to a lot more baking now that I have all this counter space for kneading, mixing and tossing around ingredients.
 

Want to create beautiful food and product photos that you can't wait to share?!
Discover your style, control the light, and shoot using the tool you know how to use (yes, your phone included). Learn about free resources, Live Q&As with Lori, and online courses you can take from anywhere in the world!
We respect your privacy. Unsubscribe at any time.