Browsing Category

Fruits and Vegetables

Mustard and Chive Potato Salad with Greek Yogurt

July 22, 2010

“I can show you how I make my potatoes,” my mom said during a visit a few weeks ago.

Why yes, I thought that was a great idea considering that I’ve had my mom’s potato salad all my life, yet I don’t know that I’ve ever actually watched her make it.

At least, not with a pen and notebook in hand which is often the case when it comes to witnessing the creation of family recipes these days.

I have to admit that there was a part of me that was slightly amazed at what unfolded next. She washed some potatoes, put them in a pot, and covered them with water. She turned the heat to high and put on the lid and then watched. The potatoes came to a boil within a few minutes. They boiled for a minute or two, she removed them from the heat and kept the lid on.

Then the potatoes were left to sit there in the water for about an hour or so, until they were cool enough to touch. After draining, the skins peeled off easily and they were chopped for potato salad. Soft, but still firm enough to hold their shape in the dressing. Perfect.

This is the first time I’ve encountered such a no-fail method. An added bonus is that research has shown chopping potatoes before cooking can reduce the mineral content by up to 75%. Cooking them whole helps prevent this.

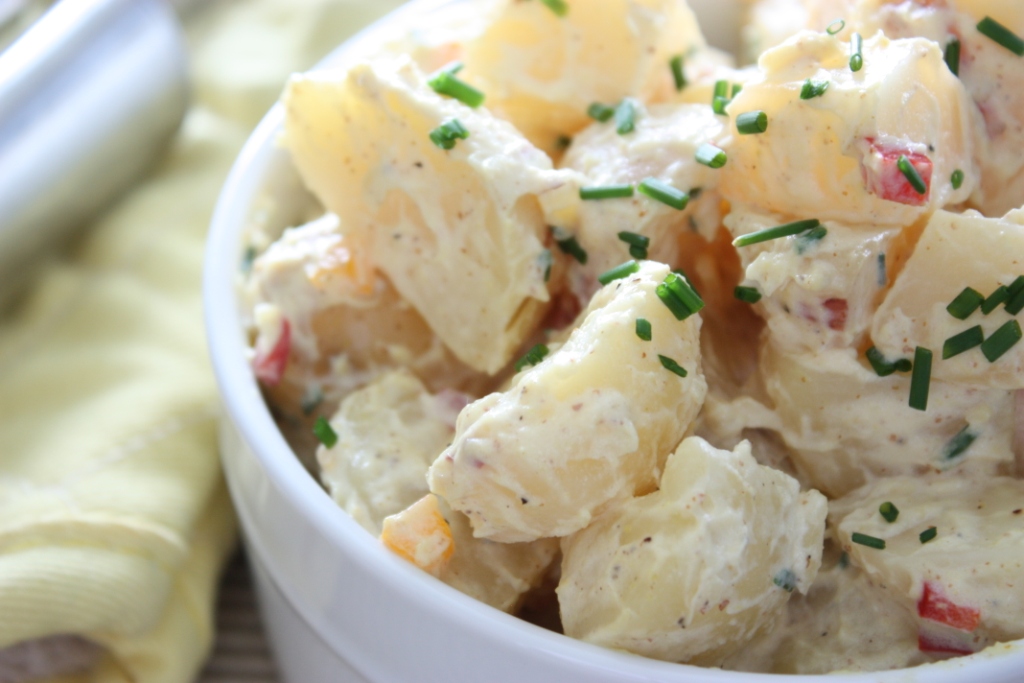
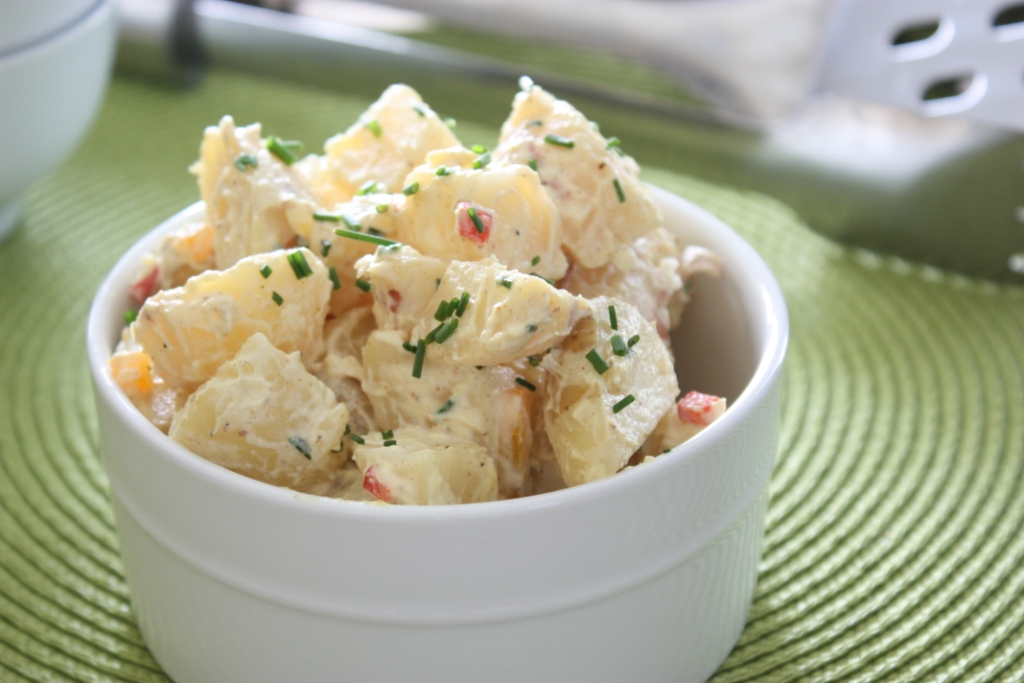
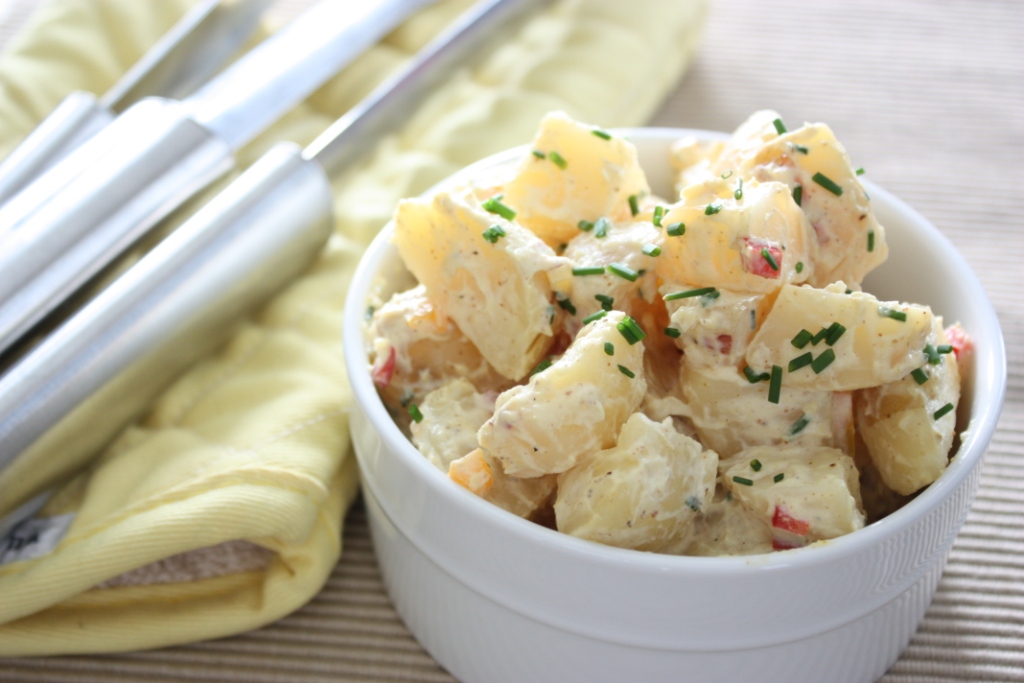
Since the potato preparation discovery I have been trying out different combinations of potato salad. I find I really like the flavor of spicy brown mustard and it allows you to use a lot less mayonnaise. This time around I added Greek yogurt, cut the mayo even more, and I’m pretty sure I’ve discovered my favorite one!

Mustard and Chive Potato Salad with Greek Yogurt

5 to 6 red potatoes (cooked and cubed using method above)

2 tbsp red bell pepper, diced
2 tbsp orange bell pepper, diced
2 tbsp mayonnaise
3 tbsp plain Greek yogurt
1 tbsp spicy brown mustard
3 tbsp fresh chives, chopped
Salt and pepper to taste

Combine the potatoes and peppers in a bowl and add the mayo, yogurt and mustard. Stir until all ingredients are mixed and the potatoes are evenly coated.

Mix in 2 tbsp of the chives, reserving the rest for garnish. Salt and pepper to your taste. I usually end up adding about ½ tsp of sea salt and ½ tsp of black pepper. Refrigerate for at least 1 hour, garnish with the remaining chives and serve. Makes about 3 to 4 servings.

PS. How exciting is it that every fresh ingredient in this dish came out of our garden?!

This post has been added to the July Side Dish Showdown at Cinnamon Spice and Everything Nice, and submitted to Souper Sundays at Kahakai Kitchen.

Cherry Lemon Pistachio Scones

July 21, 2010

I’ve written of my love of scones before, although it has been a long time since I’ve made them. This is purposeful since a batch barely lasts a day in our kitchen. Yes, put me and a scone in the same room and the self control goes out the window.

Due to a series of events that involved inspiration and obtaining of ingredients, I decided I had sacrificed long enough. It was time for another batch of scones.

Earlier this week I was inspired by this amazing Lemon and Pistachio Cakes recipe at Baker Wanabe. This is a new blog by Anna from Chef Wanabe, one of my favorite food blogs. I still want to try that cake as is, but for this recipe it got me thinking about the lemon pistachio combo.

Next, I received a package of assorted nuts and dried fruit from Oh Nuts. I was thrilled to receive this because I was able to get raw nuts – cashews, pistachios and almonds. I find that I no longer need salt on nuts. If you take it away, you get to enjoy the true, unique flavor of each variety. I also got a bag of dried tart cherries, the benefits of which I wrote about just last week.

I broke into the bags right away. The nuts were very fresh and while the cherries do have added sugar and oil (it is difficult to find varieties that don’t), I just couldn’t stop snacking. Then I reminded myself that I needed to use these for some cooking.

Hmmm…lemon, pistachio…how about cherries too? Check!

So far I haven’t made scones with white whole wheat flour so I tried it with this time around. Excellent! I also skipped a glaze and simply pressed some demerara sugar into the top of each before baking.

My only change is that in the recipe written below I reduced the salt to ¼ teaspoon. I used sea salt and the original ½ teaspoon I added made them just a little too salty and overpowered the sweet. Otherwise these scones have it all – sweet, salty, tart, chewy and crunchy!

Cherry Lemon Pistachio Scones

1 ¼ cups white whole wheat flour
2 ¼ tsp baking powder
2 tbsp mascavo sugar
¼ tsp sea salt
1 tbsp lemon zest
¼ cup cold unsalted butter
Juice from ½ a lemon
2/3 cup dried tart cherries
¼ cup raw pistachios
½ cup milk
Demerara sugar

Preheat the oven to 400 degrees F. In a medium bowl, mix together the flour, baking powder, mascavo sugar, salt and lemon zest. Cut the butter into pieces and blend with two knives or a pastry blender until the butter is cut into pea-size pieces.

Stir in the lemon juice, cherries and pistachios. Gradually add the milk and mix the dough to form a ball. Place the dough ball on a floured surface and flatten or roll out until it is ¼ to ½ inch in thickness.

Cut it into 8 pieces and place the pieces on a greased baking sheet. Sprinkle each scone with Demerara sugar and gently press it in to stick. Bake for 13 to 15 minutes or until the edges are browned and scones are baked through. Makes 8 scones.

Happy 70th Birthday to my Dad today! One of my most loyal readers!
 
Disclosure: Oh Nuts nuts and dried cherries were sent to me free of charge. I was not under any obligation to write about or cook with them, and I did not receive any compensation for doing.

Cherry Margarita

July 14, 2010

For a person who loves a good cocktail, I tend to do very few posts on the subject. I think perhaps it is time to change that.

I have cherries in mind and I’m not alone. It seems they are all the rage around the food blogging world and for good reason. Although they are popular in other countries, after being in South America I’ve come to strongly identify cherries with the US. Yes, all you lucky people who live in the Michigan and Rainier growing regions of the northwest.

Fortunately cherry trees do grow around Kentucky and Indiana, they are just in limited supply and they tend to be done bearing by early summer. I did pick up a bag from the Farmer’s Market back in May, but now I have to resort to the Bing cherries in the supermarket if I want them. Otherwise, I can go for cherry juice.

A few months ago Cheribundi sent me some samples of tart cherry juice to try. Its arrival motivated me to do some more research about the benefits of tart cherries. My Dad swears by it for reducing inflammation and arthritis. Well, okay, he rarely swears, but you know what I mean.

For tart cherries and health it is all about the anthocyanins, those plant substances that give cherries their deep, dark red color. Tart cherries are linked to a reduction in the inflammation that is related to heart disease and diabetes. These anti-inflammatory properties may also be why many people claim that cherry juice eases their arthritis pain.

For all my runners out there, a study in 2009 found that drinking tart cherry juice resulted in faster recovery after marathon running. (I sent my husband this study back in April during our training and after two days the bottle of cherry juice which I had been rationing in our fridge for about a week was gone.)

Tart cherries are beneficial in just about any form – fresh, dried, juice. Just make sure that the dried variety isn’t loaded with sugar or other sweeteners.

The sweet cherries such as Bings which are so plentiful here right now don’t appear to have as much of the antioxidant anthocyanins. However, they still deserve plenty of attention for their health benefits.

After drinking the first bottle of TruCherry, which was very good by the way, I knew I wanted to create something with the second. No rack of lamb with a cherry reduction here, I was thinking cocktail! I decided to combine fresh lime, fresh Bing cherries, tart cherry juice and tequila.

I rimmed the glass with ground Pink Himalayan sea salt which is a new favorite ingredient of mine. Just go easy because a little goes a long way!

Now, I’m not advocating you drink all your cherry juice as a cocktail, but this was one good margarita!

Cherry Margarita

¼ of a fresh lime
3 Bing cherries, pitted
1 oz tequila
2 to 3 oz tart cherry juice

In a cocktail shaker or glass mull the lime and cherries together, extracting as much juice as possible. Pour in the tequila and cherry juice. Add some ice cubes and shake or stir until chilled. Strain into a cocktail glass of your choice. Rim the glass with salt if desired. Makes one drink.

References:

University of Michigan Health System (2008, April 10). Tart Cherries May Reduce Factors Associated With Heart Disease And Diabetes. ScienceDaily. Retrieved July 14, 2010, from http://www.sciencedaily.com¬ /releases/2008/04/080407114647.htm
Howatson et al. Influence of tart cherry juice on indices of recovery following marathon running. Scandinavian Journal of Medicine and Science in Sports, 2009

Disclosure: Cheribundi Tart Cherry Juice was sent to me free of charge. I was not under any obligation to write about it and I did not receive any compensation for doing so nor did any factors influence my opinion.

Chocolate Chip Zucchini Cake with Candied Walnuts

July 12, 2010

Let’s give a round of applause to the first person who decided to add vegetables to desserts, breads and muffins. There is the carrot cake, sweet potato pie, beets in cakes, and of course, zucchini bread. Perhaps vegetables surrounded by sugar aren’t always the best way to go, but it is certainly nice to throw a veggie dessert in the rotation every now and then.

Summer squash doesn’t always stand out as a nutritional superstar, but it definitely has some appealing characteristics. It is rich manganese which activates enzymes that play a role in energy metabolism. It also plays a role in the formation of healthy cartilage and bone. Zucchini also offers vitamin C, vitamin A and dietary fiber in addition to several other vitamins and minerals.

I showed you our zucchini in my last post. We have three plants bearing right now which means we have at least one or two zucchini every day.

We have eaten plenty of sautéed summer squash around here topped with fresh herbs and olive oil. So about two weeks ago I was ready for some zucchini bread. At least bread is what I started with. Then I started thinking about cake.

After adapting the zucchini bread recipe from the 75th Anniversary Edition of the Joy of Cooking by adding my favorite sugars and flour along with some additional spice. I had the cake recipe set. With the chocolate chips and the walnuts this definitely falls in the dessert category, but just between you and me we did have some for breakfast.

Chocolate Chip Zucchini Cake with Candied Walnuts
Cake adapted from Joy of Cooking, Sweet Zucchini Bread

1 ¼ cups white whole wheat flour
1 tsp baking soda
1 tsp baking powder
½ tsp cinnamon
¼ tsp nutmeg
½ tsp salt
¾ cup demerara sugar
2 eggs
½ cup butter, melted
½ tsp vanilla
2 cups fresh zucchini, shredded
½ cup dark chocolate chips

2 tbsp butter melted
1/8 cup mascavo sugar
½ cup walnuts, chopped

Preheat the oven to 350 degrees F and lightly grease an 8 x 8 inch brownie pan.

In a medium bowl whisk together the flour, baking soda, baking powder, cinnamon, nutmeg and salt. Set aside.

In a larger bowl, whisk together the demerara sugar and eggs. Slowly whisk in the ½ cup cooled, melted butter. Whisk well to dissolve the sugar as much as possible. Stir in the vanilla.

Gradually add the dry ingredients to the wet ingredients and stir just until combined. Add in the zucchini and the chocolate chips and stir just until incorporated. The batter will be very thick. Transfer the batter to the prepared baking pan.

In a small dish, stir together the butter, mascavo sugar and walnuts until the walnuts are coated. Sprinkle the walnuts over the batter and press in gently.

Bake for about 30 minutes or until a toothpick inserted in the center comes out clean. Cool and serve warm or at room temperature. Makes about 9 servings.

Nutritional Resources
WHFoods: Summer Squash (my favorite resource on the web for nutritional info)
Oregon State University: Manganese

Cucumber Dill Wheat Berry Salad

July 1, 2010

Cucumber Dill Wheat Berry Salad | Fake Food Free | A hearty cold grain salad with a tangy yogurt dressing and refreshing cucumber.

Ever since my food service class in undergrad I have been crazy about herb gardens. The class involved operating both the department cafeteria and a seated dining room two times a week. I had to take the course over the summer the year before I graduated so the fresh foods we used were at their peak.

On the first day of class Chef walked us outside and showed us the herb garden right behind our building on campus. I had walked by it on my way to classes for nearly 2 years and had never seen it. It was a modest row of basics – basil, thyme, parsley, oregano, dill, cilantro and a few others. The whole garden was only about 6 feet long and 3 feet wide, but the plants were overflowing out onto the side walk and most came to at least knee height.

It was my first introduction to using fresh herbs in cooking. I’m sure that was evident to my instructors when I kept pronouncing thyme as it looks with the “th” and not “time.” Our TA quietly told me the correct pronunciation to help me avoid embarrassment.

Since then I’ve been interested in herb gardens and while I still may mispronounce a name now and then, and I am thrilled to have my own again this year. The only problem is the plants produce A LOT and my cooking can’t keep up with them. I’m always looking for things to use them in, but I have to admit they tend to go a few days at a time without me picking a single leaf.

So last week, armed with some wheat berries, I began thinking about what herbs would go well with the grain. That led me to think about the fresh cucumbers I picked up at the farmer’s market which ended up in thoughts of Greek yogurt.

Finally, all those food thoughts resulted in this:

Cucumber Dill Wheat Berry Salad | Fake Food Free | A hearty cold grain salad with a tangy yogurt dressing and refreshing cucumber.

The Cucumber Dill Wheat Berry Salad ended up a hit. I was able to combine two of my favorite herbs for a refreshing cold grain salad. I used leftover, previously cooked wheat berries so if yours are still warm, wash them well under cold water to cool them off. Also, peel your cucumber before chopping if it is of the waxy skin variety.

I’ve already made this salad once more for lunch and now I have my eye out for a potluck to take it to (it can easily be doubled or tripled).

Cucumber Dill Wheat Berry Salad | Fake Food Free | A hearty cold grain salad with a tangy yogurt dressing and refreshing cucumber.

Cucumber Dill Wheat Berry Salad

Makes: 2 servings

Ingredients


1 cup cooked wheat berries
½ medium cucumber, chopped
1 T fresh lemon juice
½ T fresh dill, chopped
½ T fresh chives, chopped
1 ½ T plain Greek yogurt
Salt and pepper to taste

Prep

Place the wheat berries and chopped cucumber in a medium-sized bowl and set aside.

In a small bowl, whisk together the lemon juice, dill, chives and yogurt. Pour the dressing over the wheat berries and toss or stir to coat. Sprinkle with a generous amount of sea salt which adds great flavor and a little black pepper. Eat right away, or refrigerate for up to a day. 


This recipe was submitted to Souper Sundays at Kahakai Kitchen.
 
Thanks for reading! All images and content are the property of Fake Food Free unless otherwise stated. Please do not republish full recipes and images without written permission. What is okay? Feel free to Pin images, share links to my posts or share the photo in a round up post with the title of this recipe and a link back to the post. Confused about copyright and food blogs? Here is some helpful information on Recipe Attribution. If you want to use a photo or full recipe, just ask. I’m sure we can work something out. 

Ataulfo Mango Jalapeno Pizza

June 9, 2010
These days I’m feeling incredibly mango deprived. Actually, I’m feeling tropical fruit deprived in general.

Ataulfo Mango Jalapeno Pizza | Fake Food Free
 
Wow, has it been difficult to go from fresh bananas, pineapples, guava, mangos, papaya and oranges at the local farmer’s market in Brazil, back to mediocre store-bought apples and grapes. Things are looking up now, of course. Spring brought strawberries. Summer will bring blueberries, blackberries, raspberries and peaches. The wonderful central Kentucky apples will follow this fall.
 
I missed all of these things when I was in Brazil. Now that I’m back, I miss mangos! They did have a very distinct season where we lived, but when ready, the flavor was incredible. The local Japanese market would also import several different varieties from around the country.
 
One variety that I did not find there, however, was the Ataulfo, or Champagne, mango from Mexico. This was introduced to me by a friend in the States. I just love these tiny little bundles of sweetness. Everything you read about the flesh being rich and buttery is true.
 
 
Ataulfo Mango

These are still available at the stores around here so when I saw Mango & Tomato’s 2 year recipe contest I knew I had to pick one up and enter!

About this time last year I introduced you to one of my favorite mango combinations – the Sweet and Spicy Mango Quesadilla. I decided I needed to somehow include a tomato in the mix for my recipe entry. I first considered fresh salsa, but I expect that many people will consider that as well, so I kept thinking.

Finally, it came to me – pizza! Now, I was a little leery of how the tomato sauce on the pizza would go with the mango and jalapeno, but I love pineapple on my pizza so I went for it. Good thing, because the combination turned out wonderfully.

I’ve been wearing out Off Her Cork’s Spelt Pizza Dough recipe. It is excellent! I made it again here, but this time I used whole wheat flour for the spelt and white wheat flour for the unbleached. I also added a half teaspoon of salt and an Italian seasoning blend. You can use any crust of your choosing, of course.

This pizza is every bit as good as the quesadilla combo with a different twist. If you like a sweet and spicy combo on your pizza, this is one for you!

Ataulfo Mango Jalapeno Pizza | Fake Food Free

Ataulfo Mango Jalapeno Pizza

Makes: 1 to 2 servings

Ingredients

Sauce
1 (14 oz. can) no-salt, tomato puree (this will soon be fresh tomatoes once they arrive in the garden!)
1 tablespoon fresh basil, chopped
½ tablespoon balsamic vinegar
½ tablespoon mascavo sugar
½ teaspoon garlic powder
½ teaspoon fine ground sea salt
½ teaspoon ground black pepper
¼ teaspoon crushed red pepper
 
Toppings
1 Ataulfo mango, sliced or chopped
¼ cup sliced pickled jalapenos
¼ cup whole milk mozzarella, chopped or shredded
 
10 to 12 inch size of your favorite pizza dough
 
Prep

Heat the oven to 400 degrees F. In a medium sauce pan, combine all the ingredients for the sauce. Heat over medium-high and simmer for 7 to 10 minutes, stirring often. Remove from the heat and set aside. You will likely have much more sauce than you need so you can make another pizza or use it another day.

Roll the dough out to your desired thickness and coat the bottom with cornmeal. Place on a pizza pan and spread on about ¼ cup of the sauce over the dough. You can use more or less based on your preferences.

Top the sauce with the mango, jalapenos and cheese. Bake for about 15 minutes, or until the cheese begins to brown and bubble. Allow to cool for 2 to 3 minutes, slice and serve. 

Ataulfo Mango Jalapeno Pizza | Fake Food Free

 
Thanks for reading! All images and content are the property of Fake Food Free unless otherwise stated. Please do not republish full recipes and images without written permission. What is okay? Feel free to Pin images, share links to my posts or share the photo in a round up post with the title of this recipe and a link back to the post. Confused about copyright and food blogs? Here is some helpful information on Recipe Attribution. If you want to use a photo or full recipe, just ask. I’m sure we can work something out.  

Patty Pan Squash Stuffed with Basil Orzo

June 7, 2010

Stuffed Patty Pan Squash with Basil Orzo Recipe

Just when I was becoming confident in my knowledge of squash varieties I came across a new one at Lexington Farmer’s Market a couple weeks ago.

My Dad has grown varieties of yellow squash and zucchini in his garden my whole life, but I’ve never come across Patty Pan Squash. It is also sometimes called Scalloped Squash for obvious reasons. Have you seen it or cooked with it before? 

Patty Pan Squash

Patty Pan or Scalloped Summer Squash

Just look at that interesting shape. It is as if the little squash decided that it really didn’t want to grow long and decided to grow wide instead. You know, just to be different.

Well, in my opinion, different is good, and while Patty Pan has a similar flavor and texture to its longer cousins it adds a lot more fun to cooking.

Patty Pan Squash Stuffed with Basil Orzo


I spent several days trying to figure out what I was going to stuff into these little bowl-like vegetables. I kept going back and forth between rice, bulgur and orzo, finally settling on orzo. With all the fresh basil in our herb garden at the moment, I thought an Italian twist was the way to go.


Patty Pan Squash Stuffed with Basil Orzo


At first I was much more interested in the shape than the actual squash, but that quickly changed as I began creating this dish. Patty Pan are easy to roast up. If you trim the stem and flip them over you can simply remove the top, clean out the seeds and stuff them with all sorts of ingredients. These squash can also be sliced and steamed or sautéed with a little olive oil or butter.

Patty Pan Squash preparation

The yellow Patty Pan that I used had a sweet, fresh flavor. They seemed even sweeter to me than standard yellow straight or crooked-neck summer squash. The basil and cheese combination with its slight saltiness paired perfectly with the tender, sweet flesh of the squash.

Patty Pan Squash Stuffed with Basil Orzo

Makes: 2 servings

What you’ll need:

2 medium Patty Pan squash
Olive oil
1 cup orzo, cooked and cooled
2 tablespoon whole milk ricotta cheese
2 tablespoon Romano cheese, grated
6 fresh basil leaves, chopped
¼ teaspoon sea salt
1/8 teaspoon black pepper

How to make it:

Preheat the oven to 400 degrees F. Trim the stem off the squash to create a flat surface. Coat them in olive oil and place them stem side down in a baking dish. The bake time will vary greatly depending on the size of the Patty Pan. I had two, one smaller than the other. The smaller cooked in 30 minutes and the larger took 40 minutes. Insert a fork in the flesh to ensure that it is tender and remove from the oven. Set aside until cool enough to handle.

In a bowl mix together the orzo, cheeses, basil, salt and pepper. Set aside.

Patty Pan Squash recipe prep

Using a small paring knife carefully cut the top off of each squash. Gently scrape out some of the seeds using a spoon to create a bowl to hold your filling. Scoop half of the filling into each squash. Return to the oven and bake 5 to 7 minutes longer until everything is heated through. Makes 2 side dish servings.


Thanks for reading! All images and content are the property of Lori Rice and Fake Food Free unless otherwise stated. Please do not republish full recipes and images without written permission. What is okay? Feel free to Pin images, share links to my posts or share the photo with the title of this recipe and a link back to the post. Confused about copyright and food blogs? Here is some helpful information on Recipe Attribution. If you want to use a photo or full recipe, just ask. I’m sure we can work something out.

Whole Grain Rhubarb Waffles with Strawberry Butter

June 1, 2010
Whole Grain Rhubarb Waffles with Strawberry Butter | Fake Food Free
 

I’m always inspired when I read about other food bloggers taking on challenging ingredients. It is usually something like a root veggie or an over abundance of cabbage in a CSA box. While there is apprehension at first, the final result is always beautiful even if you don’t prefer the star ingredient.

Rhubarb has been my challenging vegetable as of late. It was a staple in our garden growing up, but when I had the opportunity to grow it myself, I declined. But since my parents had an over abundance, I was offered some of this year’s harvest. Seeing it as a culinary challenge, I accepted.

I feel a bit sorry for rhubarb with its poisonous leaves. It really isn’t a nutritional superstar either; just a stalk that is often in the shadows of fruits like strawberries, in order to be enjoyed.

Whole Grain Rhubarb Waffles with Strawberry Butter | Fake Food Free

I like the flavor of rhubarb, just not the texture. This is especially true after growing up at dinner table with brothers who made disgusting jokes about said texture while eating the pie. Thus, be careful of the way you perceive and communicate perceptions of foods to children. I’m proof that those comments hang around and can control food preferences later in life!

But now, I was up for the challenge of tackling my rhubarb apprehension. With plenty on hand I had to come up with something that would present the flavor, but not the texture.

My first thought? Waffles!

Ever since I got my waffle maker last Christmas I’m always thinking about new waffle recipes. For this one, the rhubarb blended in nicely to the whole grain waffle and while it wasn’t quite as strong as I would have liked it was still good. I topped it off with some strawberry butter and breakfast was complete.

Whole Grain Rhubarb Waffles with Strawberry Butter | Fake Food Free

Whole Grain Rhubarb Waffles with Strawberry Butter

Makes: About 6 waffles

Ingredients


1 cup rhubarb, chopped
4 tablespoon water
¼ cup demerara sugar

1 cup white whole wheat flour
¾ cup whole wheat flour
1 tablespoon baking powder
½ teaspoon salt
¼ cup unsalted butter melted, plus 2 tbsp more for waffle iron
2 large eggs, lightly beaten

Prep

In a sauce pan, combine the rhubarb, water and sugar. Cook on medium-high heat, stirring often until the rhubarb cooks down to a jam-like consistency, about five to seven minutes. Remove from the heat and set aside.

rhubarbrhubarb-cookedrhubarbpan

In a large bowl, sift together the flours, baking powder and salt. Stir in the cooled melted butter, eggs and rhubarb. Stir to combine all the ingredients.

Heat your waffle iron and lightly brush each side with melted butter. Pour a heaping 1/3 cup of batter onto the iron, close and cook for about four minutes. Remove and repeat with the butter for the next waffle. Top waffles with strawberry butter (below) before serving. 

Strawberry Butter

I really enjoy fruit butters in place of syrup on waffles. We used to make them all the time when I worked in a bakery. There are a variety of ways to create them, but the easiest is with jam and butter. I used some strawberry freezer jam that my mom made with this year’s fresh strawberries.

Ingredients

¼ cup butter, unsalted, slightly softened
2 teaspoon strawberry jam, the thinner the consistency the better

Prep

Place ingredients in a small food processor. Process until everything is blended and the butter is soft and spreadable.

For more info, the University of Illinois Extension Service has a helpful page about rhubarb.


Thanks for reading! All images and content are the property of Fake Food Free unless otherwise stated. Please do not republish full recipes and images without written permission. What is okay? Feel free to Pin images, share links to my posts or share the photo in a round up post with the title of this recipe and a link back to the post. Confused about copyright and food blogs? Here is some helpful information on Recipe Attribution. If you want to use a photo or full recipe, just ask. I’m sure we can work something out.  

Butternut, Flax and Walnut Bread

May 12, 2010

It is rare that you come across a food that is fresh and local, yet out of season. Sounds kind of strange doesn’t it? Fall and winter squash is such an amazing thing. Stick those babies in a cool environment and they seem to last forever.

That is exactly how this bread came about. At Easter my parents gave me two butternut squash, the last two of the 2009 season. They had kept them in the garage all winter and spring.

I wasn’t sure what I would find when I cut them open. I inserted the knife and carefully split open the squash a little nervous that I might be met with smelly, rotting innards. I breathed a sigh of relief when I saw only bright orange flesh staring back at me, ready to be roasted.

I will admit I was pretty thrilled. One, because of how amazing these veggies are that they can be stored for so long and still taste great. Two, because this cool, rainy spring we are having is really messing with my cravings! I should be in a blissful state of enjoying fresh salads and grilled fish, but I find myself wanting warm comfort food and baked goods scented with cinnamon and spice.

The latter led to this recipe. Regardless of the season I can’t seem to pass up a tender, yet hearty quick bread for breakfast. This one is a twist on banana bread. It is sweetened with mascavo sugar and maple syrup and has some walnuts and flax meal thrown in for extra crunch and nutrition. The result? A slightly sweet bread, soft and moist from the squash — the perfect partner for coffee or tea eaten plain or with a small swipe of cinnamon butter.

Butternut, Flax and Walnut Bread

1/3 cup minimally refined cane sugar
3 tbsp maple syrup
½ cup butter, melted
2 eggs
1 cup roasted butternut squash, mashed or pureed
2 tsp ground flax meal
¾ cup milk
2 ½ cup white whole wheat flour
1 tsp baking soda
1 tsp salt
2 tsp cinnamon
½ cup walnuts, chopped

Preheat the oven to 350 degrees F. Grease two loaf pans, or you can use one standard loaf pan and two mini-loaf pans like I did.

In a mixing bowl whisk together the sugar, syrup and butter. Add the eggs and whisk until combined. Stir in the squash, milk and flax. Sift together the flour, baking soda, salt and cinnamon. Gradually mix these dry ingredients into the wet batter just until everything is combined. Stir in the nuts.

Divide the batter between loaf pans. Bake the small loaf pans 20 to 25 minutes and the standard loaves 30 to 32 minutes, or until a toothpick inserted in the center comes out clean. Cool for 10 minutes, de-pan and allow to cool completely on a wire rack.

Blackberry Yogurt Coffee Cake

April 30, 2010

My freezer is still full of blackberries from last summer. In fact, it has gotten to the point that my parents are now shuffling off their overabundance onto me because the new harvest will be coming up quickly. Considering that our little sprig-like bushes are going to need some time to come around, I’ve gladly accepted all they have offered.

I’ve been tempted to fill the house with desserts, but have had to pull the reigns the past few weeks as my husband prepares for his first marathon this weekend. Of course, I try to use little to no processed sugar and flour in most of our desserts (there are exceptions on occasion), but we still don’t need an overabundance of sweets around at the moment.

I keep hoping I’ll find more and more people to pawn off my desserts too, but right now most of the goodies end up hanging out in our kitchen for a while. If you work from home, you know exactly how dangerous that can be.

Speaking of that I have a question I’ve been meaning to ask. For all of you who pump out posts of dessert after dessert on your food blogs, what do you do with all of it? Big families, neighbors? I’m interested to know.

So what do you do when you don’t want to make a dessert, but still want to use up frozen berries and have something sweet? Well, you make something that is actually a dessert hidden under a name that classifies it into another meal category.

Coffee cake. Problem solved.

Coffee cake is one of those things that I rarely make so maybe that is why I’ve had it on my mind lately. I’ve seen quite a few posts up on other food blogs featuring it likely because coffee cake is great for springtime brunches. So for whatever reason, I wanted to make one.

This recipe successfully used up berries and combines some of my favorite ingredients; one of these being honey-flavored Greek yogurt. I recently found Greek Gods Greek Yogurt at our local supermarket and have been hooked ever since. I used it in this recipe and it resulted in a tender, moist cake with a slightly sweet flavor. I suppose you could use any Greek yogurt, but if you decide to use plain you might want to up the sugar in the recipe a bit. Especially if you are using tart berries, or a minimally refined sugar which are typically more complex and not a sweet as processed white or brown sugar.

I ended up using clove as the sole spice as I wanted something more creative than the traditional cinnamon. This resulted in a cake with berries that remind you of summer and a background flavor that whispers of the holidays. I already have plans to make it again. It is simple to throw together and I’m thinking the berry and fruit options are endless.

Blackberry Yogurt Coffee Cake

½ cup unsalted butter, softened
½ cup mascavo sugar
1 egg
¾ cup honey-flavored Greek yogurt
½ tsp vanilla
¼ tsp clove
¼ tsp salt
1 tsp baking soda
1 tsp baking powder
¾ cup white whole wheat flour
1 cup frozen blackberries

Topping:

¼ cup unsalted butter, melted
¼ cup mascavo sugar
¼ cup white whole wheat flour
¼ cup rolled oats

Heat the oven to 350 degrees F and grease a square 8 x 8 inch pan. In a mixing bowl beat together the ½ cup of softened butter and sugar. Add the egg and beat until light and fluffy. Next, mix in the vanilla and yogurt. Sift together the clove, salt, baking soda, baking powder and flour and slowly mix into the wet ingredients until everything is combined. The batter will be very thick. It is almost like a soft cookie dough.

Spread half of the batter evenly into the prepared pan. Evenly distribute the berries over the batter, pressing them in gently. Next, cover the berries with the remaining batter spreading it as evenly as possible.

In a bowl, combine all of the ingredients for the topping. Sprinkle it evenly over the batter. Bake for 30 to 35 minutes or until a toothpick inserted in the center comes out clean. Makes 9 slices.

Want to create beautiful food and product photos that you can't wait to share?!
Discover your style, control the light, and shoot using the tool you know how to use (yes, your phone included). Learn about free resources, Live Q&As with Lori, and online courses you can take from anywhere in the world!
We respect your privacy. Unsubscribe at any time.