Browsing Category

Fruits and Vegetables

Baked Eggs with Pumpkin and Greens Recipe

October 16, 2012

I love eggs just about any way you can make them. No problems with the taste or texture here, I could eat them at every meal. Over the years my tastes have evolved from scrambled and hard boiled only, to fried, and just recently to poached with rich, runny yolks.

I realized recently that one of the only ways I have yet to make eggs is baking them. It had to be easier than poaching, right?

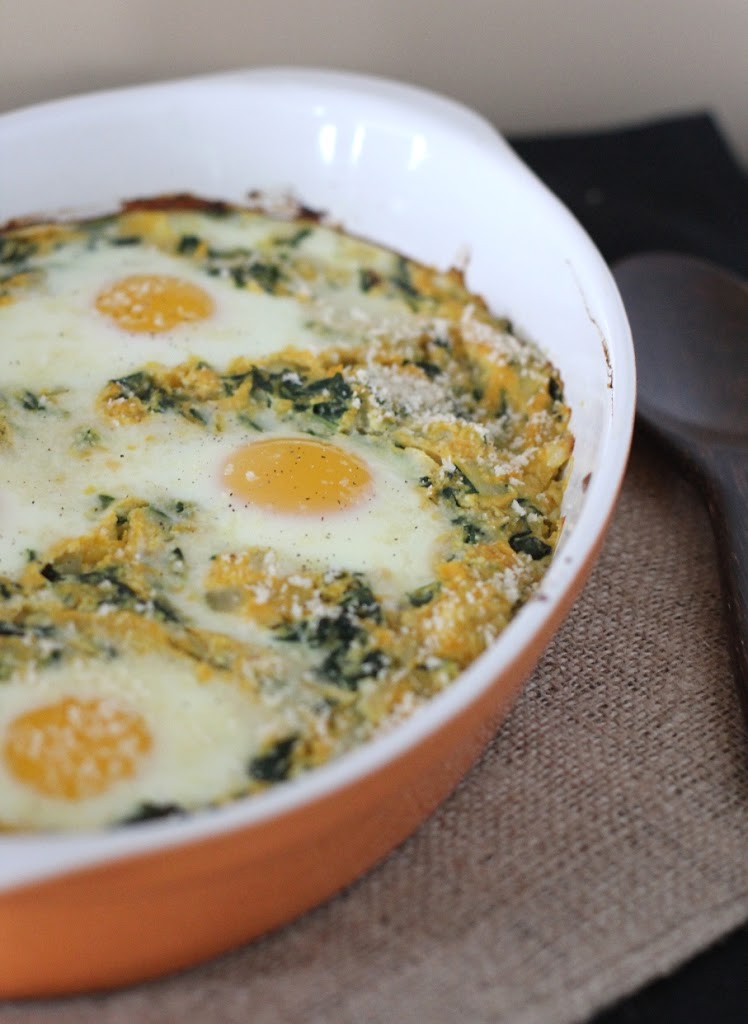
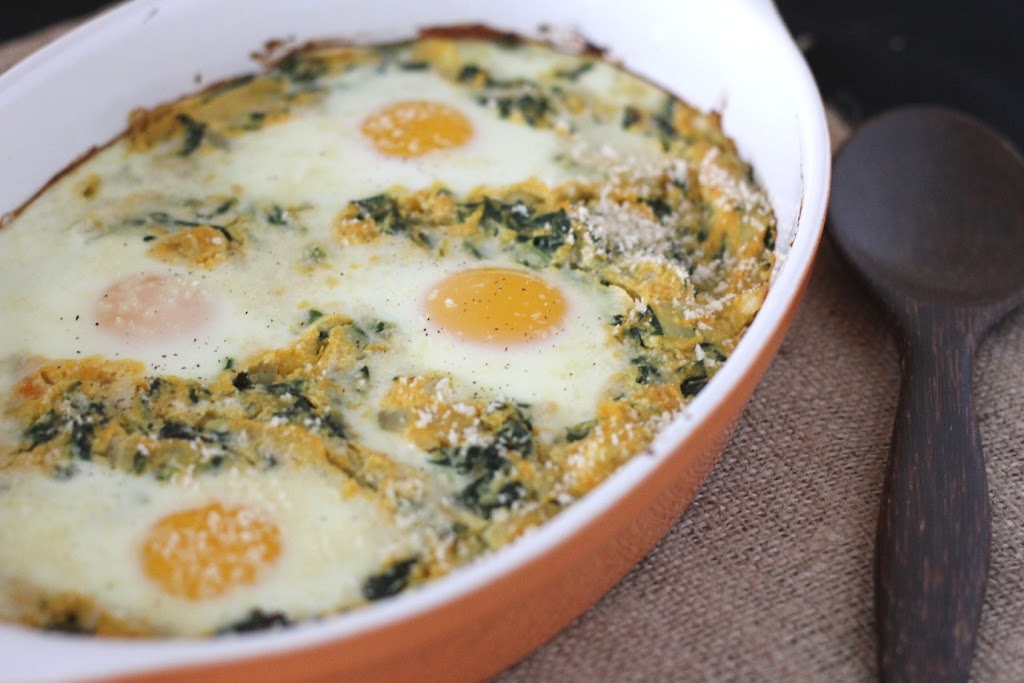
I had some left over pumpkin puree from roasting a pie pumpkin last week, and my mom brought me some kale from their garden this past weekend. I mixed in a few other ingredients and made this the base for eggs.

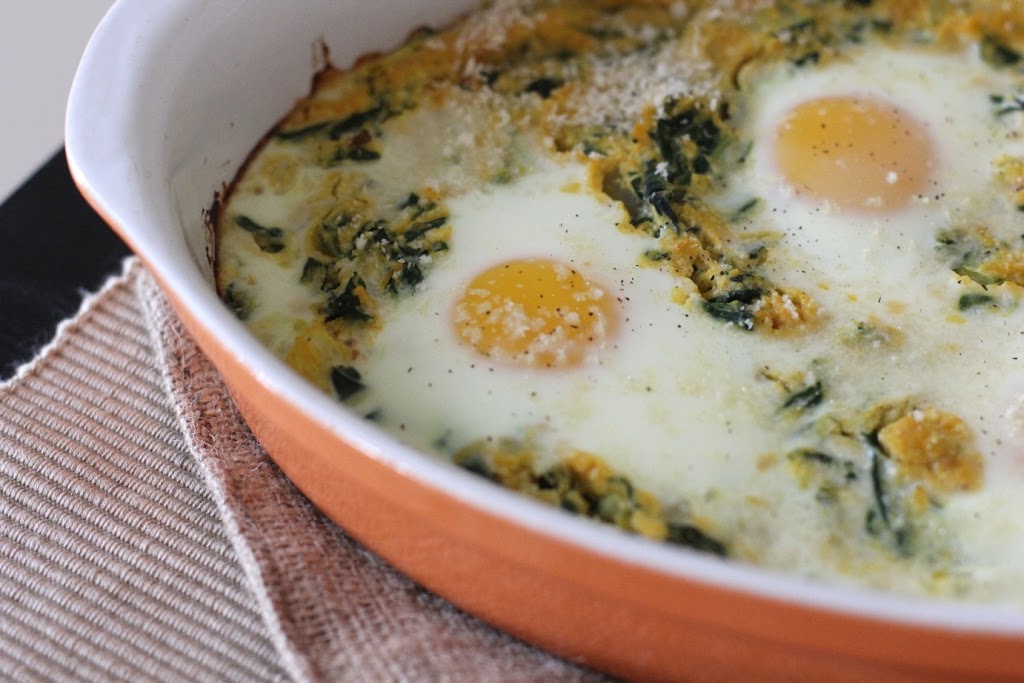
No surprise – I now love baked eggs too!

Even if eggs aren’t your thing, this combination makes a great baked side dish. I used kale and bok choy, but any hearty green will work fine

 Baked Eggs with Pumpkin and Greens Recipe

1 tbsp olive oil
1 small onion, sliced
2 cloves garlic, minced
2 cups chopped kale
2 cups chopped bok choy (mostly greens)
1 cup pumpkin puree
1 cup ricotta cheese
1/2 tsp salt
1/4 tsp black pepper
4 eggs
1 tbsp panko bread crumbs (optional)

Preheat the oven to 375 F and lightly grease a small casserole dish with olive oil.

Heat the 1 tablespoon of olive oil in a skillet over medium-high and add the onion and garlic. Cook for 2 minutes, or just until the onions begin to soften. Add the greens and cook only 60-90 seconds, just until the greens begin to wilt. Remove the skillet from the heat.

Stir in the pumpkin, ricotta cheese, salt and pepper. Transfer the mixture to the casserole dish.

Make four small indentations in the pumpkin mixture. One at a time, crack the eggs into the wells you created. Sprinkle the top evenly with the bread crumbs.

Bake for about 20 minutes, or until the whites are set, but the yolks are soft. Less if you like runny yolks, more if you like your eggs firm. Remove from the oven and serve warm. Makes 4 servings.

Lettuce Wraps with Pork, Apple and Tamarind Recipe

October 6, 2012


I hate to be that person. The one who squeezes produce before they by it. I minded my manners on my last visit to the Farmer’s Market, and simply selected my basket of apples by sight alone. Big mistake. I grabbed one for a snack on the drive home only to find that it was soft, along with the rest in the basket.

You should know something about me and soft apples. I can’t stand them. If the first bite isn’t so crisp that it pops, I can’t even finish it. I know, I know. It’s a bit dramatic, but it’s the truth.

So this whole recipe started with soft apples. Since the basket I bought wouldn’t be good for eating fresh (by my standards) I had to find some more creative ways to use them.

The apples led me to a sweet and savory ground pork dish, which then led me to having it over rice, which then led me to wrapping it up in a lettuce leaf. I’m not quite sure why I don’t make lettuce wraps more often. I need to move them up the list of my go-to dishes.

I used sticky rice for this version, but any type of rice will work. Or you can use rice noodles, or leave it out all together.

Lettuce Wraps with Pork, Apple and Tamarind Recipe

~ 1 lb ground pastured pork
1 medium onion, chopped
3 cloves garlic, minced
1 apple, cored and diced
1 tsp tamarind concentrate
1 tbsp tamari or soy sauce
1 tsp fresh ginger, grated
1/4 tsp crushed red pepper
4 green onions, sliced (for garnish)
1 to 1 1/2 cups cooked sticky rice
1 head romaine lettuce

In a heavy skillet, brown the pork over medium-high heat. Break it up into small pieces as it cooks. After 2-3 minutes, add the onion, garlic and apple. Continue to cook until the pork is fully browned and no longer pink. Drain any excess grease, if necessary.

Add the tamarind, tamari, ginger and crushed red pepper. Sprinkle on some of the green onions.

Prepare about 3 lettuce leaves for each person. Top each leave with a portion of rice, and then the pork. Garish with any remaining onions. Serves about 4.

Spiced Gooseberry Oat Bars Recipe

September 29, 2012

A few weeks ago, a slight freezer malfunction caused a hiccup in my food storage. All is good now, but there were a few things that managed to completely thaw before I was able to catch them. One of these was the gooseberries that my parents had given me earlier in the summer. 
I spent a few days staring at them in the fridge, and then decided that baking was the only answer. (I’ve learned that baking is the answer to a lot of things. I recommend trying it the next time you have a problem.)
I decided that these tart little berries would go great in my favorite oat bars. Since this gave me the opportunity to make the recipe again, I decided I’d experiment with a few other ingredients as well.
I made this batch with virgin coconut oil, which worked great. Keep in mind that this makes them a delicate, crumbly bar; one you will want to eat with a fork and not pack in your snack bag. I also had some gluten-free flour. Since this is a recipe that doesn’t need to rise, I felt it was safe to substitute all the white whole wheat flour for the gluten-free mix. Another winner. (Although, as you probably know if you eat gluten-free, oats are a tricky food. So I won’t be quick to name these 100% gluten-free.  But you can easily make yours that way, if you need it.) 
With fall finally arriving, I decided to spice this batch up a bit with ginger, nutmeg and cinnamon. I loved the way the flavors went with the tart berries. If you can’t get your hands on gooseberries, almost any berry will work. Cranberries and blueberries have been two of my past favorites. 

Spiced Gooseberry Oat Bars Recipe

Adapted from Blueberry Oat Bars, Bryant’s Blueberries

1 ¾ old fashioned rolled oats
1 ½ cups flour (I used Bob’s Red Mill Gluten-free All Purpose Baking Flour in this batch)
¾ cup mascavo (muscovado) sugar (or brown sugar)
½ cup chopped walnuts
½ tsp baking soda
1 tsp salt
¼ tsp ground ginger
½ tsp ground nutmeg
1 tsp ground cinnamon
¾ cup melted virgin coconut oil

2 cups thawed gooseberries
¾ cup raw sugar
1 tbsp cornstarch or arrow root
2 tbsp water
1 tbsp lemon juice

Preheat the oven to 350 degrees F.  Grease a 9 x 13 inch baking dish with coconut oil. 

In a medium bowl combine the oats, flour, mascavo sugar, walnuts, baking soda and salt. Add the ginger, nutmeg and cinnamon. Pour in the melted coconut oil and stir to mix well. You should have a crumbly mixture that is wet enough to hold when pressed together. Reserve about ¾ cup of the mixture. 

Press the remaining oat mixture into the baking dish. Spread it evenly and press it firmly into the pan. Bake for 10 minutes. Remove from the oven and set aside. 

In a sauce pan combine the gooseberries, and raw sugar (you can add more or less sugar to your taste). Bring to a boil, then simmer, for about 2 minutes. Stir to break up the berries. 

In a small dish, stir together the cornstarch, water, and lemon juice to make a paste. Add the paste to the gooseberries and stir until the fruit is thickened. Remove from heat.

Spread the fruit over the oat crust leaving just about a ¼ inch edge on all sides. Crumble the reserved topping evenly over the fruit. Bake for 18 to 20 minutes or until the edges of the crust begin to brown. Cool the pan on a wire rack. 

Once cooled completely, cut into bars. Makes about 15 bars.

Smoky Tomato Jam

September 25, 2012

Smoky tomato jam recipe | FakeFoodFree.com

 
You will never hear me use the word guilt in association with food and eating. Personally, I think it is a damaging word that has shaped our thoughts on eating habits, weight and health for far too long. 
 
That being said, I have one exception. 
 
The garden.
 
When this time of year rolls around and I see hot peppers so heavy on the plant that they touch the ground, and tomatoes that are ripe, but a little ugly, I start to feel guilty. It’s food, I can’t let it go to waste! And while I’m exhausted from thinking of ways to use it, I just can’t leave it out there to rot, or pull up the plants knowing they have some life left in them.
 
So with a full freezer, I turned to a little more canning this past week. 
 
First up? Tomato jam. 
 
I’d been entertaining the idea of making tomato jam, most of the summer, but never committed. Then I found a recipe from Food in Jars for Orange Tomato Jam with Smoked Paprika.  It was the smoked paprika that got me. I love that stuff!
 
Smoky Tomato Jam Recipe for summer | FakeFoodFree.com
 
 
So I gathered up the last of the tomatoes, and got cooking. Our orange tomato plants are done producing, but I still had Better Boy and San Marzano hanging on. They worked perfectly. I also used dried ginger (half the amount) instead of fresh, and skipped the cayenne simply because I didn’t have any dried on hand. 
 
You can find the recipe on the Food in Jars blog. This jam is the perfect balance of sweet, spicy and smoky. Next year, I will be pulling this recipe out early to get a head start during prime tomato season. Yes, it’s that good.
 
 
Smoky Tomato Jam Recipe | FakeFoodFree.com

Homemade Garden Chili Slow Cooker Recipe

September 19, 2012


Chili is one of those foods that I get burned out on by December, but every time the next September rolls around, I’m ready for it all over again. My cravings for it this year started this past week, and they are just about spot on, considering we are moving towards the end of the month.

As you can probably tell from my posts, it has been a great garden year. We are still bringing in more tomatoes than I know what to do with, and I have plenty of frozen veggies from harvests earlier in the summer. With the weather turning cooler here, chili seemed like the ideal way to use them up.
My goal was to use a lot of fresh tomatoes, so this recipe does take some prep work. For me, this is just the kind of thing I enjoy doing on a quiet Sunday. Once it’s all in the slow cooker, it’s low maintenance from there on out. 
Feel free to substitute different kinds of vegetables. I’ve been shredding and freezing zucchini all summer, and we also had some sweet corn tucked away in the freezer. Both ended up being a great addition to this chili.

Homemade Garden Chili Slow Cooker Recipe

6 – 8 lbs of tomatoes (you’ll need about 6 cups of sauce)
5 cloves garlic
1 small onion, chopped
2 cups black beans, soaked overnight
2 cups shredded zucchini, thawed if frozen
1 cup sweet corn, thawed if frozen
1 cup water
2 tbsp chili powder
1 tsp chipotle chili powder
1 tsp cumin
2 tsp salt
½ tsp ground black pepper
2 scotch bonnet peppers (or your favorite hot pepper)
Preheat the oven to 400 degrees F. Cut de-stem and core tomatoes if necessary, and cut in half. (I used a mix of San Marzano, Beefsteak and heirlooms.) Arrange cut side down on a baking sheet with the garlic and drizzle with a little olive oil. In batches, roast for 20 minutes. Set aside to cool.
Add the onion and black beans to your slow cooker. Remove the skins from the tomatoes and place the pulp and the garlic cloves in a blender. Blend in batches until a smooth sauce results. Pour the sauce into the slow cooker. Set to high.
Add the zucchini and corn. Add the water. Stir in the chili powders, cumin, salt and black pepper.  Take the scotch bonnet peppers and de-stem them. Cut a small slit in the side of each. Place the whole pepper in the soup. Put on the lid and cook on high for about 4 1/2 hours, or until the beans are tender.
Before serving, remove the two peppers and discard. Serve with your favorite toppings. Makes about 6 servings.

Roasted Eggplant and Black Lentil Soup Recipe

September 16, 2012

This eggplant and black lentil soup recipe is one I came up with after a Kentucky Food Bloggers event at Whole Foods. I’ve used black lentils a lot more since then, but this recipe still remains a favorite for cool summer days and for transitioning into autumn. It’s thickened with eggplant puree and flavored with tahini and garam masala. 

Roasted Eggplant and Black Lentil Soup Recipe | Fake Food Free
 
It’s hard to believe that it has been almost a year since our Kentucky Food Blogger group got together. We attempted all spring and summer, but busy schedules wouldn’t allow us to find a date that would work for more than a couple people.
 
That changed this past Friday night with the help of Whole Foods Market in Lexington. We were invited out to attend a special edition of their Flights After 5 event. Flights After 5 is a Friday night get-together where 5 beer tastings are matched with 5 appetizers at stations throughout the store. Last Friday Kentucky beers were featured including two of my favorite breweries West Sixth and Lore Brewing.


Several area bloggers joined the staff at Whole Foods as they told us a bit about the work that they do, and about the mission of the store. I will admit that I’m not a 100% Whole Foods shopper, but I do appreciate the products I buy there – grains from the bulk bins, my puffed kamut, and Ataulfo mangos, when they are in season.
 
I really like that on their website you can find Unacceptable Ingredients for Food and their Meat Animal Welfare Standards. That makes shopping easy. Through my work in agriculture, I’ve come across many local meat producers and fruit and vegetable farmers who supply Whole Foods. The combination of local support and global projects makes me a fan. We also learned that they price match with surrounding competitors, which explains why I’ve always felt that many things at Whole Foods aren’t any more expensive than they are at other area supermarkets.
 
Along with a little education, good beer and snacks, and great company, we received every food bloggers favorite thing – a goodie bag! They kept our cooking in mind and filled it with several ingredients, perfect for putting together a few new recipes. I was happy to see black lentils in my bag. I’ve used their brand before, and I was excited to create something new with them.
 
 
Baba ganoush was one of the appetizer offerings that night so I had eggplant on my mind. Lucky me, we just happen to still have eggplant from the garden.
 
I had no idea what direction I would go with the soup, but the more I tasted it, the more I felt it needed some Indian influences, which ended up making it a lot like daal. (And I’m definitely not complaining.) Tahini and garam masala came to the rescue, and I added some crushed red pepper for heat. It turned out to be a great way to celebrate the start of comfort soup season!
 
Roasted Eggplant and Black Lentil Soup Recipe | Fake Food Free


Roasted Eggplant and Black Lentil Soup Recipe  
Makes: 4 to 6 servings
Write a review
Print
Ingredients
  1. 6 small eggplants (you need about 1 cup roasted pulp)
  2. 1 1/2 tablespoons extra virgin olive oil
  3. 1 small onion, chopped
  4. 2 cloves garlic, minced
  5. 4-6 cups vegetable stock
  6. 2 tablespoons tahini
  7. 1 cup black lentils
  8. 1 teaspoon salt
  9. 1 teaspoon garam masala powder
  10. ¼ teaspoon ground black pepper
  11. ¼ teaspoon crushed red pepper
Instructions
  1. Preheat the oven to 400 degrees F.
  2. If your eggplant is round, de-stem and cut each in half. Longer Japanese style can be roasted whole. Lightly coat the eggplants with 1/2 tablespoons of the olive oil and spread in an even layer, cut side down, on a baking sheet. Bake for 20 minutes, or until pulp is very soft. Remove from the oven and allow to cool.
  3. In a soup pot, heat the 1 tablespoon of olive oil over medium-high and add the onion and garlic. Cook over medium to medium-high until the onions begin to soften, about 3 minutes. Add 4 cups of the stock. (Reserve the remaining 2 cups to add later, if you want a thinner soup.) Simmer for about 3 minutes.
  4. Scoop out the cooled eggplant pulp and transfer it to the soup pot. Use an immersion blender to blend the eggplant, onions and garlic with the stock until smooth.
  5. Add the tahini, and bring the soup to a low boil. Stir in the lentils. Reduce heat and simmer for 20 minutes or until the lentils are tender. Add the salt, garam masala, black pepper and crushed red pepper. Add more or less of each to taste. Simmer for another minute or two and serve.
Fake Food Free https://www.fakefoodfree.com/


—————————————————————————-

Voting for the Country Living Blue Ribbon Blogger Awards ends September 17, 2012! Fake Food Free is a finalist! If you enjoy my blog, I’d truly appreciate your vote for Reader’s Choice. You can vote here, no sign in or registration required.

Disclosure:  Some products in this recipe were given to me free of charge from Whole Foods Market. I was not required to post about them and received no compensation for doing so. Thoughts here are my own. 


Thanks for reading! All images and content are the property of Fake Food Free unless otherwise stated. Please do not republish full recipes and images without written permission. What is okay? Feel free to Pin images, share links to my posts or share the photo in a round up post with the title of this recipe and a link back to the post. Confused about copyright and food blogs? Here is some helpful information on Recipe Attribution. If you want to use a photo or full recipe, just ask. I’m sure we can work something out.  

Pesto Pizza with Red Grapes and Bacon Recipe

August 20, 2012
Pesto Pizza with Red Grapes and Bacon Recipe | FakeFoodFree.com


Grapes on pizza. Have you tried it yet?

I love fruit on pizza – pineapple, even mango – but I have to admit I wasn’t sure about grapes. Aside from picking a bunch off the vine, warm from the summer sun, I’d never had hot grapes before.

Although, after seeing it on several food blogs, I figured there had to be something I was missing. And there was. I’m sold! I love the burst of sweet, juicy flavor from the grapes.

For this pizza, I used pesto as the sauce and cooked up some pastured pork bacon for a little extra smoky, salty flavor. Red onions worked great, both in flavor and color. I can see all kinds of cheeses working for this, but I used a basic whole milk mozzarella.


Pesto Pizza with Red Grapes and Bacon

Makes:  3 to 4 servings 

Ingredients 
Dough for a 14 inch pizza
1/4 cup basil pesto
1/2 red onion, sliced into rings
3 slices bacon, cooked crisp and chopped
1 cup red grapes, halved
1/2 cup whole milk mozzarella cheese, sliced or shredded

Preparation
Preheat the oven to 425 degrees F.

Roll the pizza dough out to 14 inches and place on a pizza pan. Spread the dough with pesto.

Top the dough with the onion, bacon, and grapes. Top the pizza evenly with the cheese.

Bake for 12 to 15 minutes until the cheese is bubbly and browned. 

Pesto Pizza with Red Grapes and Bacon Recipe | FakeFoodFree.com


Okay, I want to know – what’s the most unique pizza topping you’ve had before? For me, it would be canned tuna. It was a pizza topping when we dined on rodizio pizza (kind of like a buffet brought to you) in Brazil. 


Thanks for reading! All images and content are the property of Fake Food Free unless otherwise stated. Please do not republish full recipes and images without written permission. What is okay? Feel free to Pin images, share links to my posts or share the photo in a round up post with the title of this recipe and a link back to the post. Confused about copyright and food blogs? Here is some helpful information on Recipe Attribution. If you want to use a photo or full recipe, just ask. I’m sure we can work something out.  

Cheddar, Sun-dried Tomato and Zucchini Scones Recipe

August 15, 2012

I’m happy to say that Fake Food Free has transitioned to the Substack Newsletter called Every Corner of the World.

I hope to see you there.

Cheddar, Sun-dried Tomato and Zucchini Scones Recipe | Fake Food Free
 
I’m no stranger to scones. I’ve written about my favorite breakfast pastry a few times in the past. But I rarely make savory scones. 
 
Our zucchini plant just stopped producing this week, so I’ve had plenty to work with this year. When I was trying to use it up, scones seemed a logical choice. I stepped out of my sweet comfort zone, though, and decided to do something a little cheesy and spicy.
 
These scones are great by themselves, but they also make a good base for a breakfast egg sandwich.  If you happen to have a tomato jam, that would dress them up nicely, too. 
 
Cheddar Sun-dried Tomato and Zucchini Scones
Makes 8 to 10 scones
Write a review
Print
Ingredients
  1. 2 ½ cups white whole wheat flour
  2. 4 teaspoons baking powder
  3. ½ teaspoons salt
  4. ½ cup cold unsalted butter, cut into cubes
  5. ½ cup shredded zucchini
  6. ¼ cup sundried tomatoes, chopped fine
  7. 1/3 cup shredded cheddar cheese, plus extra for topping
  8. 1 tablespoon hot sauce
  9. ¾ cup + 1 tablespoon 2% or whole milk
Instructions
  1. Preheat oven to 400 degrees F.
  2. In a mixing bowl, stir together the flour, baking powder and salt. Add the butter cubes and use a pastry blender or two knives to cut the butter into the flour until it is in pea-sized pieces.
  3. Stir in the zucchini, sundried tomatoes and cheese. Add the hot sauce and milk, and mix ingredients until a dough is formed. Turn the dough out onto a floured surface and knead gently for 1 to 2 minutes.
  4. Shape the dough into a rectangle, about ¾ of an inch thick. Cut into 8 to 10 squares.
  5. Place the squares on a baking sheet. Top each with a small amount of shredded cheese and press it gently into the dough.
  6. Bake 12 to 15 minutes until the cheese and edges are browned and a toothpick inserted into the center of the scones comes out clean.
Fake Food Free https://www.fakefoodfree.com/


Cheddar, Sun-dried Tomato and Zucchini Scones Recipe | Fake Food Free
 Thanks for reading! All images and content are the property of Fake Food Free unless otherwise stated. Please do not republish full recipes and images without written permission. What is okay? Feel free to Pin images, share links to my posts or share the photo in a round up post with the title of this recipe and a link back to the post. Confused about copyright and food blogs? Here is some helpful information on Recipe Attribution. If you want to use a photo or full recipe, just ask. I’m sure we can work something out.  

Grilled Marinara Pasta Recipe

August 12, 2012

This recipe is one of the most creative things we’ve made on the grill. Grilling tomatoes in packets and then turning those tomatoes into marinara results in a unforgettable smoky sauce.

Grilled Tomato Marinara Sauce | Fake Food Free
 
We’ve been making grill packets all summer so when I was thinking of how I could put a twist on a classic tomato sauce, they were the first thing to come to mind. Packets of potatoes, onions, peppers and summer squash work on the grill, so why wouldn’t tomatoes, right?
 
I have to admit when I got all the grilled veggies pureed and took a taste, I was disappointed. The flavor I wanted just wasn’t there.

But then I added salt.

The next bite popped in my mouth! The salt brought out the smoky flavor from the grill which is exactly what I was hoping for.

A few packets of tomato may not be enough for heating up a large grill, but this marinara is the perfect thing to make when you have the grill up and running for other things. (We grilled ours while making a chicken this weekend.) Then you can quickly throw the sauce together and freeze it for another day, if it doesn’t fit on your current menu.

Grill packets with tomatoes for marinara.

This ends up being a basic marinara for any type of pasta. I am a huge fan of homemade, but I went for a quick meal this weekend and used a whole wheat penne.

The veggies only need to be roughly chopped for the grill packets. They’ll be going straight to the blender to puree so there is no reason to spend a lot of time on the prep.

I’ll be doing this with our tomatoes for the rest of the season! The flavor is so much more interesting than when I roast the veggies in the oven.

Grilled Tomato Marinara Sauce | Fake Food Free

Grilled Tomato Marinara Pasta Recipe
Makes: 4 to 6 servings
Write a review
Print
Ingredients
  1. 1 medium onion, chopped
  2. 4 cloves garlic, peeled
  3. ~2.75 lbs. tomatoes, cored and chopped
  4. 1 red or green bell pepper, cored and chopped
  5. ~15 leaves fresh basil
  6. 1 tablespoon olive oil
  7. 1/2 tablespoon balsamic vinegar
  8. 1 teaspoon fine ground sea salt
  9. 1 lb. pasta, cooked
  10. Extra basil and shaved parmesan for serving
Instructions
  1. Preheat the grill to 325 degrees F.
  2. You will need 3 large pieces of aluminum foil, about 14 to 16 inches long. You want the veggies wrapped well, so be generous.
  3. Divide the onion, garlic cloves, tomatoes, bell pepper and basil evenly on each of the three pieces of foil. Drizzle some of the olive oil over the vegetables in each packet and move the veggies around a bit to coat them.
  4. You can use any packet making techniques, but I fold the long sides in first. Then I pull the two ends together in the center to meet and roll them down, smashing things together as I go. As long as you have a sealed packet, you'll be fine. Need help? Here's a post with instructions.
  5. Place the packets on the grill, and close the lid. Let cook for 30 to 40 minutes, until the veggies are tender. Remove them from the grill and transport them into the kitchen.
  6. Once they are cool enough to touch, place the veggies in the blender in batches. Puree until smooth and pour the puree in a soup pot on the stove. Turn on low heat, and add the balsamic vinegar and the salt. Stir occasionally. You are only warming the sauce again until you are ready to eat it. (If you plan to freeze it, you can skip the heating, mix in the vinegar and salt and portion it for freezing.)
  7. Place the pasta in a serving bowl. Pour the sauce over pasta, and garnish with basil and parmesan cheese.
Fake Food Free https://www.fakefoodfree.com/


Thanks for reading! All images and content are the property of Fake Food Free unless otherwise stated. Please do not republish full recipes and images without written permission. What is okay? Feel free to Pin images, share links to my posts or share the photo in a round up post with the title of this recipe and a link back to the post. If you want to use a photo or full recipe, just ask. I’m sure we can work something out.

Black Rice and Sausage Stuffed Patty Pan Squash Recipe

August 8, 2012

I was so happy when we were finally able to grow squash in our own garden. I love stuffed patty pan squash! This squash filled with zesty sausage and nutty black rice has been a favorite since I first made it in 2012.

Black Rice and Sausage Stuffed Patty Pan Squash Recipe | Fake Food Free

I love that I made the decision to start a food blog a little over four years ago. But I’m not the only one that will tell you – the fun has a way of fading to stress from time to time. Pressures of creativity, uniqueness, pretty pictures, and “what if they don’t like me?” can rear their ugly heads.

These are the times when you have to remember that, while we would all like to be wildly successful, it’s important not to lose yourself along the way. This is supposed to be a happy place!

When I stop worrying about numbers and return to why I started blogging, I realize that these are the posts that are visited the most often on my site. I love how this changes from season to season. It reminds me that, yeah, the post I did two years ago does have some value.

Right now the top post on my blog is Patty Pan Squash Stuffed with Basil Orzo. I made it a few years ago after first discovering this veggie. Everyone seems to want advice for how to tackle patty pan’s pretty, yet hard to handle, shape in the kitchen.

 
Black Rice and Sausage Stuffed Patty Pan Squash Recipe | Fake Food Free


I’ve felt challenged to come up with a new stuffing since I made that first patty pan, but here we finally have it. A bonus this time is that the squash came straight from the garden!

I’m continuing the recent trend of using black rice, but with pastured heritage breed sausage, this recipe doesn’t leave out the meat-lovers.

It’s tasty on it’s own, but if you have some warm marinara on hand to spoon on top, it’s even better!

Black Rice and Sausage Stuffed Patty Pan Squash Recipe
Serves: 4 to 6
Write a review
Print
Ingredients
  1. 4 to 6 patty pan squash
  2. Extra virgin olive oil
  3. 1/2 lb. ground pastured pork sausage
  4. 2 yellow bell peppers, chopped
  5. 1/2 large onion, chopped
  6. 1 1/2 cups cooked black rice
  7. 1/4 cup Panko bread crumbs
  8. 3/4 cup ricotta cheese
  9. 1/2 teaspoon fine ground sea salt, or to taste
  10. 1/4 teaspoon ground black pepper, or to taste
  11. Marinara for topping (optional)
Instructions
  1. Preheat the oven to 400 degrees F. Grease a 9 x 13 inch baking dish lightly with olive oil.
  2. The recipe will fill 6 small squash or 4 larger squash. Wash the squash. Slice off the top on the stem side, and using a spoon, gently scoop out the insides. Don't scoop all the way through the bottom. You want to create a cup to hold the filling. Chop up the squash you scooped out and set it aside.
  3. Lightly coat the squash cups in olive oil and pierce with a fork in a few spots. Bake the squash for about 15 minutes, until they begin to soften. Remove from the oven and set aside.
  4. In a large skillet, brown the sausage over medium-high heat about 5 minutes. Add the bell peppers, onion and the chopped squash you scooped out. Cook until the sausage is no longer pink, 3 to 5 more minutes.
  5. Stir in the rice, bread crumbs and ricotta into the sausage. Add the salt and pepper. You can taste the filling at this point and add more salt and pepper, if you'd like.
  6. Once the filling is cool enough to handle, divide it evenly into each squash. Pile it high and press gently with a spoon so that it is packed in.
  7. Bake for 20 more minutes, or until the squash is tender when pierced with a fork. Top with marinara before serving, if desired.
Fake Food Free https://www.fakefoodfree.com/


Black Rice and Sausage Stuffed Patty Pan Squash Recipe | Fake Food Free


Thanks for reading! All images and content are the property of Fake Food Free unless otherwise stated. Please do not republish full recipes and images without written permission. What is okay? Feel free to Pin images, share links to my posts or share the photo in a round up post with the title of this recipe and a link back to the post. Confused about copyright and food blogs? Here is some helpful information on Recipe Attribution. If you want to use a photo or full recipe, just ask. I’m sure we can work something out.  

Want to create beautiful food and product photos that you can't wait to share?!
Discover your style, control the light, and shoot using the tool you know how to use (yes, your phone included). Learn about free resources, Live Q&As with Lori, and online courses you can take from anywhere in the world!
We respect your privacy. Unsubscribe at any time.