Monthly Archives

January 2010

Local Eats in Louisville

January 27, 2010

Update:  Unfortunately Lynn’s Paradise Cafe closed in 2013. 

 
There are times when I feel that the only food Kentucky is known for is fried chicken, along with that famous place that makes it. Anytime my husband and I travel abroad we are often asked by locals where we are from. When we say Kentucky, the person says fried chicken.
 
I’m not the biggest fan of this worldwide recognition our state seems to have. I think the history of it is great; what it has become, not so much. Therefore, I am excited when another Bluegrass-based restaurant gets much deserved attention. I get even more excited when I actually get to go there.
 
This past weekend I visited a good friend in Louisville and she took me to lunch at Lynn’s Paradise Café. I’ve only been once, several years ago, and even before that time the restaurant had been in the travel and food media spotlight quite often. It’s been mentioned in Bon Appetite, Southern Living, and Travel & Leisure. It was also featured in the show “Throwdown with Bobby Flay”.
 
The inside of Lynn’s is everything you would expect it to be based on the look of the outside. I mean, where else are you going to find all those flowers in Kentucky in the middle of winter? There are bright colors, eclectic decor, a tree in the center of the dining room, booths, tables and a diner-like service bar. Before entering the actual restaurant visitors make their way through the gift shop full of gag gifts, cards and stationary and even hats and hair accessories perfect for any Derby Day celebration.
 
We made reservations because the place is overflowing on Sundays with after-church diners, even at 2:00 pm when we arrived. I had checked out the menu online beforehand so I knew what I was in for and I couldn’t have been happier with the selection.
 
Lynn’s serves lots of local options such as Kenny’s Farmhouse Cheese (which I plan to review soon), and their burgers and meat loaf are made with Kentucky grass-fed beef. You can get anything from a comfort food-focused turkey and stuffing to non-meat options like the Grilled Portobello Mushroom Sandwich with sweet potato fries that I chose. The sandwich had baby greens, Gorgonzola cheese, cider honey vinaigrette and sweet onion marmalade.


It was as delicious as it sounds! Sweet and salty from the marmalade and cheese combined with a deep, rich woodsy flavor from the mushroom. The fries were crispy and slightly sweet, seasoned with cinnamon.

Lynn’s also offers breakfast all day and I have to admit that I was tempted by the Bourbon Ball French Toast. This was listed as the star of the “Throwdown with Bobby Flay” episode. I need to look that up because I haven’t gotten the chance to see it yet.


My friend Michelle, who graciously put up with my food photography, decided on the Popeye Omelet, which is the regular for her, she tells me. It looked wonderful too, stuffed with creamy spinach, bacon and tomatoes.


Lynn’s Paradise Café has such a unique character with fantastic local food options. It is no surprise that it has gotten so much media attention. If you find yourself in Louisville, put it on your list, but make reservations or you might be waiting quite a while for seat!

Lynn’s Paradise Cafe
984 Barret Ave.
Louisville, KY
(502) 583-3447

Baking With Coconut Oil: Chocolate Chip Cookies

January 26, 2010

I’ve been using virgin coconut oil for a while now and loving every bite of it. Most often it goes in my oatmeal or on toast so this past weekend I decided I needed to try baking with it. A rainy end to last week had me craving chocolate chip cookies so that is where I started.
What resulted is my new go-to chocolate chip cookie recipe. I’m not kidding, my husband and I both liked these as much or more as the traditional. I used virgin coconut oil in place of butter and a combination of oat flour and whole white wheat pastry flour. I made the oat flour myself by grinding rolled oats and didn’t grind it too fine so the cookies did have a bit of texture from them. I’m finishing up my demerara sugar so I used that in place of both the refined white and brown sugars. I hope to try the cookies with mascavado or rapadura soon.
They are crunchy on the outside, soft on the inside with a complex, sweet flavor from the sugar with mild hints of coconut from the oil. I added walnuts for variety and they only make the cookies better, in my opinion.
Chocolate Chip Walnut Cookies

½ cup oat flour
½ cup white whole wheat pastry flour
½ tsp baking soda
½ tsp salt
½ cup virgin coconut oil
1 cup of cane sugar (lesser refined the better)
½ tsp vanilla
1 egg
½ cup semi-sweet chocolate chips or chopped dark chocolate
½ cup walnuts, chopped
Preheat the oven to 375 degrees F. In a bowl combine the dry ingredients – flours, baking soda and salt. In a mixer combine the coconut oil and sugar. Cream together for 2 to 3 minutes until the sugar is incorporated well. Add the vanilla and then beat in the egg.

Gradually mix in the dry ingredients, and then stir in the chocolate chips and walnuts. Place by the teaspoon on an ungreased cookie sheet or one with a baking mat. I had to flatten mine slightly so that they spread correctly during baking. Bake for 10 to 12 minutes. Remove and let cool on the pan for about 2 minutes. These cookies are a bit fragile until cooled. Place them on a cooling rack and allow to rest until cooled completely. Makes about 2 dozen cookies.

This post has been submitted to Food Renegade’s Fight Back Friday.

 Update:  I receive a lot of comments on this post letting me know your results of this recipe. Thank you! There are two major factors that will influence the final product. One is the consistency of your coconut oil. It should be about the consistency of butter, or a little harder. The second is the flour. Whole wheat flours absorb much more moisture so if you use a white pastry flour, or a white AP flour you may need to add more flour. Thank you for your feedback! 

Links to a Healthy Weekend

January 23, 2010

My Saturday got off to a great start. This morning my husband took me out to the course he runs on Saturday mornings with coworkers. The beautiful fog hanging over all the horse farms made my five mile long run go by pretty quickly. A few of the horses ran to me when I went by. Funny how they have such playful personalities.
It was a nice change from the treadmill and fortunately it wasn’t raining this morning. How has the weather been where you are? We’ve had several days of gloomy rain. The warmer temperatures are pleasant, but I still wouldn’t mind some pretty white snow. I haven’t had my fill yet.

I came across so many great recipes this week as well as inspiring stories and some more info on sugar. I hope you enjoy them as much as I did!

Have a great weekend!
A Nutritionist Eats shared a recipe for Lentils with Curried Tarka. Lentils, curry and coconut milk, what’s not to love? This is just the kind of meal I like to have for lunch paired with some rice or flatbread.
Some Ones Cooking caught my interest with a recipe for Chicken Artichoke Rice Casserole. I really enjoy artichoke hearts, but don’t know many ways to use them other than in or with dip. This sounds like a great recipe and I especially like that there is a recipe for the white sauce as opposed to only giving the option of using canned cream soup.
Whisk: A Food Blog has had a waffle theme recently and the post featuring Hard Waffles got my attention. It is a hand-me-down recipe and she’s interested in knowing if anyone has a similar recipe for them or knows the tradition of how they are enjoyed.
Daily Bread Journal shared a beautiful story about her parents along with a reminder that we need to take time to slow down and enjoy the sites and people around us.

Small Footprint Family provided an informative post entitled Just a Spoonful of Sugar to add to our collection of sugar knowledge this week. If you aren’t yet tired of reading about the sweet stuff yet head over and check it out.

Homemade Tortillas

January 22, 2010

When I announced on Twitter last night that I was going to try making my own tortillas one of the responses I received was that once I had them, I’d never go back to the packaged version.
Well, it only took one bite to prove that statement true.
I was tortilla deprived while we were in Brazil. When I visited the US I would always bring back a couple packages in my suitcase and we’d go through them in a week or two. Because this was my only option I stuck with the packaged version, but I knew I wanted to make my own.
So when my brothers asked me what I wanted for my belated birthday gift during my visit home over the holidays, I immediately said a tortilla press. There was some confusion and I had to clarify that is was not a quesadilla maker I was speaking of. Once we established that the contraption wasn’t to actually cook the tortillas, but to press them, we began looking for one at stores each time we were out finding none.
Finally at about 8:00 pm the night before I left to come back to Kentucky my brothers (two of the three) announced that they were going out for a bit. Considering strange ideas aren’t all that uncommon in my family, no one paid any attention.
About an hour later they walked in the door announcing they were home, and laid a bag on the kitchen counter with a clanging thud.
My tortilla press!
It turns out that a Mexican restaurant they favor had just opened a market next door. They went in just before closing and found the last tortilla maker. Their descriptions of the look the cashier gave them were pretty funny. He seemed surprised that two gringo men (who also ordered chips and salsa to-go, by the way) would need such an item.
I finally got some corn masa flour last week and pulled out the press last night for my first attempt at making tortillas. I opted for a half batch of eight. The instructions called for 1 cup of the flour, 1/8 tsp salt and 1/3 cup water. The label mentioned that more water could be added if the dough was dry. Mine was dry so I added about 2 tbsp more of water.
I rolled the dough into eight balls as instructed, covered the press with plastic wrap on both sides, placed the dough ball in the middle and pressed down the dough.

As you can see, not so good on my first try. It wasn’t round at all. I decided to flatten the ball out a bit before pressing to encourage it to go round and this is what I got. Success!


I popped them on a hot griddle pan for about one minute on each side and kept the cooked tortillas warm and soft by covering the plate with a wet paper towel.
I went for the standard fillings this time, but the exciting part was that I got to try my first purchase of grass fed and finished ground beef from Pike Valley Farm. Delicious! I seasoned it up with cumin, chili powder, salt and pepper.
Oh, and crushed red pepper. About the crushed red pepper…be sure you check your cap before sprinkling it in. Yep, pulled the whole unscrewed-the-cap-when-it-was-a-flip-top and poured in about a ½ cup of red pepper. With my husband’s help, I spent about 10 minutes washing it off with water. Fortunately we managed to get it down to a tolerable level of spiciness.
After we saved the meat I topped the tacos with lettuce, cheddar cheese, chopped jalapenos, salsa, olives and green onion.


I was taken a bit by surprise with my husband’s reaction to the dinner. He raved about the flavor of both the tortillas and the beef saying that all the flavors came out perfectly. I have to agree. The texture of the tortillas was excellent too, soft, yet firm and they didn’t break apart.

No more packaged tortillas for us. The extra 15 minutes it took to make them myself was worth every second!

Seeking Out the Truth About My Sugar

January 19, 2010

Don’t you just hate it when you think you have things all figured out only to learn you were wrong. Much to my disappointment that is how I felt last week. It all started when I came across the wonderfully informative post about types of sugar by Oyster Food and Culture.
When we first moved to Brazil my sugar quest began. I hadn’t really intended to reduce or cut out white and brown processed sugar until I started to learn about the açúcar mascavo (which all online sources tell me is the same as muscovado) available there. Considering this comes from evaporated sugarcane juice my research lead me to assume that it was a better choice than our standard, nutrient stripped white and brown sugars widely used in the US.
When we got back to the US, I was horrified at the price of a tiny little box of it considering what I had paid in Brazil. I then turned to demerara sugar learning that it was a more natural form from evaporated sugarcane juice as well.
Knowing that raw sugar isn’t much better than refined white sugar nutritionally, when I came across that post last week I was a bit shocked to find that both muscovado (mascavo) and demerara were listed under raw sugars.
I’ve conversed a bit with LouAnn (Oyster Food and Culture author) about this and she double checked her sources and let me know that they indicate that those two sugars undergo heating before evaporation which classifies them as refined. I double checked my sources and this is what I’ve come up with.
First, let me address demerara because I’m less clear about how beneficial it may be. So far I haven’t found a detailed nutrient outline, but I now know that this sugar is heated and then evaporated which can classify it as being refined and processed. Read on though, because you may be surprised by what I found out about two other popular so-called unrefined sugars.
Okay, so on to the mascavo sugar.
After reading that post last week I just wasn’t ready to give up on it so easily. Perhaps it is a fondness of discovering it while living in Brazil and that connection to culture. However I was still determined to confirm it a better choice than refined white and brown sugars, including raw sugars.
So far every website which sells it has stated that it is unrefined, simply evaporated cane juice. Another site which doesn’t have references (grrr!) stated that it is slightly refined.
Still, I remained hopeful in my search when I came across the Diabetes Society of Brazil which states that mascavo does contain the vitamins and minerals associated with sugarcane which is the important part for me.
In the post I mentioned earlier, another sugar that claims to be unrefined is rapadura. What’s interesting is that it is produced in Brazil, but I never came across it in the supermarkets we frequented. However, my husband seems to remember trying it from the local feira and seeing it at roadside stands.
After being thoroughly confused something dawned on me that I’m a bit embarrassed to admit I let slip by. My husband worked closely with the sugarcane industry when we were living there and many of his coworkers were very familiar with the processes. So, I did some asking and this is what I found out.
First of all, both mascavo AND rapadura are heated. They are just heated for differing amount of times. The rapadura is boiled and concentrated into block form. In the words of my Brazilian source it is the most basic/natural type of sugar between the two. The process maintains mineral and a small amount of vitamin content.
Mascavo is taken just past boiling and is transferred to a crystallizer for cooling and evaporation. The good news is while it isn’t as superior nutritionally as rapadura the process does maintain some vitamin and mineral content and it is superior nutritionally to refined white sugar.
My source was kind enough to show me this chart from the Ministry of Agriculture in Brazil listing nutrient content of three sugars – white refined, mascavo and rapadura. Don’t be overwhelmed by the Portuguese. Most nutrients are similar in both languages just keep in mind that “a” in Portuguese is “to” in English and a comma is used where we would use a period. For example “1,5 a 7” is “1.5 to 7”.
You can see when you check out the chart that nutrients are most plentiful in rapadura, but that mascavo still has some healthy components left in it versus refined white sugar. What I haven’t confirmed yet is whether or not mascavo is, in fact, muscovado. I think it is, but I can’t confirm because our friend in Brazil had never heard the term muscovado. I’m still pretty certain that it is just a difference in languages though.
So the truth is that if heating is part of the refining process than even rapadura can’t exactly be considered unrefined even though it may be the best choice nutritionally. I also learned that the reason I didn’t see it in Brazil is that it isn’t common for cooking due to it’s block form, although I know a lot of real-food focused food bloggers do use it. Mascavo is more ideal for cooking at least it seems that way in Brazil. Regarding the refining process really the only unrefined form of sugarcane available is the juice like what is being pressed in the photo below, called caldo de cana in Portuguese.

Okay, I’m not sure how much you all have cared about this, but I must admit I feel a lot better. I’ m not sure that I will keep using demerara, but I still plan to check out rapadura and I’m happy with my choice of mascavo when I can get it.
Anyone else find it odd that the less processing the more expensive the sugar? Seems like it should be the other way around to me.
I’ll close by saying that sugar is sugar when it comes to calories and cavities. I just want a product that is less refined with more nutritional value when I do use it. I trust more natural sweeteners such as maple syrup and honey, but I also like to bake and sometimes a sugar product is necessary. That’s really why I felt the need to find out some answers for myself.
References mentioned in this article:
Ministry of Agriculture Brazil – Rapadura
Diabetes Society of Brazil – Mascavo Sugar

This post has been submitted as part of Food Renegade’s Fight Back Friday.

First photo of sugarcane fields in southern Brazil.

Pumpkin Cheddar Risotto with Shrimp

January 19, 2010

Over the holidays our first visit back home after officially living back in the States was for Thanksgiving. At that time I was presented with all kinds of goodies from my Dad’s garden that my Mom had froze for me. I’m still making my way through the pumpkin, raspberries and blackberries with plenty to last me until spring.
Since what come to mind when I think of these things is often sweets and breads I’ve been challenging myself to use them in more savory dishes specifically the pumpkin. A few years ago I found a recipe for shrimp, corn and cheddar risotto and I’ve made it several times since. It came to mind when I was trying to figure out what to do with the pumpkin and this recipe is what developed.
I think risotto is sometimes perceived as a dish that takes a long time to make and this really isn’t the case. I had this meal done in 30 to 40 minutes. You do have to stand by the stove, but I usually use that time to multi-task keeping a magazine open to page through while I stir or even the laptop nearby to catch up on blog reading.( I know. I go a little extreme with the multi-tasking.)
However, if you put in the time, what results is a creamy, pasta-like dish full of vitamins from the pumpkin and carbs to fuel exercise with added protein from the shrimp and cheese. The risotto is so creamy that you need very little cheddar, just enough to add some rich flavor. At the end of cooking I decided to add in some spicy brown mustard and it really topped off the dish well.
Pumpkin Cheddar Risotto with Shrimp

1 tbsp olive oil
½ cup onion, chopped
2 cloves garlic, minced
1 cup Arborio rice
3 ½ cups chicken stock, warmed (I used my first batch of homemade!)
1 cup pumpkin puree (thawed if frozen)
1/3 cup sharp cheddar cheese, shredded
½ tbsp spicy brown mustard
15 to 20 shrimp, cooked (thawed if previously frozen)
1 tsp sea salt
½ tsp black pepper
In a large pot, heat the olive oil over medium-high heat. Add the onion and garlic and cook for about 3 minutes. Add the rice and stir to coat with the oil and cook 3 to 5 minutes longer. Begin adding the chicken stock about a ½ cup at a time, stirring the rice. Reduce the heat to medium. Ensure that all the liquid is absorbed before adding the next ½ cup of stock. Continue this process until the risotto is tender. It takes about 20 minutes.
Stir in the pumpkin, then add the cheese and stir until melted and evenly incorporated. Add the mustard, and then stir in the shrimp. Season with salt and pepper and continue to cook 1 or 2 minutes until everything is heated through. Makes 3 to 4 servings if you have other sides. Perhaps 2 to 3 if it is a main dish or if you are two incredibly hungry runners.

Links to a Healthy Weekend

January 16, 2010

Hello, hello! How is January treating you? It has been a great week around here. Not only did it warm up a bit and I got a great new writing assignment, but…
We got the house!!!

New kitchen and plenty of natural light for photos coming soon.

This weekend, we have our very first visitors since being back in the States and I’m really excited. It feels as if I haven’t hosted in forever. My parents are coming to visit. I’ll be away from the computer for most of the weekend, but back to it next week.
Until then, here are a few of my favorite reads from the week.
Spinach and Coconut Soup from When I’m Bored I Make Soup was a post from this past summer, but someone sent it around on Twitter this week so it’s new to me. After being in Brazil I find that coconut milk is a staple in the kitchen and I love finding new recipes for using it.
Healthful-living experts share their New Year’s resolutions was an article on the Washington Post. My favorites were to love eating more and say grace before meals.
Sticking to Diets Is About More Than Willpower was a research report on Science Daily. Like many health advocates, I don’t like the word diet, but this is an interesting read about how the perceived complexity of an eating plan can influence weight loss success.
Three Travel Secrets was The Backpack Foodie’s addition to a game of post tag going around travel blogs. I liked this one because it talks about the safety of local food and how communication goes beyond language.
I was also tagged in this game and you can take a look at my Three Best Kept Travel Secrets if you are interested.
Enjoy your weekend!

Photo of a Christmas gift from my mother-in-law, pug-inspired wine.

Two of Our Favorite Things: Kaya and Soup Tulang

January 14, 2010

Despite the fact that it has been two and a half months since our travel around Southeast Asia I still have plenty left to tell you about that amazing trip. I’ve given it a lot of thought and I’m constantly coming back to the question – What was my favorite thing?

I’m speaking specifically of food experiences here, and I’ve finally decided that if I had to answer that question there would be a tie. While everything was delicious and each food came with its own authentic experience, there were two very specific, very different things that stand out.

Kaya and Soup Tulang.

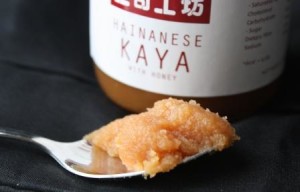
Let’s start with Kaya since it was what we began our day with every chance we were given. Kaya is a coconut jam made with egg and sugar or honey and often flavored with pandan leaf. I had read about it briefly before our trip not giving it a second thought or considering that it could end up being one of our favorite food finds of the trip.


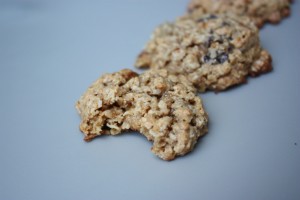
I saw it on a menu at the first hawker we stumbled into while in Singapore, and recognizing the name, decided to try it. What we were trying here was actually kaya toast, or more specifically the best breakfast and snack ever!

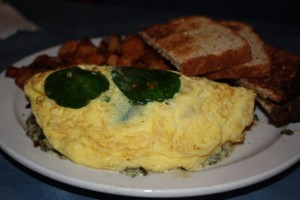
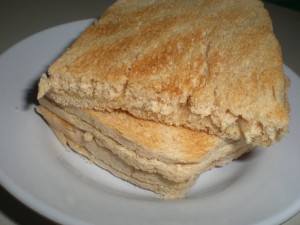
We ordered kaya toast with butter and watched as the grill cook grabbed two slices of thick white bread, grilled them, slathered each piece with the kaya and placed a slab of pre-cut butter in the middle. It was assembled like a sandwich and sliced into fourths.

The kaya has a slightly gritty texture, is similar to custard in color and taste from the egg and has a strong coconut flavor. Combined with the butter on warm toast, it was delicious.

From that point on we had our eye out for it, stopping for a snack of kaya toast when we found it. And find it we did; in other spots in Singapore, in Kuala Lumpur and when we returned to Hong Kong on our way back to the US. We also picked up a few jars to bring back home and it is just as tasty on the hearty, whole grain toast I have for breakfast around here.

I was surprised how easy kaya was to miss when visiting these places. It seemed it was downplayed a bit in the resources I had read. The publications suggested trying it, but it wasn’t highlighted and I think it should be. Not only because of the flavor, but because it was so popular locally. The one spot we frequented while in KL had a line out the door every morning with locals eating kaya toast and soft boiled eggs for breakfast.

To find what ended up being our next favorite, I will admit we followed the Anthony Bourdain trail. Ever since seeing the episode of No Reservations in Singapore, my husband had wanted to try Soup Tulang, mutton bones simmered in a chili sauce, an Indian dish that has become a local favorite.

So one evening we made our way out to the Golden Mile Food Center which takes quite a bit of effort to get to, by the way. We took the metro for a bit of a ride and walked around a while before finally getting directions from a woman on the street. Then we walked for a couple blocks before finding the food center in the middle of a more residential area.

I’m pretty sure every stall owner in the place knew what we were there for. It seemed certain that people like us (as in Caucasian) most often go there for this specific dish. After circling the place a couple times we found the Haji Kadir stall which was featured on the show and my husband placed his order.

Going into this I didn’t really have an opinion about the dish. I wanted to try it, but I was a bit nervous about sucking marrow out of the bones. Oh, did I mention this is how you eat it? It’s the highlight of the dish. I wasn’t disgusted or anything. I was open to trying it, but expecting not to like it simply because I’m wasn’t sure I would be comfortable with the action of sucking on bones.

When we sat down with our plate, we realized that it was not at all a touristy place despite the fact that visiting foodies like us might make their way out there. We were surrounded by huge tables full of locals, sucking on bones, pounding them on the table to get the marrow out and leaving behind plates making the place look like a graveyard in a bad Halloween movie.


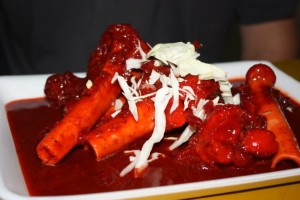
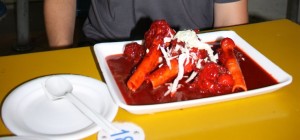
The plate itself is quite impressive to the eye. All that red chili sauce looked delicious and it was topped with just a little shredded cabbage. It was just barely spicy, but full of flavor. They also gave us a big plate of bread to dip in the sauce, a great combination.

I let my husband try the bones first and we decided to use the straw method to get the marrow out which, by the way, no one else in the place was using. I tried it next, not sure what to expect.


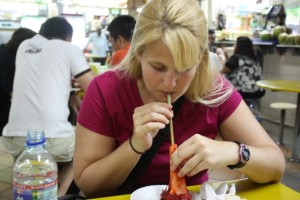
I picked up my bone, inserted the straw and sucked up some of the jelly-like substance that melted in my mouth like butter. I have to be honest with you, it was so good! The action of eating it felt odd and unfamiliar, but I definitely like bone marrow. The flavor of the chili sauce had cooked in, leaving a rich, slightly spicy flavor. We both walked away feeling that, if not our favorite food for the flavor, it certainly was for the experience.


So there you have it. I told you the two foods were very different! It was really hard to narrow it down to these two because I’m not sure we had anything that we truly disliked on this trip. We certainly confirmed what people are always telling us – Southeast Asia has some of the most amazing food in the world.

Walnut Crusted Tilapia

January 13, 2010

Whenever I visit a coastal location overflowing with fresh fish and seafood I tend to fantasize a bit about what it would be like to live there. I think about how creative I could be in the kitchen and even how my health would benefit. I’ve experienced this daydreaming all across the world, a couple years ago while visiting Howth, Ireland, last October in Hong Kong and then again in November in San Francisco.
Central Kentucky is pretty far away from all of these places and while I may live in a coastal location someday, I certainly don’t right now. Even though our fish isn’t always coming straight from the ocean, I’ve been trying to keep it regularly on our menu lately.
I still have a lot to learn. This goes for both proper preparation methods and sustainable practices. I’ve got a good grasp on the best sources for meats and poultry, but fish is an area I’m still learning about – the benefits, the risks, the best sources, the most sustainable options.
For now I’m settling for the frozen options we have available here, most often salmon and tilapia. I prefer the former, my husband the latter. Well, last night was his night and we enjoyed some tilapia.
When it comes to crunchy coatings on fish, I tend to always reach for the pecans. Last night I was feeling like I wanted something different so I thought I would give walnuts a try. In addition to that, I’ve been trying to cook with my virgin coconut oil more so I saw this as the perfect opportunity.
I used egg to help coat the fish, but I’m sure buttermilk or something similar would work fine too. The walnuts were every bit as good as pecans and the coconut oil made the coating nice and crunchy giving it only a slight coconut flavor. I’m thinking this is something that would work great on salmon and chicken too.
Walnut Crusted Tilapia

3 tilapia fillets, fresh or thawed
¾ cup walnuts, finely chopped
¼ cup bread crumbs
½ tsp garlic powder
½ teaspoon dried parsley
½ tsp sea salt
¼ tsp black pepper
1 egg, beaten
1 tbsp virgin coconut oil
Combine the walnuts, bread crumbs, and seasonings on a plate and set aside. Gently coat the fish in egg and place the fillets in the bread crumb mixture. This makes enough to cover one side generously or the whole fillet sparingly.
Heat the coconut oil in a skillet on medium high heat. Place the fillet in the skillet, coating side down if you just covered one side. Gently press the fish into the pan with a spatula. Allow it to cook about 3 minutes, then flip and cook 3 minutes more. The fish is done when it turns from opaque to white and begins to flake. You may need to reduce the heat a bit if your coating begins to darken too quickly before the fish is fully cooked. Serves 3, or for us, 2 for dinner and 1 for lunch sometime later this week.

Honey Cinnamon Oatmeal Raisin Cookies

January 11, 2010

I know, I know. Only a couple weeks into the new year and I’m already back to baking cookies. You would think I had enough of it before Christmas.
I have to admit the eating balance has been a challenge so far, mainly because running makes me HUNGRY. It is unlike any other physical activity I partake in. A couple hours after a run I get ravenous. So while some people would be burning off those calories and reaping the benefit, I’m practically gaining weight because I can’t seem to fill the tummy.
On that same note, while I’m training for a half marathon, my husband is training for a marathon. Yesterday I burned about 500 calories and he burned over 1,000. So I’m trying to have enough food readily available for him to eat, without having it sit around calling my name.
So back to the cookies.
All this hunger had me wanting something sweet, yet something that had at least a few nutritious, unprocessed ingredients. With left over raisins from the holiday and a new container of oats on hand, I decided to make oatmeal raisin cookies.
I used unrefined cane sugar, honey and whole white wheat pastry flour in these and loved the result. They are slight chewy and the sugar and honey produces a rich flavor that goes beyond just sweet. For these cookies I prefer using the cane sugar instead of the refined white and brown sugars most recipes call for.
Honey Cinnamon Oatmeal Raisin Cookies
¾ cup butter, softened
1 cup demerara sugar
2 tbsp honey
2 eggs
1 tsp vanilla
1 ¼ cup whole white wheat pastry flour (I use Bob’s Red Mill)
1 tsp baking soda
¾ tsp ground cinnamon
½ tsp salt
2 ¾ cup old fashioned rolled oats
1 cup raisins
Preheat oven to 375 degrees F.
Cream the butter and sugar well, add the honey and blend some more. I usually let this go 3-5 minutes because the sugar is so course. Beat in the eggs, then add vanilla.
In a separate bowl combine the flour, baking soda, cinnamon, salt and oats. Gradually mix this into the wet batter. Stir in the raisins. Use a cookie scoop or spoon to drop dough on ungreased cookie sheets. Bake 8 to 10 minutes. Cool on wire rack. Makes about 36 cookies.

This post has been submitted as part of Food Renegade’s Fight Back Friday.

Want to create beautiful food and product photos that you can't wait to share?!
Discover your style, control the light, and shoot using the tool you know how to use (yes, your phone included). Learn about free resources, Live Q&As with Lori, and online courses you can take from anywhere in the world!
We respect your privacy. Unsubscribe at any time.