Browsing Category

Grilling

Hog Island Oyster Farm – Marshall, California

February 26, 2013

I was just about to post an Instagram photo when I noticed two little words at the top of my phone.

No Service.

Not only-one-bar, or the dreaded E, but no service. Zip, zero.

Wait a second. We moved from rural Kentucky to California, right? And you are telling me we don’t have service here.

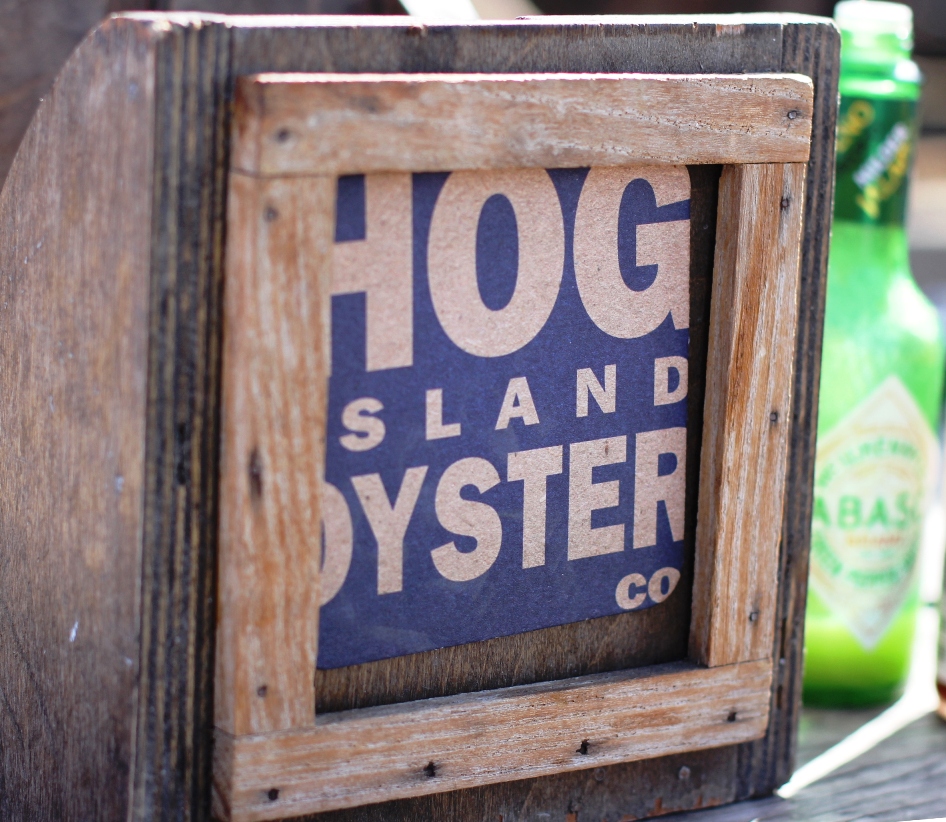
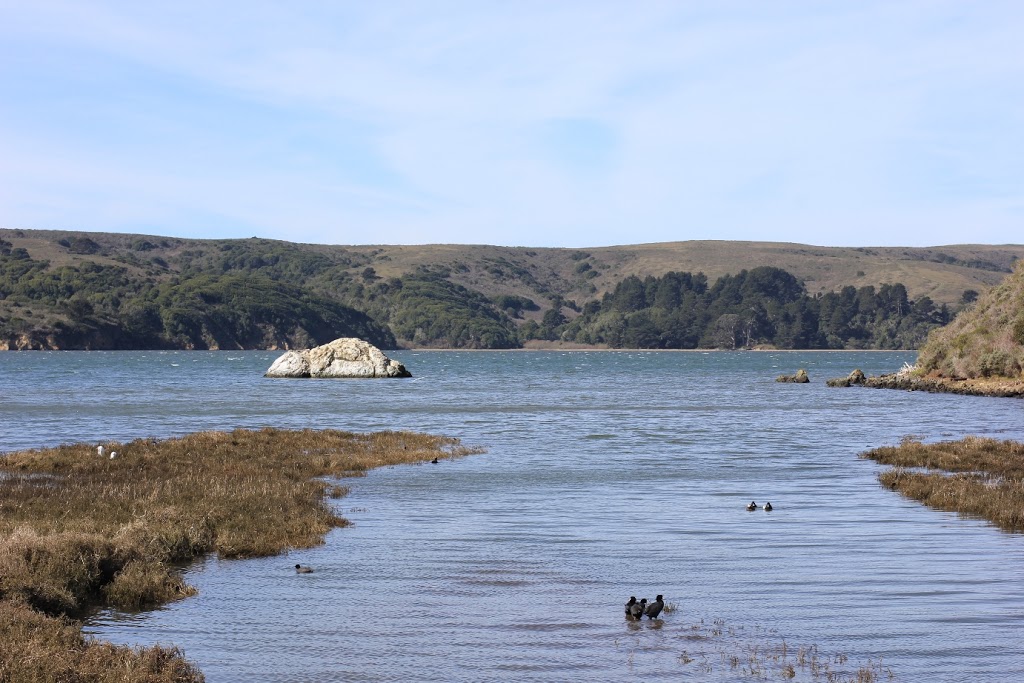
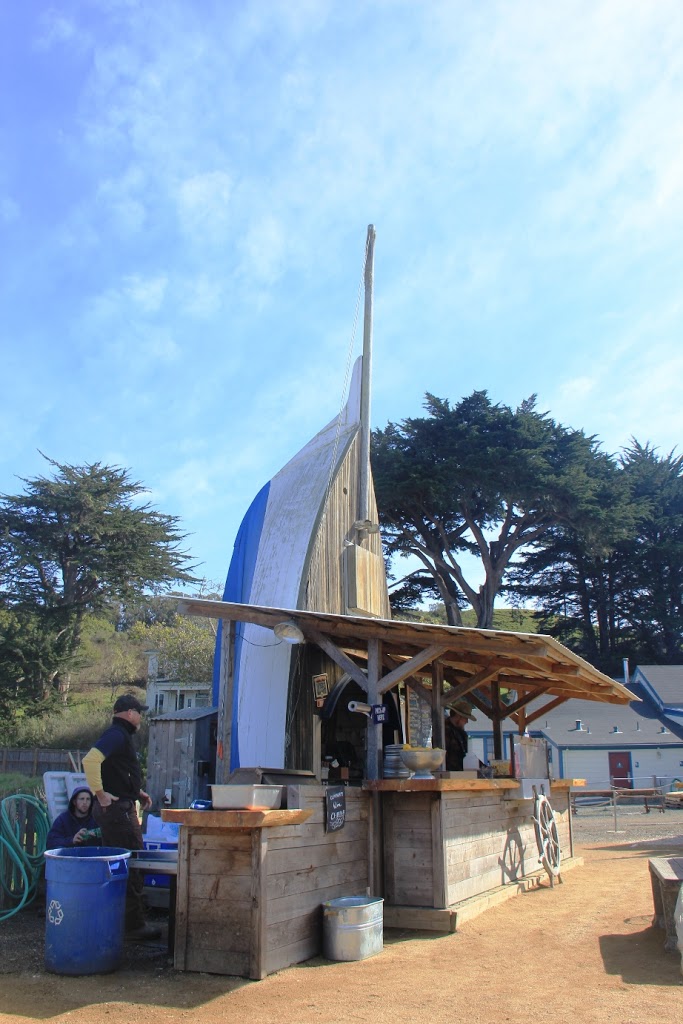
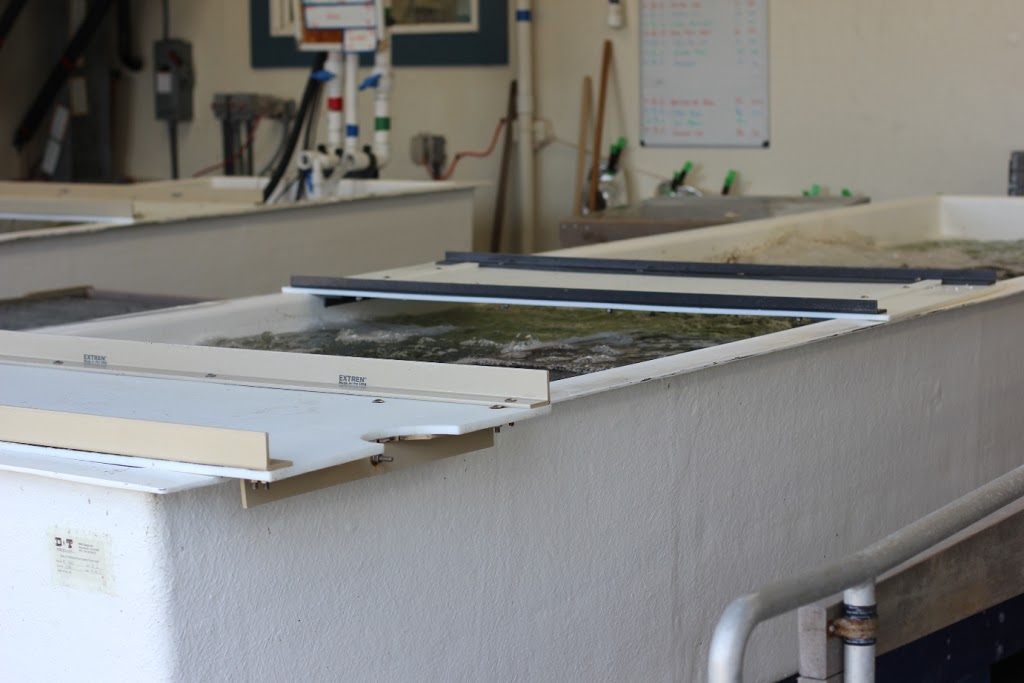
We were headed to Marshall, California. A small community in Marin County, tucked inside the Tomales Bay. After some twists and turns, carefully passing an entire Tour de France of cyclers, and smiling back at enough happy dairy cows to supply my morning coffee for years, we reached our destination – Hog Island Oyster Farm.

It turns out you don’t need cell service. You don’t need anything at all in this patch of paradise except oysters, lemon, butter, hot sauce and maybe some wine.

A visit to Hog Island was among the many tips we received when we announced – we’re moving to the East Bay. I was introduced to their oysters a few years ago when I visited San Francisco, but this, this is different.

This is the farm. This is rural California in all its glory. And as my husband and I said to each other a few minutes after we arrived – this is why you live here.


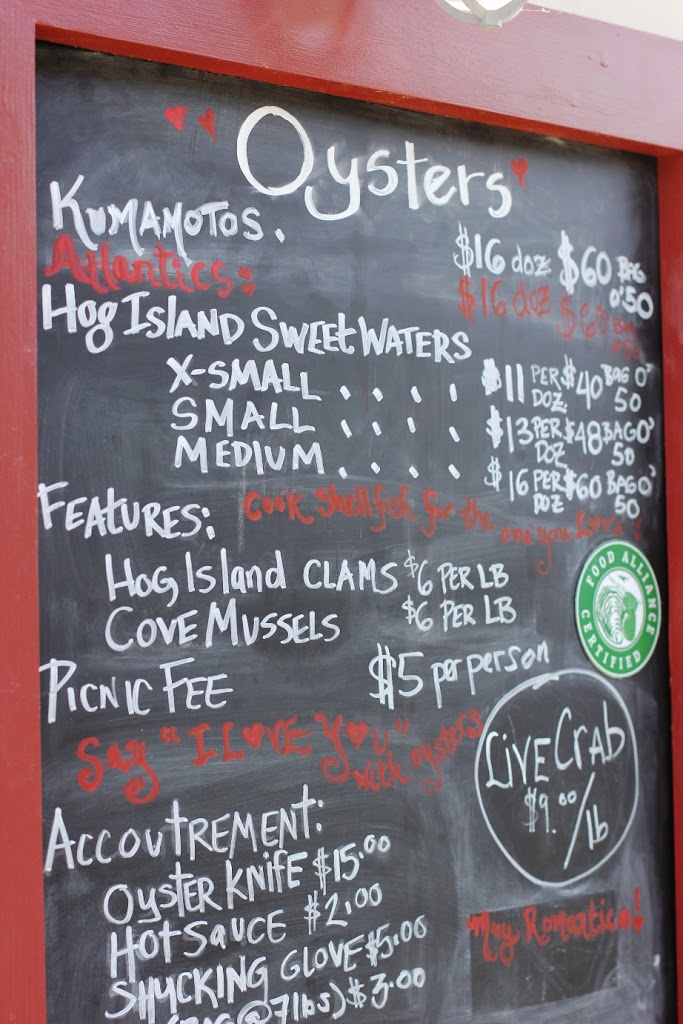
There are two options for diners at Hog Island. You can order raw oysters shucked for you at The Boat along with bread, cheese and wine or beer, and take a seat at one of the shared picnic tables (first come, first served).

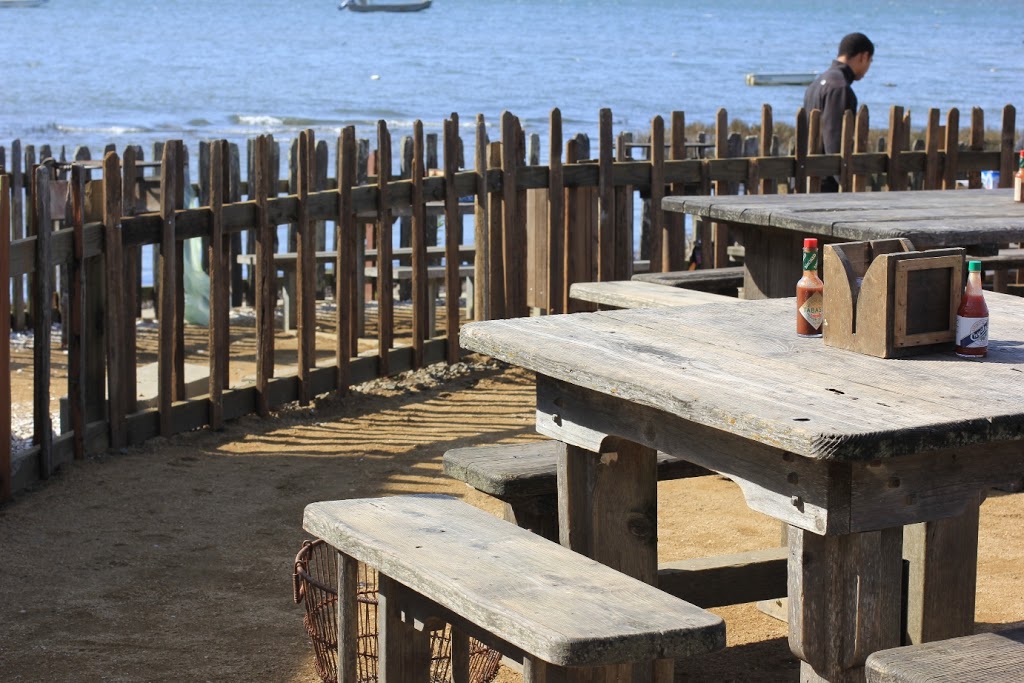
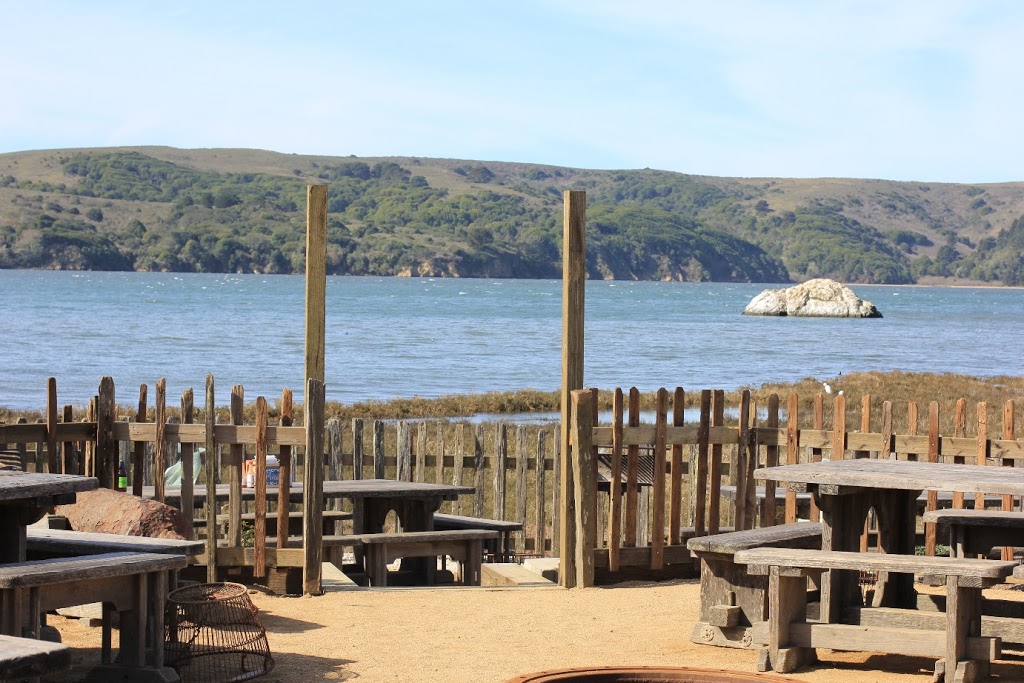
Your other option is to reserve one of the (5, I think) picnic tables many weeks in advance. With my husband’s birthday in mind, I made a reservation for the end of February back in early January. Here you have a grill and a table to yourself. You bring along your picnic and grilling gear, extra eats, and wine or beer.

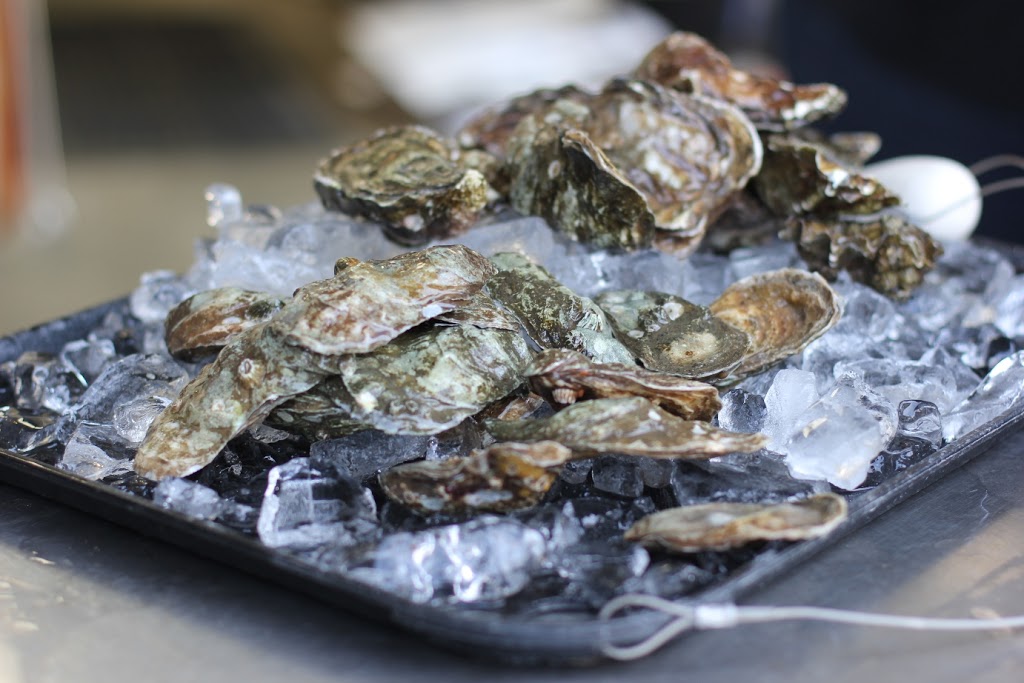
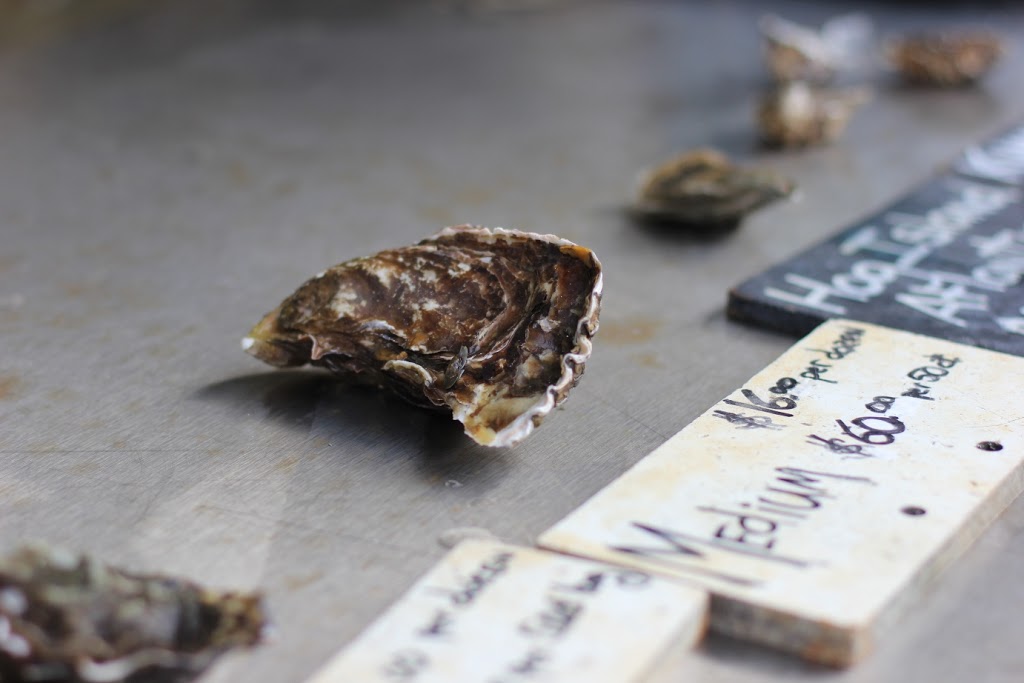
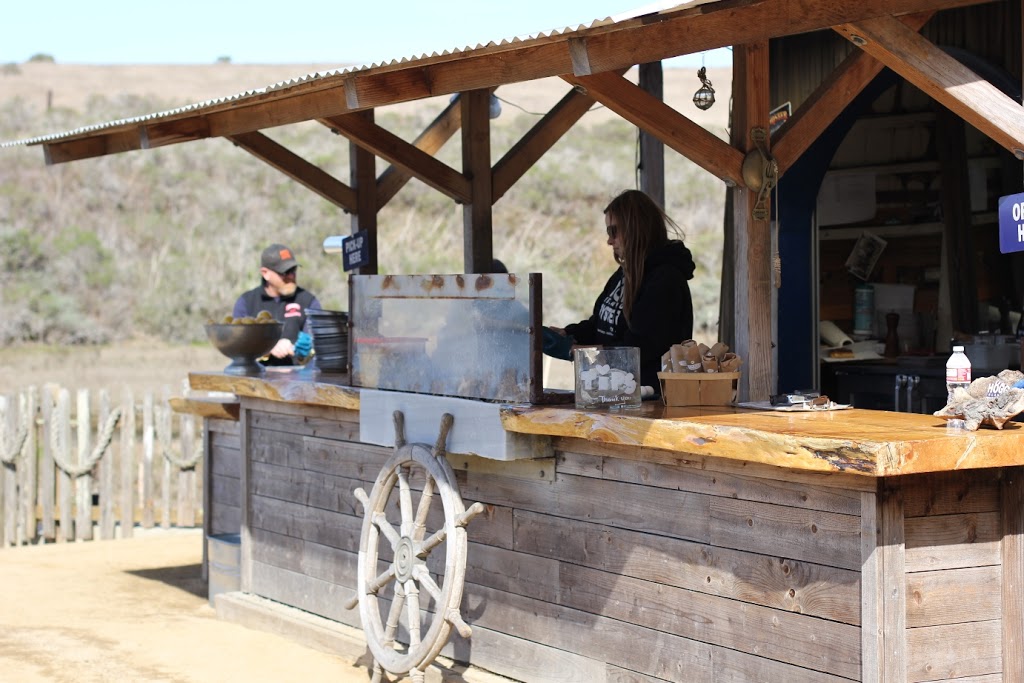
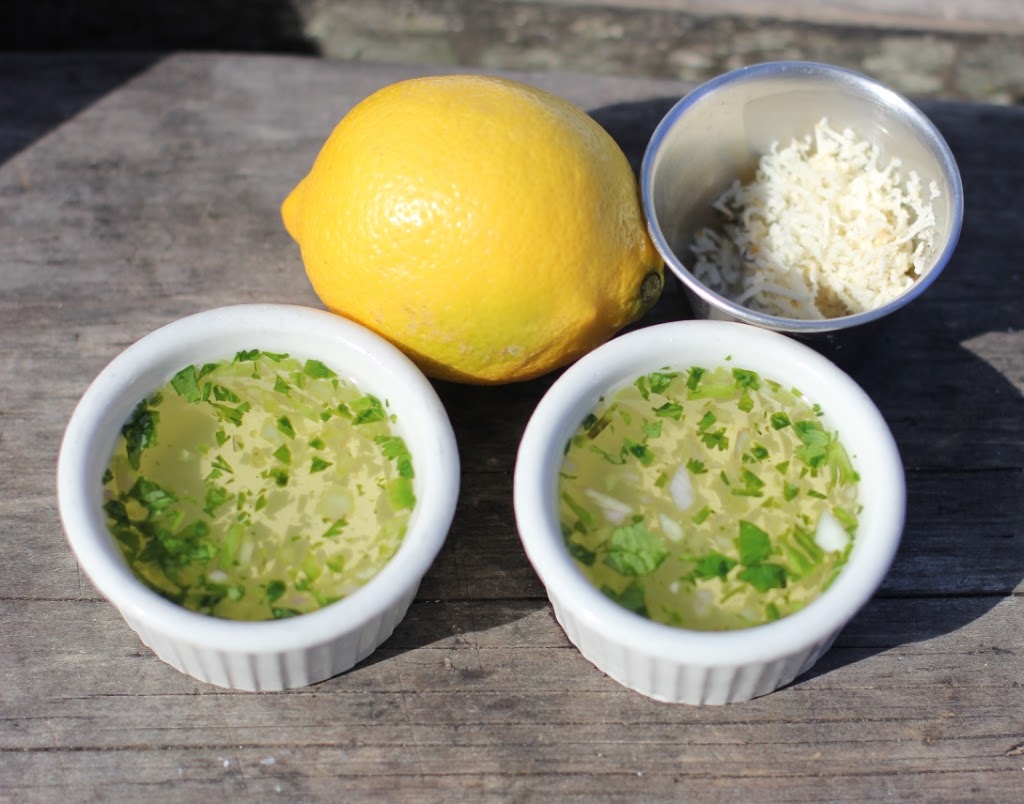
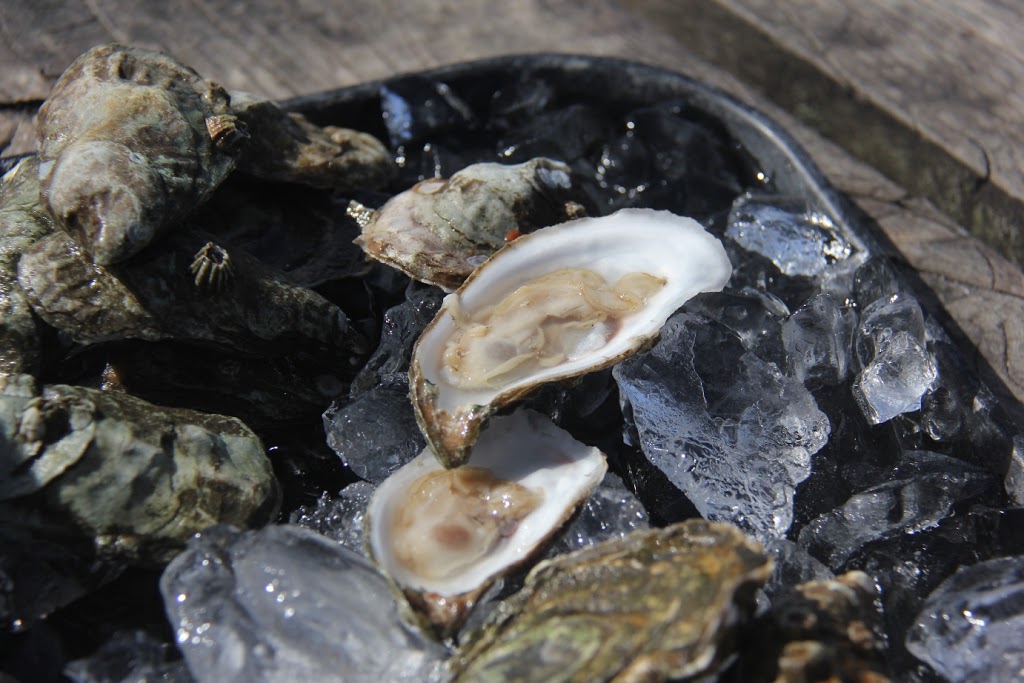
Oysters can be purchased near the entrance. You shuck them yourself, and then eat the delicious suckers raw or toss them on the grill. They provide shucking gear, lemon, hot sauce, freshly grated horseradish and Hog Wash (rice vinegar, shallot, jalapeno, cilantro and lime juice.) I’ll add that you are free to order anything from The Boat as well including oysters already shucked for you.

My tip – reserve a picnic table and get the early time slot.

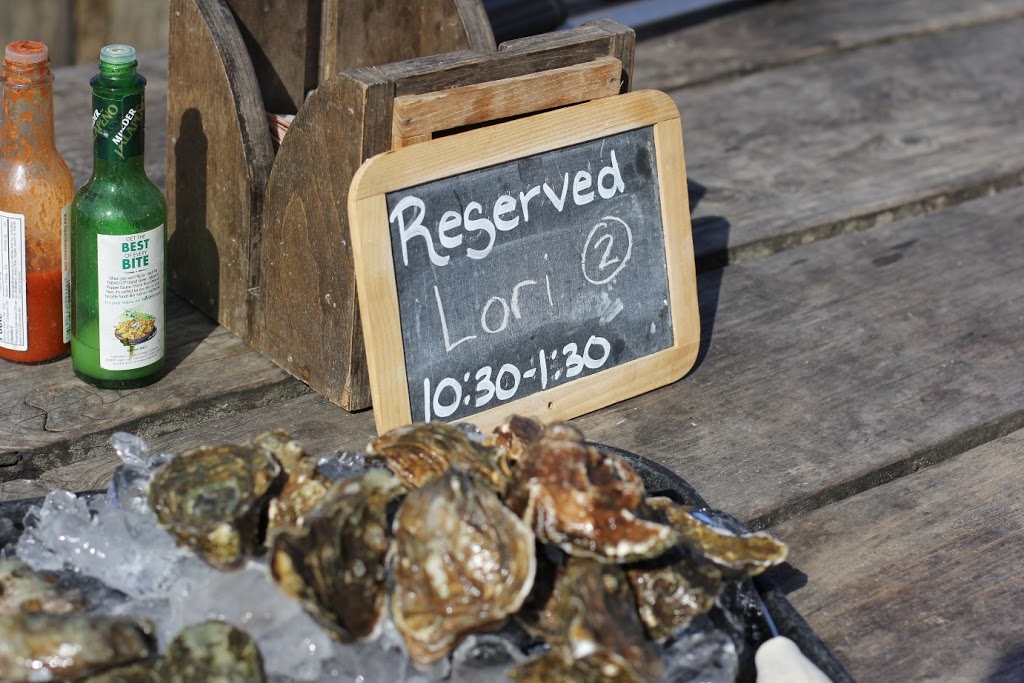
We arrived at 10:30 and were among the first guests there on a Saturday morning. The tranquility of the area set the stage for our entire day. It was absolutely amazing.After soaking it all in, we headed over to buy our oysters.

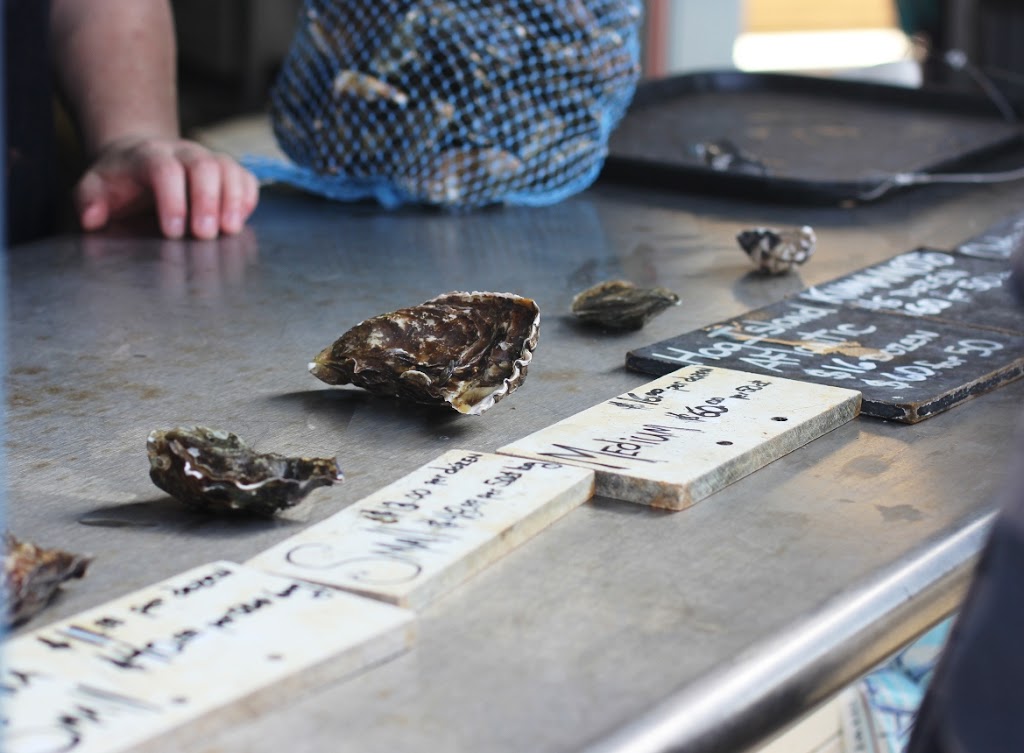
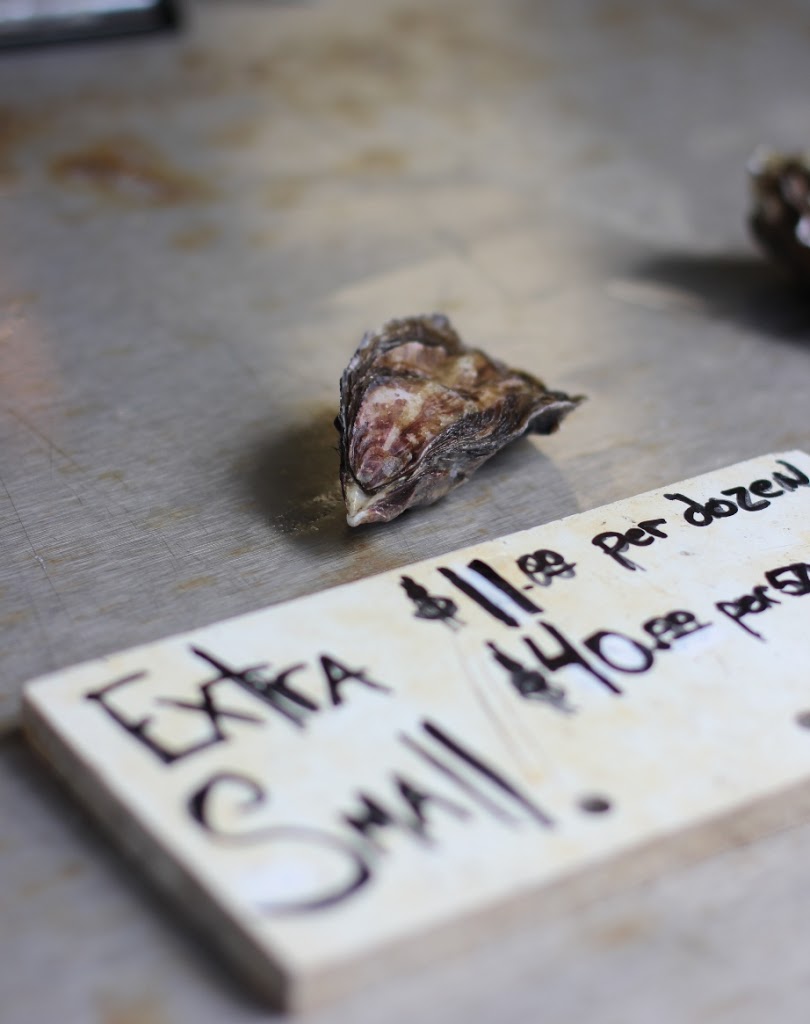
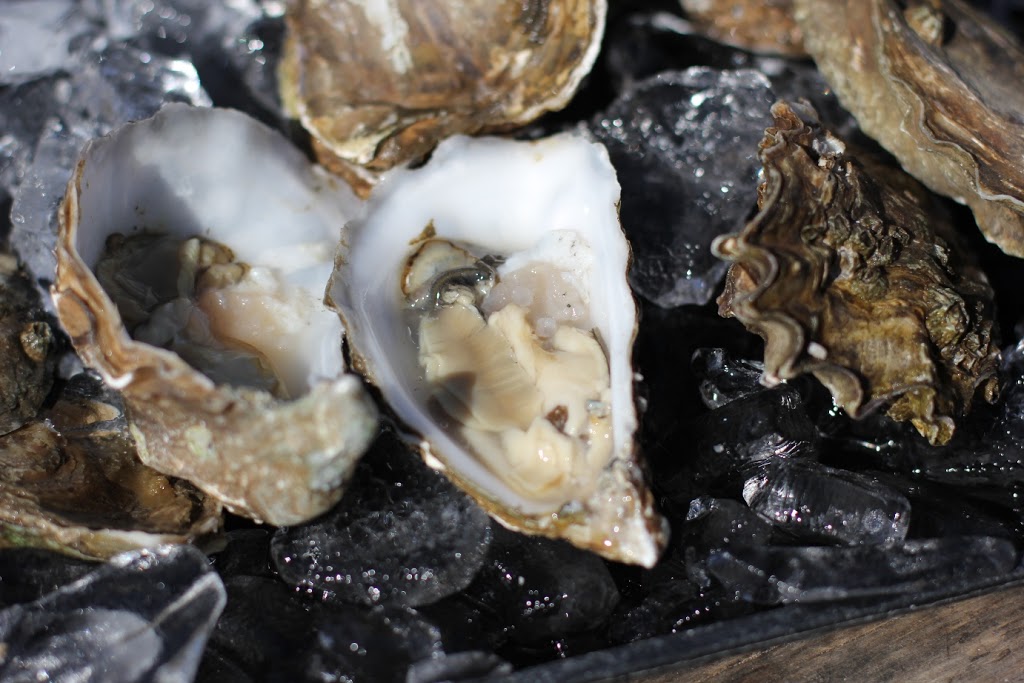
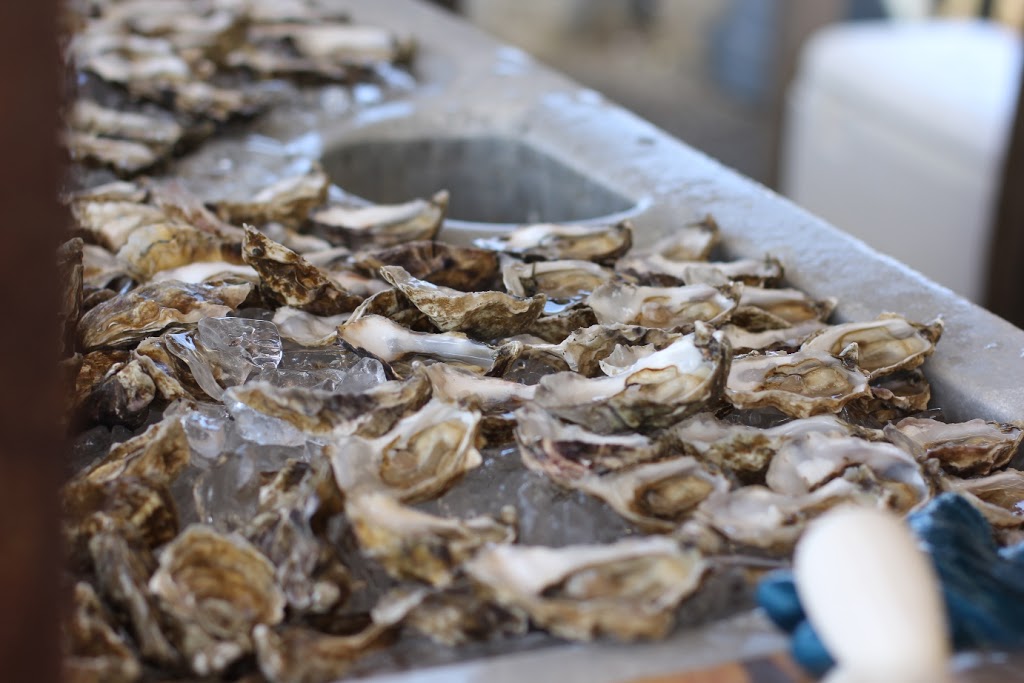
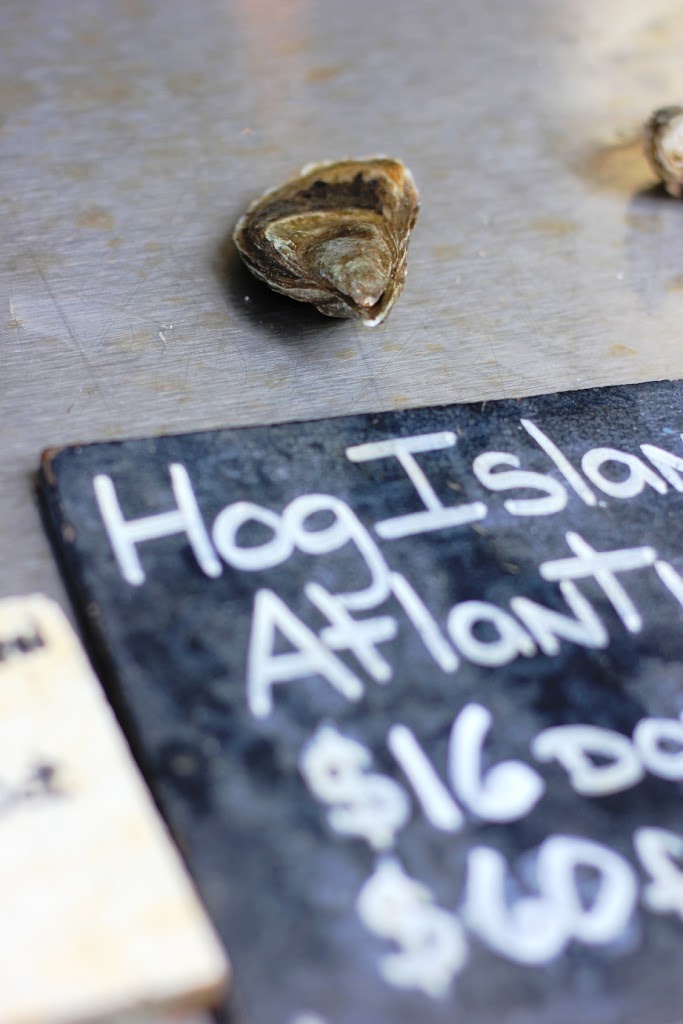
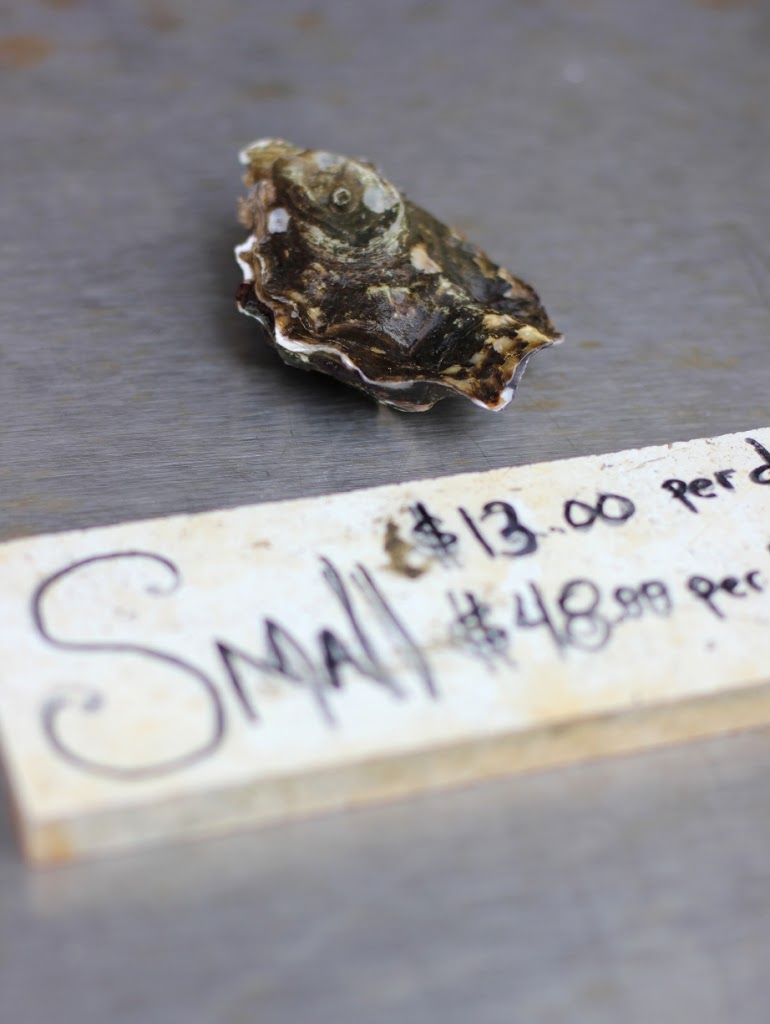
I’ve never been a huge raw oyster fan. That was before I had a Hog Island oyster straight out of the tank, shucked for me. It tasted like the bay – light, salty, and refreshing. We ordered the Atlantics to eat raw, and the small oysters to put on the grill.

Two things I learned during our trip – 1) I cannot shuck an oyster to save my life, and 2) I love grilled oysters!

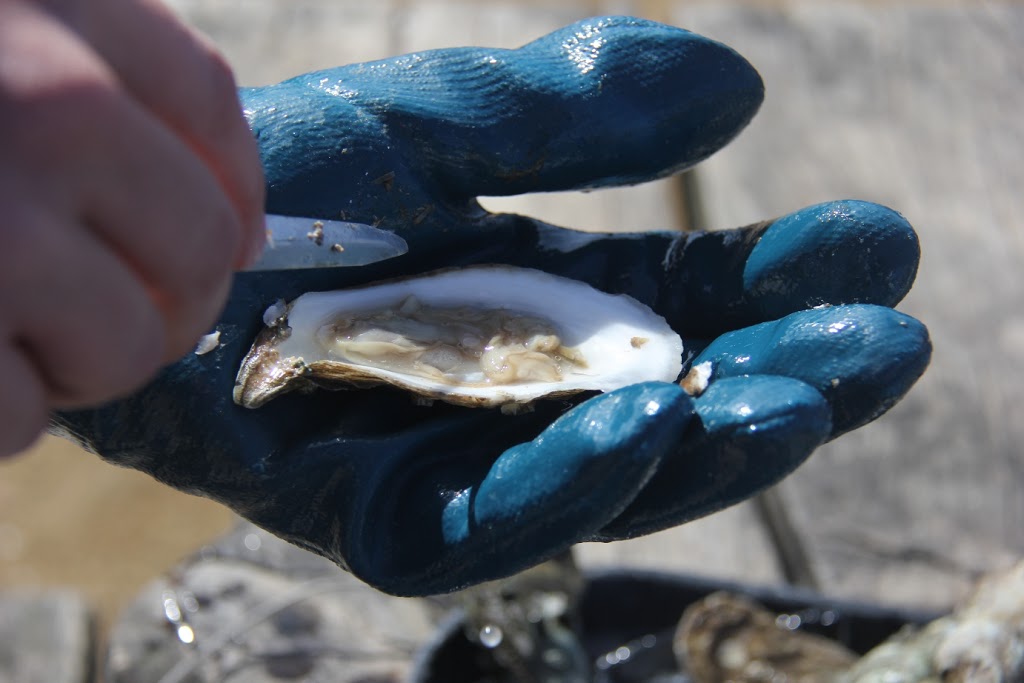
Fortunately, my husband was up for the challenge of shucking them all. And a challenge it was. It takes a lot of strength and just the right angle, something I couldn’t master in 3 hours.

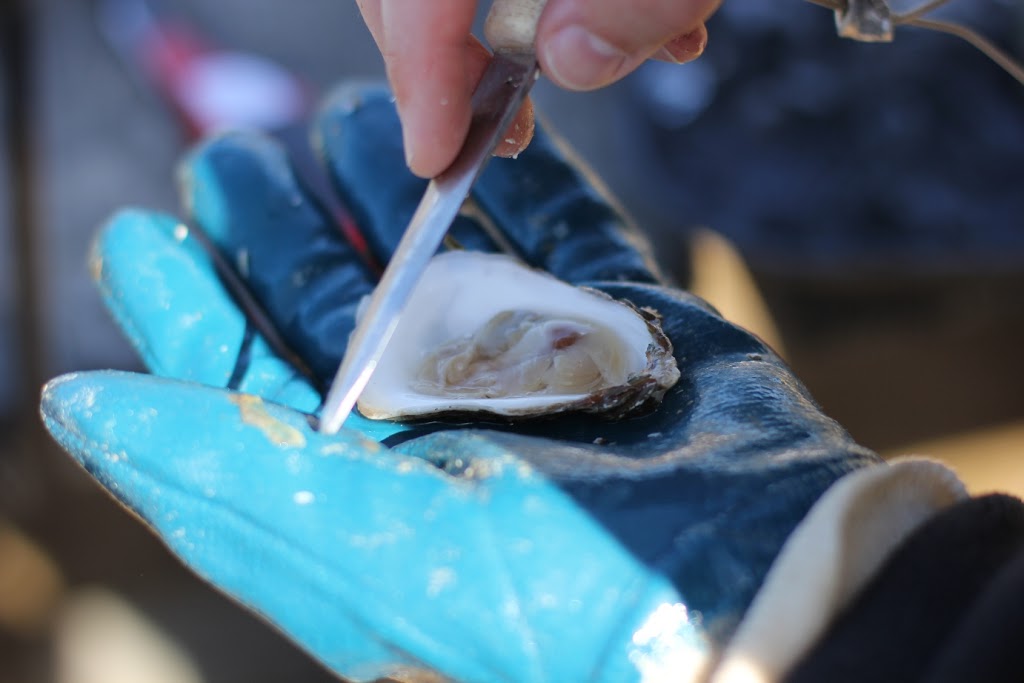
If one were to shuck an oyster correctly (from what I understand), you would place oyster cup side down and insert the tip of the shucking knife into the pointed end at the hinge. Once the ligament pops, you slide the knife in along the inside of the top, flat shell and pop it off. Slide the knife under the meat to release it from the shell and remove any pieces of shell that might have broken off.

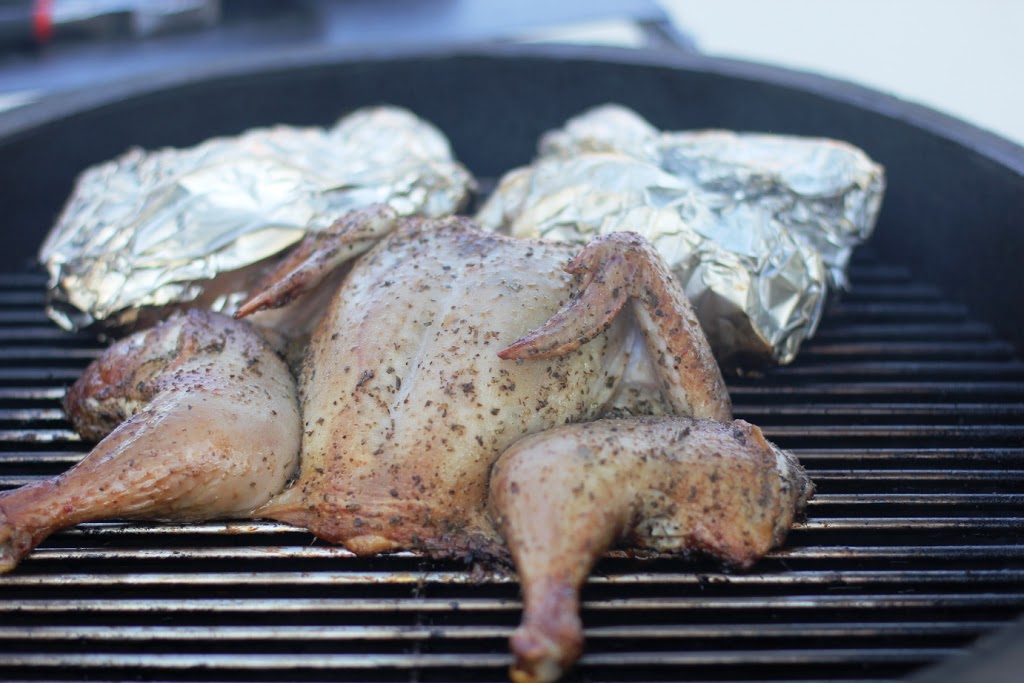
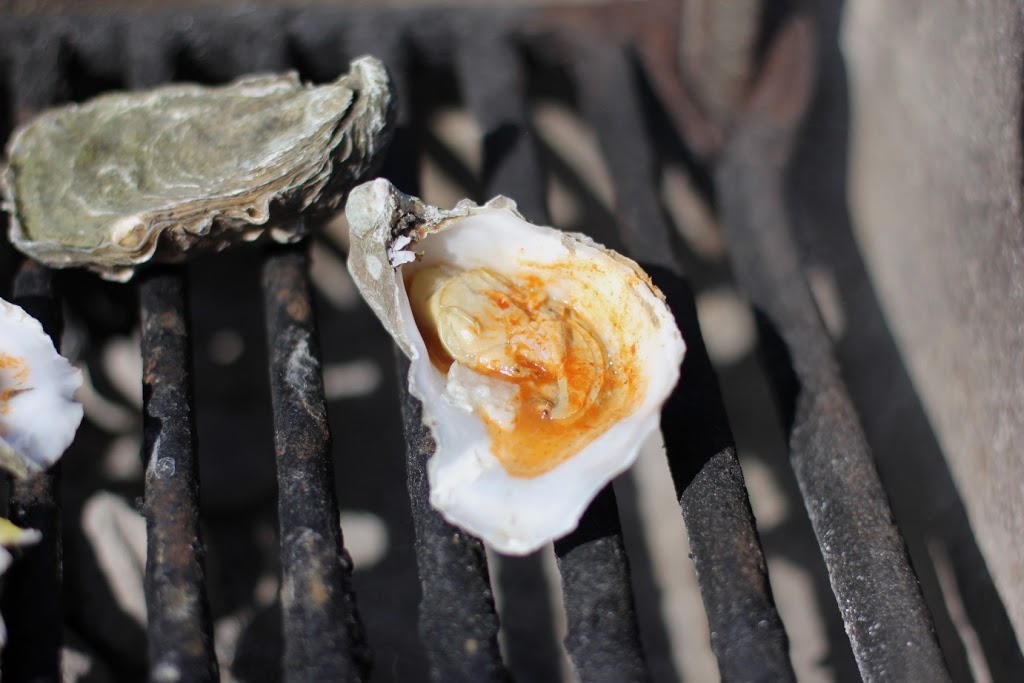
After gathering a few tips from the staff, we topped our open oysters with a little butter and placed them on the heated charcoal grill. Once the edges of the oyster began to brown we took them off with tongs, topped them with hot sauce and lemon juice, and ate them with a fork. Raw oysters are good, but the grilled are now my favorite.

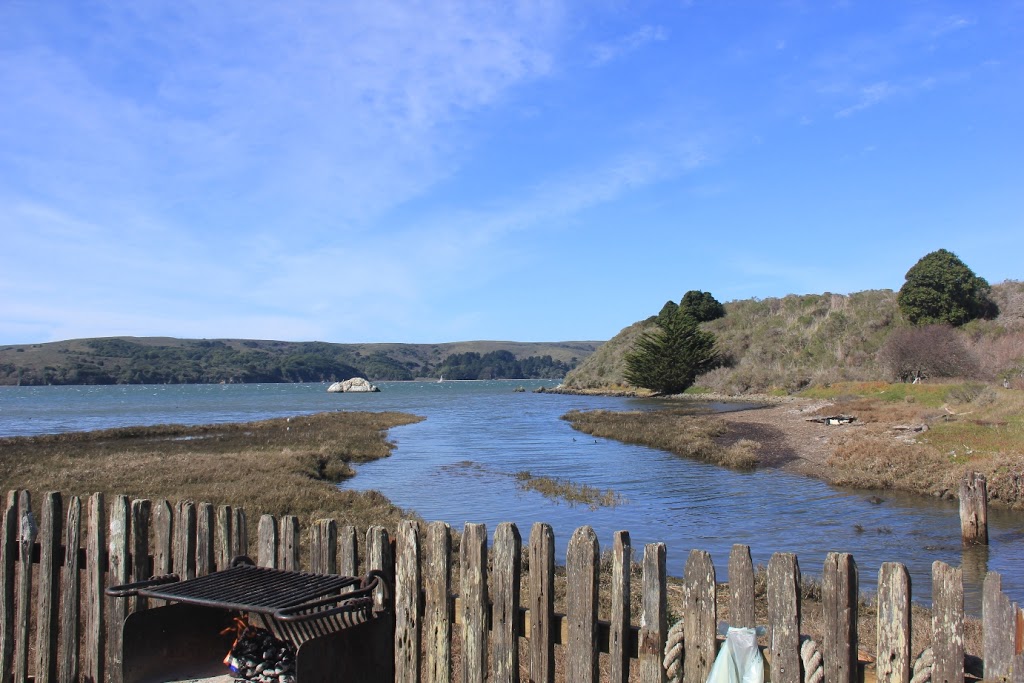
After filling ourselves with oysters and sourdough bread, we were left with enough time to watch the water (my very favorite pastime), and take in what was around us. The area got crowded by lunchtime, but it was much less so than I was expecting. I’m sure it would be different in the summer. I’m also sure we will find out personally because we will be back a few more times this year. It may be the only time I actually look forward to seeing the words – No Service.

Grilled Marinara Pasta Recipe

August 12, 2012

This recipe is one of the most creative things we’ve made on the grill. Grilling tomatoes in packets and then turning those tomatoes into marinara results in a unforgettable smoky sauce.

Grilled Tomato Marinara Sauce | Fake Food Free
 
We’ve been making grill packets all summer so when I was thinking of how I could put a twist on a classic tomato sauce, they were the first thing to come to mind. Packets of potatoes, onions, peppers and summer squash work on the grill, so why wouldn’t tomatoes, right?
 
I have to admit when I got all the grilled veggies pureed and took a taste, I was disappointed. The flavor I wanted just wasn’t there.

But then I added salt.

The next bite popped in my mouth! The salt brought out the smoky flavor from the grill which is exactly what I was hoping for.

A few packets of tomato may not be enough for heating up a large grill, but this marinara is the perfect thing to make when you have the grill up and running for other things. (We grilled ours while making a chicken this weekend.) Then you can quickly throw the sauce together and freeze it for another day, if it doesn’t fit on your current menu.

Grill packets with tomatoes for marinara.

This ends up being a basic marinara for any type of pasta. I am a huge fan of homemade, but I went for a quick meal this weekend and used a whole wheat penne.

The veggies only need to be roughly chopped for the grill packets. They’ll be going straight to the blender to puree so there is no reason to spend a lot of time on the prep.

I’ll be doing this with our tomatoes for the rest of the season! The flavor is so much more interesting than when I roast the veggies in the oven.

Grilled Tomato Marinara Sauce | Fake Food Free

Grilled Tomato Marinara Pasta Recipe
Makes: 4 to 6 servings
Write a review
Print
Ingredients
  1. 1 medium onion, chopped
  2. 4 cloves garlic, peeled
  3. ~2.75 lbs. tomatoes, cored and chopped
  4. 1 red or green bell pepper, cored and chopped
  5. ~15 leaves fresh basil
  6. 1 tablespoon olive oil
  7. 1/2 tablespoon balsamic vinegar
  8. 1 teaspoon fine ground sea salt
  9. 1 lb. pasta, cooked
  10. Extra basil and shaved parmesan for serving
Instructions
  1. Preheat the grill to 325 degrees F.
  2. You will need 3 large pieces of aluminum foil, about 14 to 16 inches long. You want the veggies wrapped well, so be generous.
  3. Divide the onion, garlic cloves, tomatoes, bell pepper and basil evenly on each of the three pieces of foil. Drizzle some of the olive oil over the vegetables in each packet and move the veggies around a bit to coat them.
  4. You can use any packet making techniques, but I fold the long sides in first. Then I pull the two ends together in the center to meet and roll them down, smashing things together as I go. As long as you have a sealed packet, you'll be fine. Need help? Here's a post with instructions.
  5. Place the packets on the grill, and close the lid. Let cook for 30 to 40 minutes, until the veggies are tender. Remove them from the grill and transport them into the kitchen.
  6. Once they are cool enough to touch, place the veggies in the blender in batches. Puree until smooth and pour the puree in a soup pot on the stove. Turn on low heat, and add the balsamic vinegar and the salt. Stir occasionally. You are only warming the sauce again until you are ready to eat it. (If you plan to freeze it, you can skip the heating, mix in the vinegar and salt and portion it for freezing.)
  7. Place the pasta in a serving bowl. Pour the sauce over pasta, and garnish with basil and parmesan cheese.
Fake Food Free https://www.fakefoodfree.com/


Thanks for reading! All images and content are the property of Fake Food Free unless otherwise stated. Please do not republish full recipes and images without written permission. What is okay? Feel free to Pin images, share links to my posts or share the photo in a round up post with the title of this recipe and a link back to the post. If you want to use a photo or full recipe, just ask. I’m sure we can work something out.

Salad with Grilled Zucchini and Blackberry Balsamic Dressing Recipe

July 7, 2012

Salad with Grilled Zucchini and Blackberry Balsamic Dressing Recipe | Fake Food Free


If you’ve spent any time at all near a summer squash plant, you know how it goes. One minute you see a tiny little zucchini growing; a day later you have a squash as big as your arm.

Those huge zucchinis always went into bread at our house so I made some zucchini muffins last week. Unfortunately, that only used up ½ of the monster.  Instead of more baked goods, I decided to take the rest to the grill for zucchini steaks.

With summer zucchini always comes blackberries so a blackberry dressing sounded perfect. This dressing drizzled on a salad with a couple zucchini steaks and few extras made a great summer meal.

Blackberry Balsamic Dressing Recipe for Salad with Grilled Zucchini | Fake Food Free


Salad with Grilled Zucchini and Blackberry Balsamic Dressing

Makes:  4 servings

What you’ll need:

Zucchini Steaks
8 – 1 ½ inch thick slices zucchini
2 teaspoons olive oil
1 teaspoons balsamic vinegar
Salt and pepper to taste

Blackberry Balsamic Dressing
½ cup blackberries, defrosted if frozen
5 fresh rosemary leaves
2 tablespoons balsamic vinegar
½ cup extra virgin olive oil
1 teaspoons sugar
¼ teaspoons salt
1/8 teaspoons black pepper

Salad
8 cups greens (I used romaine, cabbage and spinach)
4 oz. blue cheese, crumbled
4 tablespoons sunflower seeds

How to make it:

Place the zucchini slices in a shallow dish and drizzle with the olive oil and balsamic vinegar, and sprinkle with salt and pepper. Coat each piece and set aside to marinade while you prepare the dressing and salad.
In a small food processor, combine all of the dressing ingredients and pulse until it is smooth. If using fresh berries you may need to add 1-2 tablespoons of water. Makes about ½ cup of dressing. Set aside.
Prepare four plates with 2 cups of greens, 1 ounce of blue cheese and 1 tablespoon of sunflower seeds. Set aside.

Preheat the grill or a grill pan on the stove. Place the zucchini slices on the grill and cook on medium-high for 3 to 4 minutes on each side.

Place two zucchini steaks on each salad and drizzle with dressing.

Salad with Grilled Zucchini. A great vegetarian summer meal! | Fake Food Free


Thanks for reading! All images and content are the property of Fake Food Free and Lori Rice unless otherwise stated. Please do not republish full recipes and images without written permission. What is okay? Feel free to Pin images, share links to my posts or share the photo in a round up post with the title of this recipe and a link back to the post. Confused about copyright and food blogs? Here is some helpful information on Recipe Attribution. If you want to use a photo or full recipe, just ask. I’m sure we can work something out.


Pure Beef: Tamarind Beef Satay

May 24, 2012

I first made this delicious beef satay recipe back in 2012. Every summer it continues to be a great go-to meal or snack when we fire up the grill for some outdoor cooking. 

Grilled Tamarind Beef Satay Recipe | Fake Food Free


The email subject read, “As far from fake beef as one can get.”

That was enough to spark my curiosity.

Before I opened it I wasn’t aware of the cookbook that awaited me, of the story that would later have me nodding my head, or the fact that it would be so educational that my husband would hijack it for a day and read the first 70 pages.

Pure Beef Cookbook

The title says a lot, but it does not say it all. I’ve found this cookbook to serve as a novel as I have read through Lynne Curry’s story. Lynne is a former vegetarian who now finds herself in Oregon’s Wallowa Valley enjoying what I can only imagine is one of the most beautiful places on earth with some of the best food.

I live in central Kentucky and it’s pretty beautiful here, too. As I write this I just happen to have a chorus of cows singing from the farm behind our house, but I’ve been to Oregon and I love it. This can be considered – how I related to this book #1.

Number 2, is the story of how a vegetarian came to enjoy the flavor of grassfed beef, culturally, nutritionally, and ethically. To paraphrase roughly, the moment was during her international travels in Guatemala when she was graciously offered grassfed beef as a gesture of hospitality.

Tamarind Beef Satay recipe from the Cookbook Pure Beef


While I have never been a vegetarian, I fully believe that culture and respect for the people of that culture should override what we will and will not eat. I’ve tried many things, and maybe one day I will be put in a position where I just can’t stomach it, but as of now this is my view. It was a view that I felt I shared with the author as I read, making this book even more meaningful.

I was never all that crazy about beef until I enjoyed the local grassfed beef of the Bluegrass. This opportunity occurred only about 2 years ago when we returned to the States. Now it is the only beef I will buy. There are many reasons for this, and I will let you read through these when you get your copy of Pure Beef. Considering my background, nutrition is one reason.

As I moved past the why of the book, I got to the how. How to cut beef, how to buy it, how to cook it. I still have a lot more to read, but this is as much a resource for my library as a cookbook.

Then you get to the recipes. There truly is a recipe for every cut, and an endless amount of tips on how to cook it all. Coffee Bean-Chile Rubbed Sirloin Roast, Boneless Oxtail and Buckwehat Crepe Purses, and Baked Argentinian Empanadas to name a few.

There are side dishes and condiments galore as well, with and without beef, such as Roasted Corn Salsa, Butternut Squash Bread Pudding, and Lemony Chard Bundles. There are also variations on recipes such as the gluten-free meat loaf.

There were too many great recipes to choose from, so I had to use a bit of a spin-the-bottle approach to select one. I landed on Tamarind Beef Satay.

Tamarind Beef Satay


We picked up a tri tip from our local grassfed beef source, Marksbury Farm Market. It worked beautifully and all the credit has to go to my husband. One tip he picked up from the book was to freeze the meat for about 20 minutes before slicing it thinly for the beef satay. He sliced, I mixed the marinade.

This recipe is simple and the beef satay cooked up on the grill quickly. The sweet and tart flavors of the tamarind, honey and fish sauce go so well together. Next time I’ll probably add just a little more chile sauce because we are spicy food fans. We served up the satay with grilled corn and a green salad. Easy and delicious!

Tamarind Beef Satay

Recipe reprinted with permission from Pure Beef © 2012 by Lynne Curry, Running
Press, a member of the Perseus Book Group.

From the book:

Tamarind is an intoxicating sour and sweet fruit from Indonesia where satay is the go-to snack on a stick. It is incredible with beef, so I created a tamarind marinade that lacquers thin beef strips to grill or broil. Satay makes a wonderful appetizer; to fill it out for a main dish, I accompany it with another Indonesian favorite, a fruit salad called Rujak, which has as many renditions as pasta salad does in this country. My version is a beautiful chopped salad of cucumbers, jicama, pineapple, and mango that’s crunchy, juicy, sweet, and tart. Served along with Sticky Rice or steamed rice, it turns satay into a tantalizing meal, just the thing to wake up your taste buds in the middle of winter.

Makes 4 servings as a main dish; 8 as an appetizer

3 tablespoons tamarind paste*
3 tablespoons honey
1 tablespoon fish sauce

1/2 teaspoon chile sauce, such as sambal oelek
1/8 teaspoon salt
1/2 cup unsalted dry roasted peanuts
1 to 1 1/2 pounds top sirloin steak, sliced into 1/4-inch thick strips

Mix the tamarind paste, honey, fish sauce, chile sauce, and salt in a medium-sized bowl. Pound the peanuts in a mortar and pestle or in a heavy-duty plastic bag with a rolling pin to the texture of fine breadcrumbs and stir into the tamarind sauce. Put the beef strips in the bowl, toss to coat, and marinate for about 15 minutes at room temperature.

Preheat a charcoal or gas grill for high heat (425°F to 475°F), scraping the grate clean and oiling it lightly, or preheat the broiler. Thread the slices onto wooden or metal skewers, stitching the beef on and then stretching it along the skewer so that it looks like a miniature banner. Thread any short strips onto the same skewer.

Grill or broil the skewers for 1 to 2 minutes per side and serve the satay warm or at room temperature.

*Note: Tamarind is available from Asian grocery markets in several different forms. Tamarind paste is the easiest form that can be used straight from the jar. If your tamarind is labeled concentrate, use only 1 tablespoon and mix it with 2 tablespoons water. If you have a block of tamarind, chop about 1/2 cup of it, use a fork to mash it with 6 tablespoons of boiling water, and let it soften for about 5 minutes. Use a fine-meshed strainer to extract 3 tablespoons of pulp, pressing on the mixture firmly with a spoon.


Disclosure: A copy of this cookbook was sent to me for review purposes. I was not required to post about it and received no compensation for doing so.

Grilled Peaches and Pound Cake

August 23, 2011

I was watching Cash Cab the other night and one of the very first questions in the episode was – what dessert is named due to its ingredient list with 16 oz of butter, 16 oz of sugar, 16 oz…etc?

Do you know?

I did, but only because I recently had a discussion with a friend just a few months ago about a traditional recipe.

This led me to yelling, “Pound cake. POUND Cake. POUND CAKE!” at the couple on TV who couldn’t seem to come up with the answer.

So ever since then I’ve had pound cake on my mind. Not the original recipe that makes a load of cake, but perhaps a modified version that we could handle in our house.

This weekend when we decided to grill some more peaches I decided it was my opportunity to slip in a little pound cake.

If you’ve never grilled peaches before, it is super simple. Just half and remove the pit. If you want to you can sprinkle them with sugar on the cut side, or you can do this with sugar or honey after they grill, or you can leave the sugar out all together. That’s what we did this time, just straight peaches.

Place them on a hot grill, cut side down for 3 to 5 minutes and you have warm, juicy peaches perfect for dessert.

I modified a standard recipe for the pound cake using Demerara sugar and white whole wheat flour. It baked up wonderfully. We served it with the peaches and drizzled the whole thing with some coconut milk.

Grilled Peaches and Pound Cake

½ to 1 peach per person, grilled using instructions above
½ cup butter, softened
1 ¼ cups raw cane sugar
1 tsp almond extract
2 eggs
1 ½ cups white whole wheat flour
½ tsp baking powder
1/8 tsp salt
½ cup milk
Coconut milk for drizzling

Preheat oven to 350 degrees F and grease an 8 ½ x 4 ½ inch loaf pan.

In a mixing bowl combine the butter and sugar, cream until light and fluffy. Add the eggs and almond extract and mix well. Beat for 3 to 5 minutes.

In a separate bowl, combine the flour, baking powder and salt. Gradually alternate between mixing in the dry ingredients and the milk. Mix just until smooth.

Pour batter into your prepared loaf pan and bake for 50 to 55 minutes, until a toothpick inserted in the center comes out clean. Allow to cool in the pan on a wire rack about 10 minutes, remove from pan and serve warm or allow to cool completely. Makes 10-12 slices.

Plate one slice of the cake with one or two peach halves and drizzle with coconut milk to serve.

Filipino-style Pastured Pork Kebabs

July 4, 2011

It’s an interesting experience to view your country through the eyes of someone else. Looking back I’m not sure why I hadn’t considered what a highlight this would be during our time living abroad. We encountered people who were in awe of us and those who passed judgment on us, not after getting to know us, but simply because we were from the United States.

Both situations made me equally uncomfortable, and it made me very self-aware regarding how I was perceived by others. What stood out to me the most was how the US was truly seen as the land of opportunity among the majority of people we encountered.

While we were welcoming a new adventure and happily leaving the US for a while, it felt so strange to have people view my country in this way when I really just wanted to experience theirs. After you encounter these reactions time and time again it makes you begin to think – maybe I should appreciate my own country a little more.

That is exactly what happened. Although what I appreciate about it is something that I never really considered before.

Sometimes I think we fail to remember that unless we happen to be American Indians, we’re not from here. Somewhere along the line someone in our families crossed those waters and was allowed to enter this great country we now call home. That may have happened many generations ago for some, or last year for others.

Personally, I don’t wave my flag to say ours is better than others. It’s waved to say I appreciate those who fought for the freedoms of this very diverse country, a diversity that began long ago and continues to this day. What I appreciate the most is that I can live and work among people whose cultures and heritage make my life richer whether it’s rooted in the hills of Kentucky or brought with them from abroad.

All that being said you likely also know my appreciation for food culture in this country. So a 4th of July barbecue taking place at our house just had to have a bit of an international flare.

On Friday, we stocked up on a ridiculous amount of local, pastured pork from Marksbury Farm Market. The pork butt was rubbed down, smoked and served US-style with sweet and spicy BBQ sauces. The 6 lbs of pork sirloin kebabs, on the other hand, were headed in a different direction.

In college, my husband had a friend of Filipino heritage and his family would throw some amazing barbecues. I had the opportunity to attend one and the pork kebabs were simply incredible. My husband learned to make their delicious marinade and we thought it would be a great way to make our own barbecue this weekend a bit more international.

I stocked up on veggies from the Farmer’s Market on Saturday morning. This included potatoes for my Mustard Chive Potato Salad (although chives were replaced with dill this time and I used a lot more Greek yogurt), and colorful cherry tomatoes really brightened up the Curry Wheat Berry Salad. Basil from the garden and a good bunch of heirloom tomatoes rounded out the meal with a Caprese Salad.

It all went over well, but the pork kebabs were definitely the star for us. I won’t hide my excitement that while most of the food was gone, there were a few pork kebabs leftover. Whether you use it for chicken, pork or beef, or what the heck, even tofu, the Filipino-style marinade is outstanding.

Filipino-style Pastured Pork Kebabs

6 lbs pork sirloin, cubed and skewered
3 heads of garlic, cloves smashed and peeled
Juice of 8 oranges
4 cups soy sauce
1 ½ cups white vinegar
½ cup brown sugar

Place the kebabs in a deep baking pan. It’s best to work the marinade in two batches so divide each of the ingredients in half. Add half the garlic cloves, the juice of 4 oranges (reserve the peels), about 2 cups of soy sauce, ¾ cup vinegar and ¼ cup brown sugar to a blender. Blend on medium to high until all ingredients are mixed and the marinade is somewhat foamy.

Pour the marinade over the pork and continue with the second batch of marinade. Once all of the marinade is on the pork, place the leftover orange peels among the kebabs. Cover and refrigerate for 8 hours or overnight.

When ready to grill, once the grill is nice and hot, cook the pork to a temperature of 160 degrees F.

Grilled Green Beans with Dill Feta Sauce

June 27, 2011

This past weekend I took a quick trip to Indiana to surprise my mom for her birthday. It was a huge success in two ways. First, she was surprised; second, I was able to take any and all extra garden goods back with me to my Kentucky kitchen.

Our garden seems to be pouting a bit about the fact that we got it in around 3 weeks later than normal. Peppers and squash are slowly immerging from ours, but my parent’s garden is already flourishing.

This has a lot to do with the greenest thumb that exists in the world. It happens to be attached to my Dad’s hand.

I’m amazed at how tall his pepper plants are, at the diameter of the squash plants and how the cucumbers and melon plants have multiplied since our last visit over Memorial Day.

We opted out of growing our own potatoes this year, so I was happy to take all they had to offer. Kale is still growing strong there so I loaded up on a bag, cleaned the remaining raspberries off the bushes and took all the blackberries that had ripened thus far. We topped that off with a yellow squash and green beans. There were also lots of gooseberries whose recipe destiny I’m still contemplating.

Yesterday evening my husband decided he would try out some pastured pork spare ribs we got on sale from the local meat market. We were interested in tossing on some BBQ and finishing them off on his ceramic grill.

That needed to be matched up with lots of vegetables, so I decided the first of the harvest I’d tackle would be the green beans. We both aren’t raving green bean fans so I needed to find a creative way to cook them. Simply steamed wasn’t going to cut it.

Since just about everything else from the meal was on the grill I thought, why not grill the green beans too. So I slicked them up in some olive oil and my husband tossed them into a grill pan where they stayed for about 7 to 10 minutes. I took them off the grill when they were still firm, but beginning to brown and blister (in a good way).

I wanted to match them up with something slightly cooling to balance the smoky flavor. This sauce made with feta, dill and Greek yogurt was perfect. Not only did it go well with the green beans, but I think it will become my standard veggie dip from here on out.

Grilled Green Beans with Dill Feta Sauce

½ pound green beans, cleaned
Olive oil
½ cup plain Greek yogurt
1 tbsp crumbled feta cheese
1 tbsp fresh dill, chopped
1 tbsp fresh chives, sliced
1 tsp fresh lemon juice
Salt and Pepper to taste

Lightly sprinkle the green beans with olive oil and stir to coat. Gently sprinkle with salt and pepper to taste. Place the green beans in a grill pan and grill at about 325 degrees F for 7 to 10 minutes.

In a small food processor, combine the yogurt, feta, dill, chives and lemon juice. Pulse until a creamy sauce forms. Add salt and pepper to taste.

Remove the green beans from the grill, place on a serving platter and top with the feta sauce. Serves 2 to 3.

Grilled Pizza – Six Ways

June 4, 2011

You say grilling season, I say…pizza!

Yes, I know that other things like pork chops, hamburgers and veggie skewers may come to mind, but I have officially decided that my absolute favorite thing to grill is pizza.
We have a ceramic grill and those mesquite wood chips infuse the crust and toppings with a flavor that words can’t describe. From savory to sweet, there isn’t any kind of pizza that I don’t like grilled.
On Memorial Day, I was determined to kick off the grilling season with this favorite. Knowing that I’d be traveling this week for work I made up two batches of dough and lots of flavor combos so that my husband would have some leftovers during the week.
I have a favorite pizza dough that I make every time from Food Embrace (formerly Off Her Cork). I’ve mentioned it before and you can find the recipe there. I often switch the flour combos up and this time I used (for a double batch) 2 cups of unbleached white flour and 6 cups of white whole wheat flour. This dough rises every time without fail and it grills up so well.
I had the garden in mind for these combinations. Arugula is just beginning to grow, but I couldn’t wait any longer so I picked a few pieces early for one of my favorite pizzas. The loads of kale we have came in handy, too. Herbs were perfect for the cheese pizza and the strawberries came into play for the dessert pizzas.

I had picked up some local, grassfed brisket that had been smoked a few days prior and it was a bit too fatty for us. Not knowing what else to do with it besides sandwiches, I was so glad my husband came up with the great idea of dicing up the lean portions and using it for the pizzas.

Below are all the combos from this round of grilling. No measuring necessary. I eyeballed it all and used the amount I wanted based on my preferences. I divided the dough into 7 portions and we had 6 different topping combinations. All were different in size which is the fun of pizza making!
Although you might want to ignore the guava and cheese pizza. We had a bit of a mishap with the dough and it is more of an H than a circle or oval.
I love taking a few photos when my husband isn’t paying attention and this one depicts the necessary beverage for pizza grilling. We had picked up some imports earlier in the day.
Using plenty of olive oil and cornmeal to coat the dough, the grill was heated to about 350 degrees F and my husband grilled one side of the dough for about 3 minutes. The pizza dough is then flipped onto a tray and comes inside for toppings. So we are putting the toppings on the partially cooked side. Then it goes back on the grill for another 3-5 minutes with the uncooked side down. This way, the rest of the dough bakes as the toppings melt.
You’ll notice that all the photos are grill-side shots. Time is of the essence when grilling pizza because it will cool quickly. I was so hungry for pizza that no time could be wasted for photos once it was slid off the grill!

Kale and Mushroom
Red sauce (any of your favorites will do)
Sauteed kale and mushrooms (toss in a skillet with olive oil until kale is wilted)
Mozzarella

Arugula and Sundried Tomato
Mozzarella
Sundried tomatoes, thinly sliced
Arugula, chopped if leaves are large

Cheese and Herbs
Red Sauce
Mozzarella
Cheddar
Fresh oregano leaves
Fresh thyme leaves

Brisket and Blue Cheese

Red Sauce
Cheddar
Mozzarella
Blue cheese
Smoked brisket, finely diced

Peach and Strawberry

Peach preserves (I used what I had canned last year)
Strawberries, sliced
Mozzarella
Romeu e Julieta (Guava and Cheese)
Goiabada (guava paste, chopped, or guava jam)
Mozzarella

Smoky Turkey and Kale Soup

December 22, 2010

I thought it was about time I do a post that shows we eat something other than cookies, breads and waffles around here. Lately I feel like Buddy the Elf with the four main food groups – candy, candy canes, candy corns and syrup. Well, we do in fact eat veggies, fruit and meat.

My husband’s coworker from Brazil is traveling in the US and he brought his wife along with him for her first trip to the States. We spent time with them while in Brazil and they always showed us the best hospitality so we decided to return the favor and invite them to our new house for dinner. We recreated a Thanksgiving/holiday meal with turkey, cranberries, sweet potato casserole, stuffing, Brussels sprouts and holiday cookies.

Flash back to about 2 months ago…

I ordered our turkey from a friend here who has a small homestead. She had about a dozen turkeys – natural, free range on her property and organic. They were processed by an Amish community nearby.

Great, right? I knew the source of our turkey. I think I even met it. It might have been the one that pecked me on the butt the day I went to visit her alpaca. I’m not kidding!

The problem? The processed turkey weighed 34lbs! Yes, 34!

I could barely carry it to the car. We thawed it in a foam cooler in the guest bath tub, and then we got up at 6:00am on Sunday to battle it.

Honestly if you were keeping score, the turkey won.

We finally decided we had to do our best to cut it into pieces. We managed to get two breasts, the wings and the legs. I cut off other random pieces and made turkey stock out of them. The rest went to the grill.

Nothing like grilling in the winter.

We weren’t sure how tough the meat would be with such a large turkey so my husband had the idea to baste the breast in beer and butter in a pan on the grill. We added about a 7 lb turkey breast with 1 bottle of ale, 1 stick of unsalted butter and 1 sliced onion to a pan. It cooked on our ceramic grill for about 90 minutes at 300 to 350 degrees F.

It turned out great! It was juicy with great flavor. I highly recommend winter grilling!

As you can imagine, we’ll be eating turkey for a while. To lighten things up before our feasts this weekend, I decided to make some soup with the leftover turkey.

If you have smoked turkey, it adds such a complex flavor that makes the soup. I cut some breast meat and then I also placed a turkey leg in the soup to reheat for about 5 minutes, removed it and cut off some of the meat to add back to the soup.

You can do this with any leftover pieces, or you can simply add cooked and shredded or chopped turkey meat at the end.

Smoky Turkey and Kale Soup

2 tbsp olive oil
2 large carrots, peeled and sliced
1 small onion, finely chopped
2 cloves garlic, minced
10 button mushrooms sliced
½ tsp poultry seasoning
½ tsp salt
¼ tsp black pepper
¼ tsp crushed red pepper
7 cups turkey stock
5 cups kale, chopped
Cooked turkey leg or wing (if you have one leftover)
2 cups cooked turkey meat, shredded or cubed

Heat the olive oil in a large soup pot and add the carrot, onion and garlic. Cook over medium heat for about 3 minutes. Add the mushrooms, cook for 2 minutes more. Stir in the poultry seasoning, salt, black pepper and red pepper.

Add the turkey stock and stir in the kale. Increase the heat slightly and bring to a boil. Reduce the heat to a simmer and if using, place the turkey leg or wing in the soup. Partially cover and simmer for about 5 minutes.

Remove the turkey pieces, continue to simmer the soup. Allow the leg or wing to cool slightly to touch and cut off any meat. Add this meat and the additional cooked turkey meat to the soup. Continue to cook until the turkey is heated through and the vegetables are tender, about 3 to 5 more minutes.

Serves 6 to 8


This post has been submitted to the weekly Souper Sunday roundup at Kahakai Kitchen.

Foodbuzz 24×24: Around the World with Grilled Pizza — A World Cup Celebration!

June 27, 2010

What is one event that brings the world together?

The World Cup!

What is one food that you can find in some form in almost every country of the world?

Pizza!

How do you give pizza summer twist?

Well that is where this comes in.

Yesterday my husband and I hosted our first party in our new house since moving back to the US. Given our adventures the past few years, what better way to celebrate than with an international theme intended to bring friends together through food.

I guess Foodbuzz thought it was a pretty good idea too as we were chosen for the Foodbuzz 24 x 24 event this month!

 Around the World with Grilled Pizza: A World Cup Celebration was a hands-on event for our guests. My husband and I brainstormed six different pizza combinations each representing a country in the World Cup. We prepped the dough for the attendees and then let them create their pizzas based on our menu suggestions and their own preferences.

The preparations began on Thursday with many batches of whole wheat pizza dough (a modification of the Spelt Pizza Dough from fellow food blogger, Off Her Cork). These then became 104 mini-pizza crusts. We wanted them large enough to hold a few toppings, but small enough to fit multiple on the grill at once and for our guests to make several different varieties.

Work continued into Friday and Saturday with roasting tomatoes and garlic for the red sauce, and soaking and cooking dried garbanzo beans for the hummus. There were also herbs to be picked and garden fresh vegetables to be pre-grilled.

We managed to represent the US and Kentucky with many of the ingredients. These were then used to create more international flavors to build on the World Cup theme of the party.

We had three main sauces for the pizzas. A Roasted Tomato Sauce that quickly came together after roasting tomatoes, onion and garlic for about an hour and then pureeing it with a little salt, pepper, mascavo sugar and basil. The Mediterranean Hummus sauce was your basic combination of beans, garlic, tahini and fresh lemon juice.

I decided not to tackle making my own barbeque sauce. There is a local producer in the neighboring town that makes a fantastic corn syrup-free sauce by the name of Kentucky’s Smokin’ Grill. We picked up a couple jars of that, transferred it to the squeeze bottle and it was a huge hit.

The smoked pastured chicken which my husband prepared on the grill before the big event, as well as the pastured heritage breed pork sausage, came from Pike Valley Farm. If you’ve read my blog often you know is my favorite farm around.

Most of the vegetables and herbs came from a variety of local sources including jalapenos, yellow squash, green bell pepper and basil from our garden; onions, tomatoes and zucchini from a nearby farmer’s market; and zucchini from my Dad’s garden (not exactly local, but in the family). We threw in a few extra toppings to invite creativity such as button mushrooms, pickled jalapenos, black olives and even some bananas for the dessert pizza.

You simply can’t have a Kentucky party without bourbon. It paired nicely with iced tea and the fresh lemonade sweetened with Demerara sugar. There was also plenty of Kentucky Light to go around, a Kölsch style beer brewed locally.

Now that I’ve told you how it was all prepared. Here’s how it all came together. After topping their partially grilled crusts guests headed out to the grill where my husband finished the cooking process and melted the flavors.

Our friends took some advice for pizza combinations and then added some creativity. To our surprise, the biggest hit seemed to be the goiabada for Romeu e Julieta dessert pizza like the kind we used to enjoy in Brazil. Many people were new to the guava paste and became fans of the guava and cheese combination.

Below was our World Cup pizza menu!

Greece
Grilled summer squash and onions, feta cheese and Mediterranean hummus

Mexico

(based of off Mexican themed pizzas we’ve had in Brazil and in the Caribbean)
Pastured pork sausage, fresh or pickled jalapenos, cheddar cheese and roasted tomato sauce

USA

Grilled pastured chicken, chopped onions, chopped dill pickles, cheddar cheese and Kentucky Smokin’ Grill barbeque sauce

Italy

Fresh basil, mozzarella cheese and roasted tomato sauce

Brazil

Goiabada, cinnamon sugar and mozzarella cheese
Switzerland
Chocolate fondue and chopped bananas

We were extremely pleased with the overwhelming response and everyone’s creativity, as well as a willingness to try some new flavor combinations. I think we have forgotten what hard work it is to entertain a large crowd, but fortunately as the sun went down the party continued with entertaining lawn games as well as rest and relaxation on our back patio. We were reminded that there is nothing like good food, great friends and summer nights no matter where you are in the world.

Our Greek pizza has also been submitted to the Regional Recipe Greece Round-up hosted by Eats Well with Others!

Want to create beautiful food and product photos that you can't wait to share?!
Discover your style, control the light, and shoot using the tool you know how to use (yes, your phone included). Learn about free resources, Live Q&As with Lori, and online courses you can take from anywhere in the world!
We respect your privacy. Unsubscribe at any time.